Creating and Managing Signal Groups
Signal is one of the best encrypted chat apps for communicating online because it focuses on usability and simplicity, while still retaining strong default settings that protect privacy. Because of this, it is often used in community organizing and activist groups for street protest organizing, neighborhood mutual aid, strike and labor organizing support, and more.
But Signal can take some getting used to. Knowing how it works in large groups, and its various privacy features and options, helps keep yourself and your friends safe when using it. Signal should be just one tool in a larger security and organizing strategy. If left unmanaged, it can cause confusion amongst group members. This can then lead to chaos, burnout, conflicts, and the sorts of oversharing in group chats that may lead to legal risk . Knowing how the tech works, setting up some rules, and familiarizing yourself with the app ahead of time can mitigate some of these risks.

If you’re new to Signal, start here to get your account setup and familiarize yourself with the app. And make sure you have some core security choices in place for your device, like a device passcode and the newest software updates (iPhone and Android directions).
The Basics of Communicating with Large Groups on Signal
Large group chats can get out of hand pretty quickly, and often include a mix of people you know well with others you may not know at all. Because of this, there are a few features to help manage this, along with what details about yourself may be shared with others.
Know the Limitations of the Technology
Signal is end-to-end encrypted, which means the nonprofit that runs Signal cannot see the contents of messages. It also means that if law enforcement requests data from Signal, the company does not have access to the contents of messages to share. The company also does not have access to metadata , including any information about who you’re messaging. According to the company, Signal can only provide law enforcement with two types of information, with valid legal process: the timestamp for account creation, and the timestamp for a user’s last connection to Signal.
In order to join a Signal group chat, all members must have the Signal app installed and an account set up.
However, there are ways for the contents of chats to leak out. Any chat can be screenshotted and shared, and in group chats where you don’t know everyone, it’s safest to assume this could happen.
Signal’s encryption also doesn’t protect against someone gaining physical access to a device. For example, if law enforcement gets someone’s phone, and has the means to unlock it, then they can likely be able to find all their Signal messages. This is why strong passcodes and software updates for your devices are very important, and why you may want to consider a short time period for disappearing messages for some chats. For other tips for hardening Signal, check out our in-depth guide.
Choose What You Share in Your Own Signal Profile
Everyone in all of your groups will be able to see your display name and profile photo. If you aren’t comfortable with that, you’ll want to change one or both.
- iPhone: Tap your profile picture > Settings > [profile name]. Here, you can change the name and photo if you need to. If you’re in large group chats with people you do not know, you may consider using a profile photo and name that doesn’t easily identify you.
- Android: Tap your profile picture > [profile name]. Here, you can change the name and photo if you need to. If you’re in large group chats with people you do not know, you may consider using a profile photo and name that doesn’t easily identify you.
Do this before creating a group. If you do so afterwards, others in the group chat will have a record of the change in the chat log.
Finally, it’s a good idea to check if you’re sharing your phone number unintentionally. By default, you shouldn’t be, but if you’ve messed around with settings in the past you may have changed this.
- iPhone: Tap your profile picture > Settings > Privacy > Phone Number, and make sure the “Who Can See My Number” option is set to your preference.
- Android: Tap your profile picture > Privacy > Phone Number, and make sure the “Who Can See My Number” option is set to your preference.
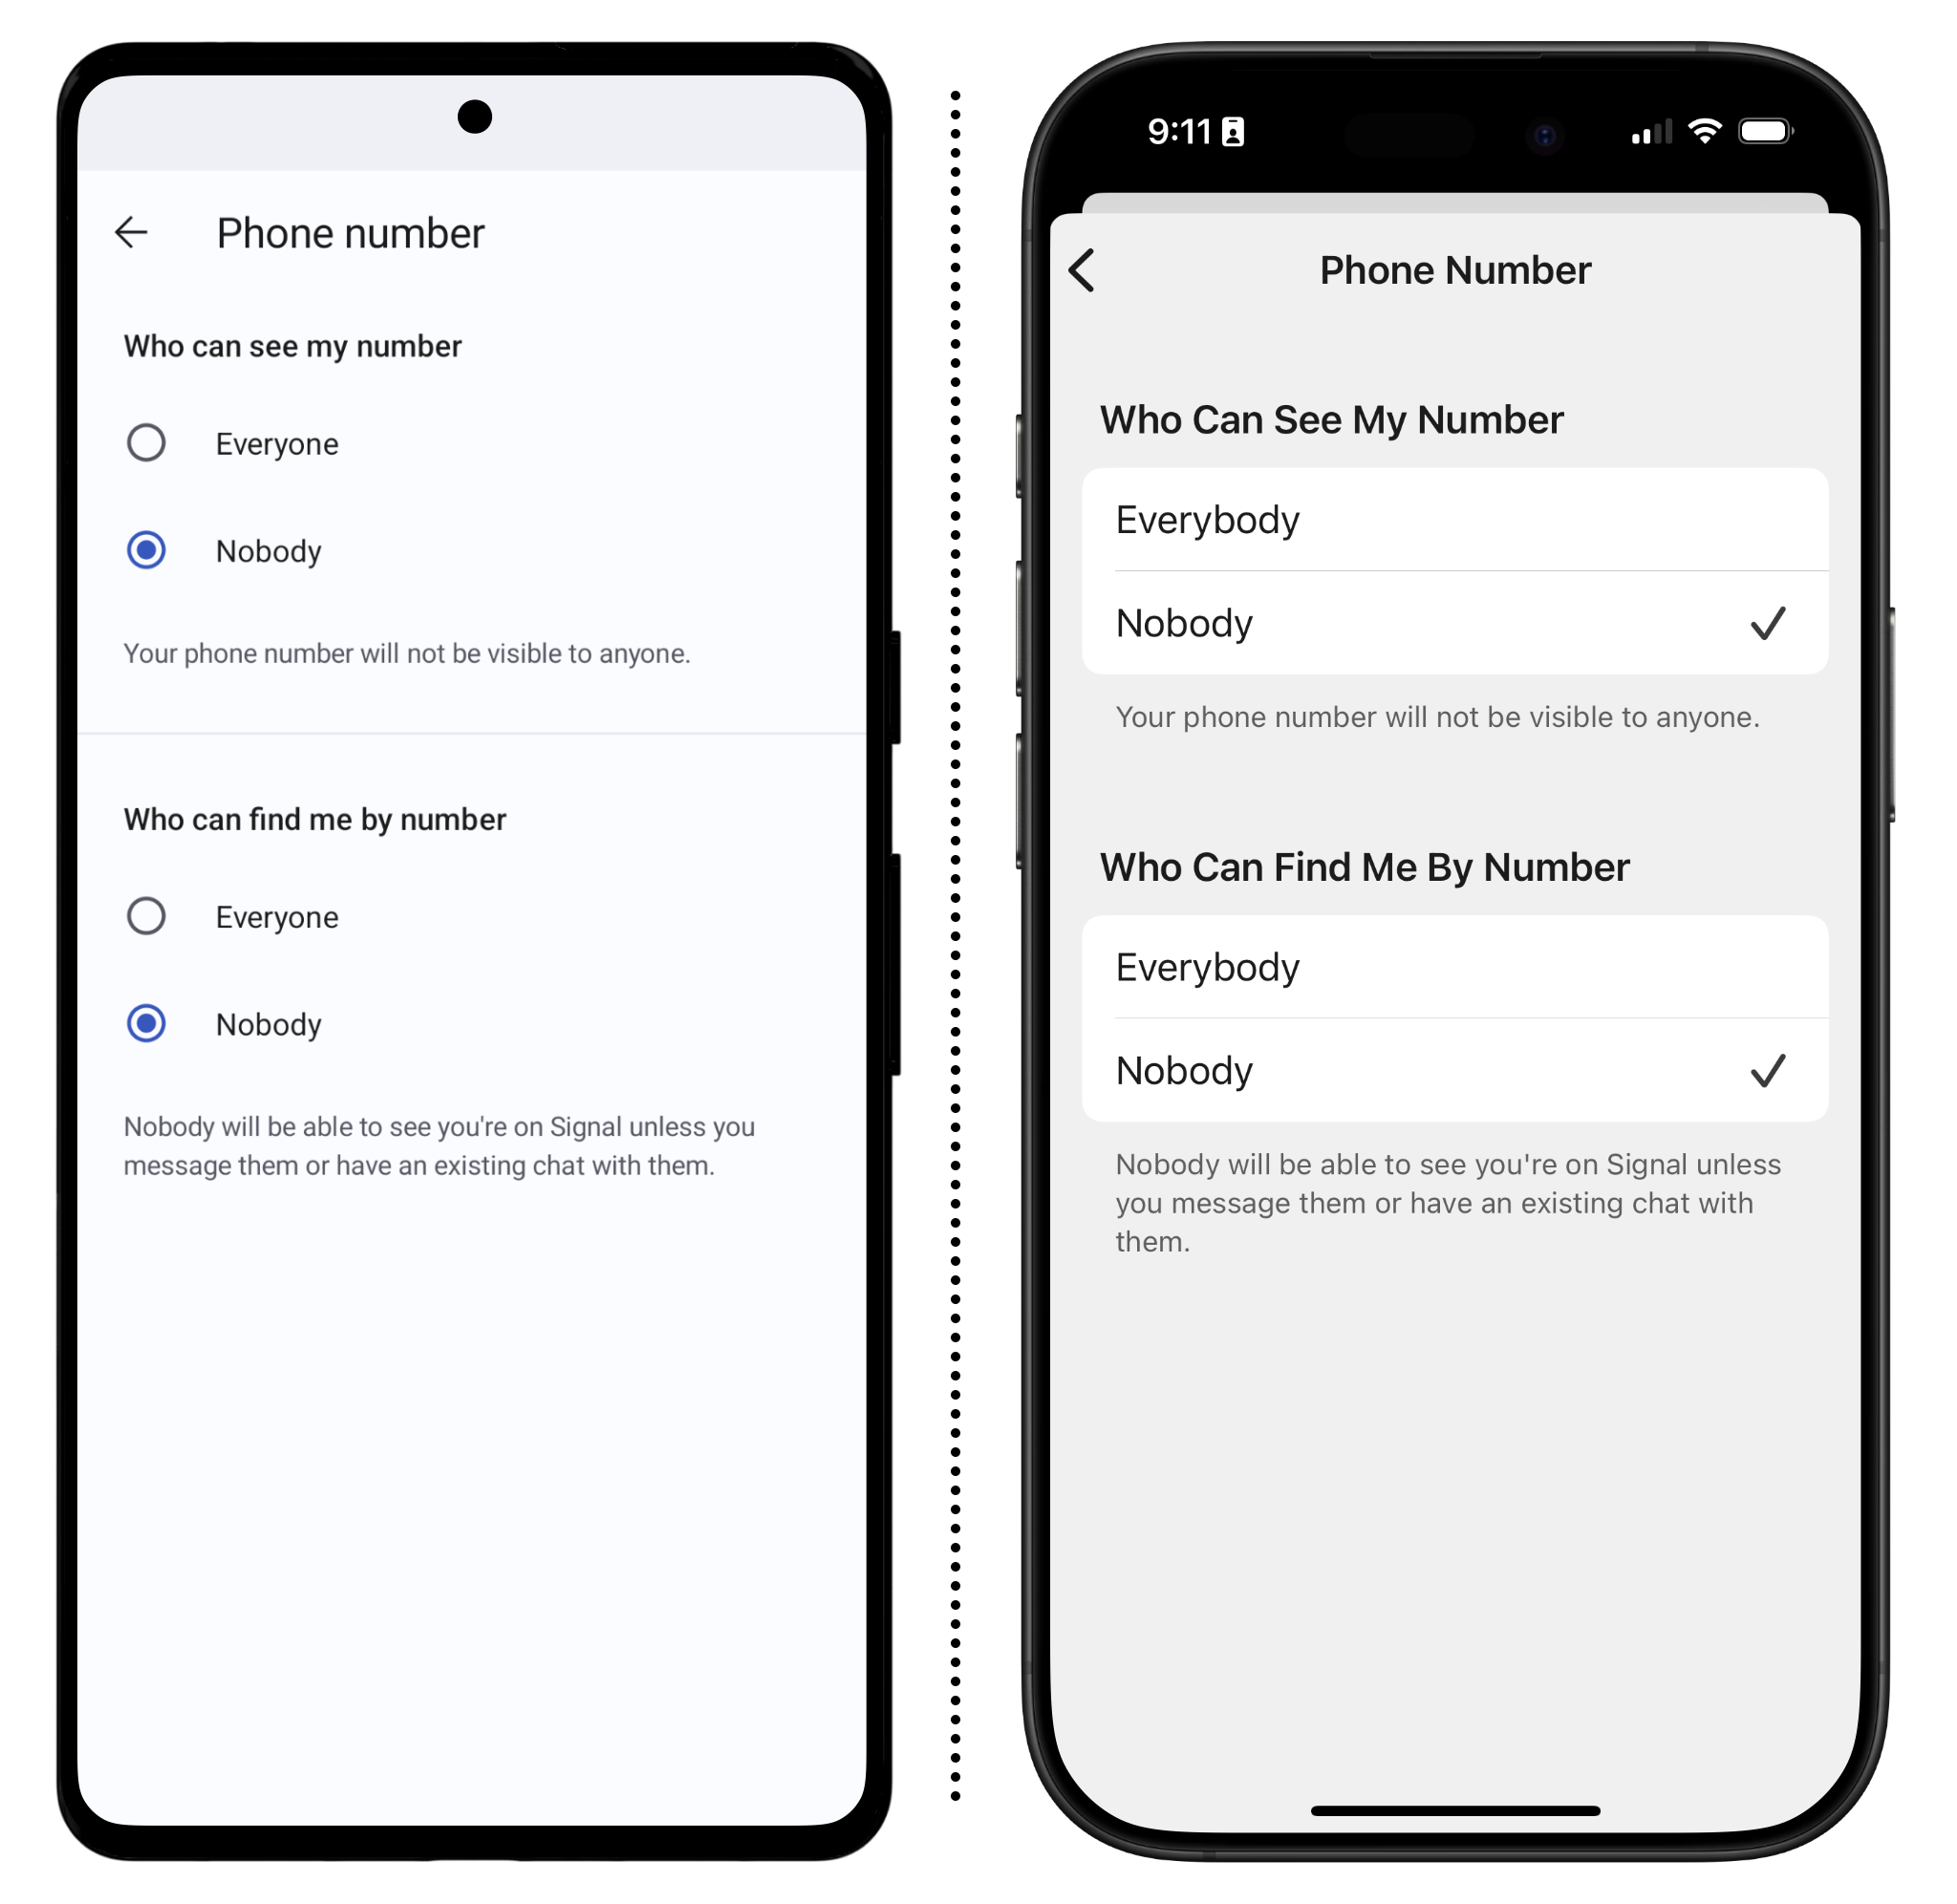
If you’ve set “Who Can Find Me By Number” to “Nobody,” you may also want to set up a username. Usernames are not display names—they are not visible to your contacts or people in a chat. Instead, they’re more like a “discovery handle,” so you can share your username with someone to connect without giving them your phone number. You can find more information about how this works in our full Signal guide.
Remember that the name and photo someone uses is always up to the account creator, and may not reflect their real name. This is a benefit for pseudonymity, but can also make it difficult to vet who is who in a group chat. If you’re ever not sure who someone is, you can view their profile by tapping it, which also tells you what other conversations or group chats you’re in with them. If a group meets in person, it’s a good time to check recent group chat joiners against their profiles.
Adding People to a Group Chat
Joining and inviting others to join Signal group chats is straightforward. If you and someone in the group are already contacts, the person in the group can simply add you to the group:
- Tap the group name, then “Add Members” to add a contact (this option depends on admin settings, which we’ll detail below).
Creating group chats manually based on phone numbers (or usernames) can help ensure you know who everyone is in the chat.
Another way to join a group chat is through a “Group Link.” Group Links are disabled by default but can be turned on and off by the chat group administrator. A Group Link is a URL that starts with https://signal.group that leads directly to the group when clicked, and looks like this:

If you receive a link like this, you can tap the link and you’ll join the group automatically. If you are in a group chat and want to share a group link, tap the chat name, then scroll down to “Group Link” to find the shareable link. If this option is listed as “Off,” then there is no group link. Likewise, if you’re an administrator and want to enable or disable the Group Link feature (or change the link URL), you can do so on this screen.
Group Links are useful for broad advertising on flyers or specific events, but for higher‑risk contexts consider using invite-only or short-lived links, and turning links off or resetting them between events. If you’re an administrator for an existing chat, and plan to share the chat with a group link for the first time, let participants know so they can review their profile settings before new members join.
If you’re together in person and want to create a group chat for everyone there, you can head to the Group Link page, then tap Share, and then QR Code. Then, just have everyone scan the QR code with their phone’s camera and they’ll get their invite.
Group Links are a useful way to quickly get people into a group chat without a lot of administrative overhead, but keep in mind that links can also make it harder to know exactly who is joining over time, so you may want to disable it after the first wave of invites arrive.
Managing Groups to Reduce Risks
Signal has some tools to better help manage group chats, including ways to control who can join and who can invite others. It’s good practice to establish these boundaries early on when starting a new group chat.
Signal groups can include up to 1,000 members, so be mindful of what you say and share in these large public chats. Once your group is large enough that you do not know everyone, somewhere around 50 people, or after you share a Group Link publicly, treat it like social media, where everything could end up shared outside the group, including in a police file.
Decide on Length of Time for Disappearing Message
Different group chats will require different message retention periods. For some, you may want to keep a searchable index of messages for as long as the chat exists. For others, you may want messages to automatically delete after a short period of time.
In any group chat, administrators can set or change the length of disappearing messages by tapping the group name, then Disappearing Messages. It is good practice to set these retention periods when first creating the group. For sensitive group chats, setting the timer to a short period, like a day or a week, can be a good way to better protect the privacy of everyone in the chat. Shorter timers also ensure that if someone in the chat’s device is physically compromised, fewer messages exist.
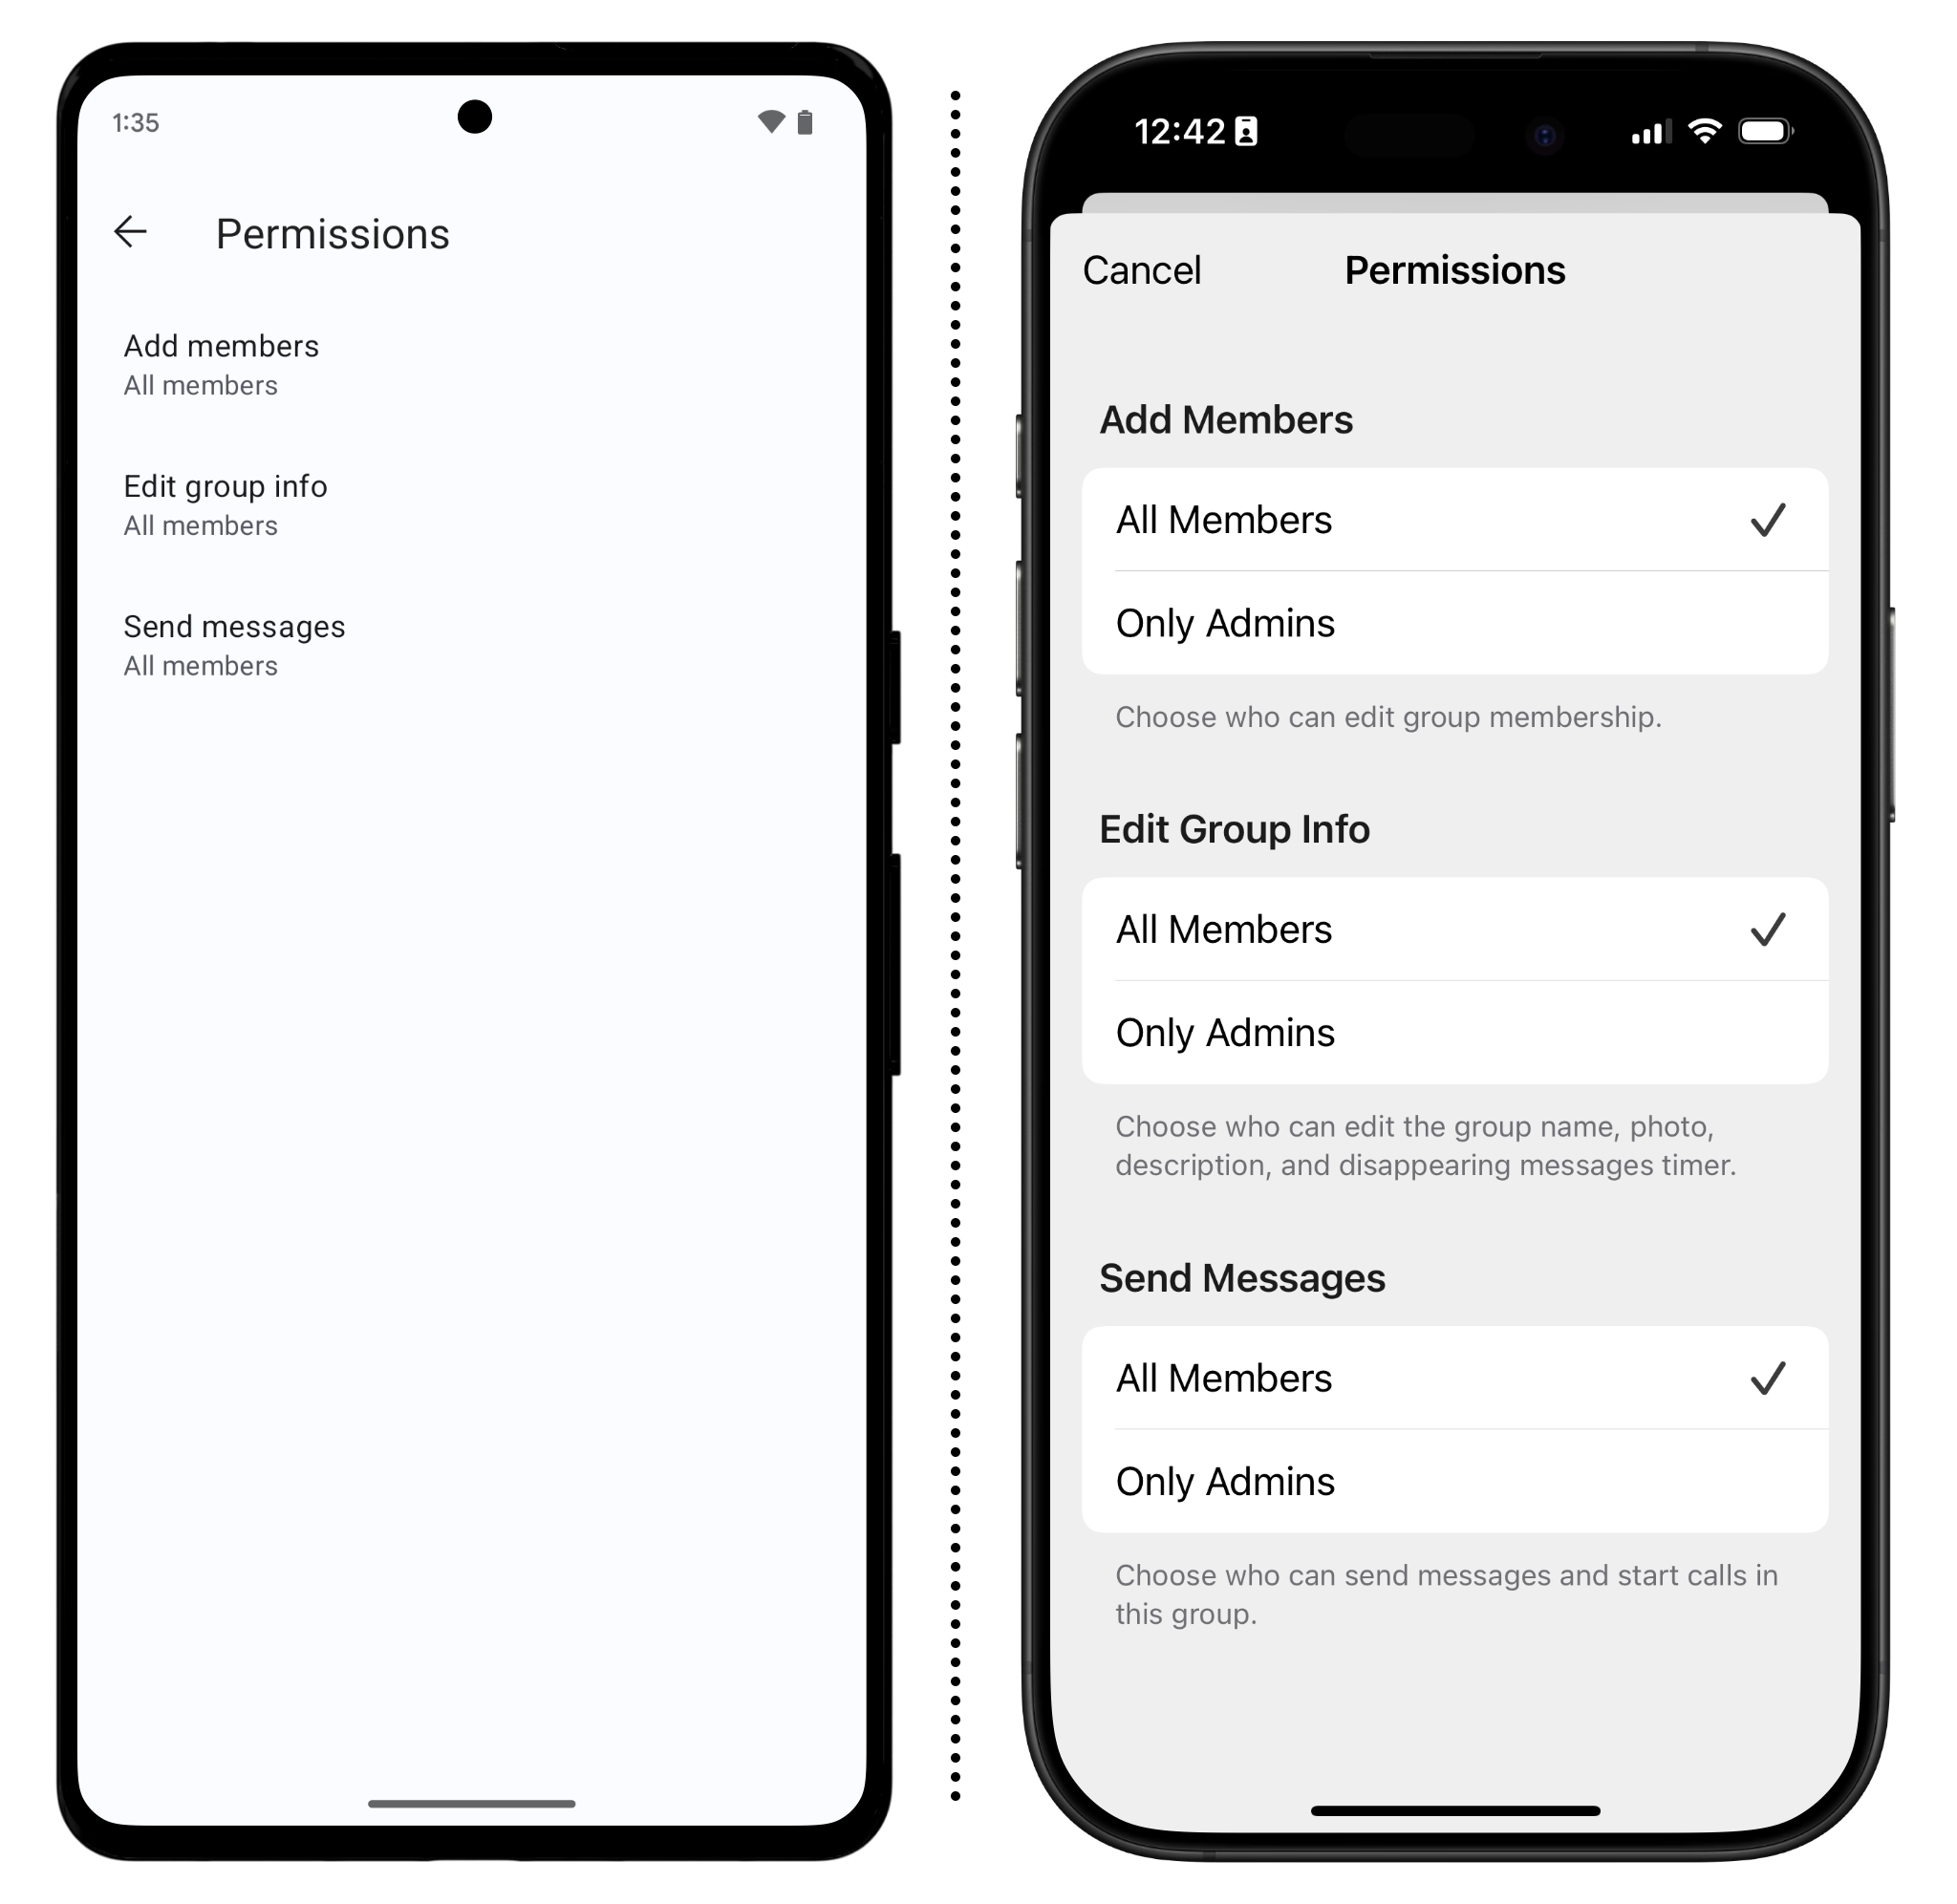
Set Up the Group Chat Permissions
When starting a new group chat, think through how you plan to use the chat and who you plan to invite, so you can put some protections in place ahead of time. Knowing the options on the group chat permissions page can be helpful in deciding how you want to manage a chat:
- To create a new group chat, tap the pen icon from the “Chats” tab, then tap “New Group.”
- Select the members you’d like to include, or tap the skip button if you plan to share a group link or invite people later.
- Name the group chat, set the disappearing messages length, then tap “Create” to create the group.
- Once the group is created, tap the group name, then screen down to “Permissions.” Here, you’ll see options to control who can add members, who can edit the group information, like the name, photo, and disappearing messages timer, and who can send messages.
Which options you choose will depend on the sort of group chat you’re running. A small group chat amongst friends may not need specific administrators or approvals for adding new members. But a large public group might need administrators and other guardrails.
Choose Your Administrators
If you have a group chat with more than just a handful of friends, you should consider designating at least one or two administrators. Depending on the group chat permissions you set above, an administrator can: approve or add new members, change group information, pin messages, and remove people from the chat. Administrators can have a good amount of control over chats, so be sure to choose a trusted member of the community, especially in very large group chats.
Be mindful that being an admin is labor that, depending on your group rules, can include vetting members, mediating conflicts, removing people, answering questions, updating the group description, and more. This can be a lot of work, so make sure they’re on board for it.
In even smaller groups, consider at least two trusted administrators at a time. To manage this, consider rotating roles to help prevent burn out and establish rules for when it’s time for an admin to step back and transfer ownership to someone new.
If you created a group, you are already an administrator. To also make someone else in the chat an admin:
- Tap the group name
- Scroll to the members section and tap the name of the member you’d like to make an admin
- Tap “Make Admin,” then “Make Admin” again.
On this same screen, you can also revoke Admin status at any point if needed.
Establish Group Rules
If you are running a large group mixed with people who do and do not know each other, it’s good to have some rules. The group description field is an excellent place to put these rules so they’re easy to reference. Tap the group chat at the top of the screen, then tap "Add group description..." to add whatever information you want.
Consider some basic rules that make sense for your community—every one will have different needs. This might include setting up guardrails around safety and conflict, establishing rules around doxxing and harassment, explicitly stating the guardrails around taking (and sharing) screenshots, or how people are added to, or removed from, the group. They could include asking everyone to implement technical protections, like making sure everyone has screen lock enabled.
Large groups may also need to establish the basics of what the group is for and is not for and include details about which admins to reach out to when there are problems. The description field can be used for this. Pinned messages can also be helpful, but if you use disappearing messages, pinned messages will disappear on the same schedule.
In small to medium-sized group chats, it can be worth checking occasionally to see who is in the chat. From the group chat screen, tap the chat name, then scroll down the list of members to see who is in it. For larger chats, this is often too difficult, especially since many people may be pseudonymous or may change their profile information frequently.
One way to handle this is to ask members in a group chat to use a “Member Label.” Member Labels are a short bit of text that appears after your profile name in chat messages. They are limited to specific group chats. For example, for a more official organizing campaign, you could set your Member Label to the organization you represent, like “EFF,” but for others, you could make the label more broad, like your location, profession, or whatever other short bit of information would be good to remind people about when you send messages. You can set your Member Label by going to a group chat, tapping the name of the chat, then “Member Label.” Remember that this can be set to display incorrect information.
Consider Announcement Only Channels
When setting up a group, you may have already noticed the option to allow only admins to send messages. This can be useful for critical announcement chats that you do not want getting clogged up with hundreds of other messages.
For example, this can be useful to send information on direct actions, or just to send out information as if it’s a newsletter. Announcement-only channels are also useful for action logistics or rapid updates, but keep in mind you may need to pair them with a smaller “organizer coordination” group or a separate space for discussion.
To set up a channel this way:
- Tap the group name, then scroll down to Permissions and change all the settings to “Only Admins.”
Even if a channel is set up like this, members can still emoji react to messages.
Admin Example: Local Climate Activist Group Chat
Let’s say you want to have a semi-public group chat of climate activists in your neighborhood. Since you created the group, you are automatically an admin, but you’d like to make it so only approved people can join the chat, and you need some help vetting them, moderating the chat, and helping manage any other issues that might come up.
After some discussion around the expectations for this role, your neighbor, Fernando, agrees to come on as the other admin. Now you and Fernando are in charge of managing the technical aspects of the group.
Before you start inviting others, take a few steps to set up the group chat:
- Tap the group name and make sure the name is descriptive of what the group is. Tap Add a group description… and then write in a description for your group along with any membership rules. In this case, you might write something like, “This is for organizing group actions for the group and for sharing related news. It is not meant for gossip, memes, or jokes. If you repeatedly break these rules you will be removed from the chat.”
- Since you’ve decided this group will be semi-public, tap Group Link, and turn it on. Then make sure “Require Admin Approval” is enabled. This ensures only you and Fernando can approve new members.
- Once you're done, go back to the group settings screen and select Permissions. Here, change “Add Members” to “Only Admins” and consider changing “Edit Group Info” to “Only Admins.”
- Share the group link, for instance via email or social media.
Now, when anyone new to the group joins from the group link, you and Fernando will need to approve them. You’ll receive a notification when this happens, but you can also always see the list of pending requests and invites by tapping the group name, then scrolling down to Requests & Invites. Remember, there is no real name requirement for Signal, so you may need to come up with solutions for vetting new members. This can include asking them directly where they learned about the group, or asking other members to vouch for them.
With the group created and active, it starts to get a little overwhelming for you and Fernando. At that point, you bring in another admin, Maia, who was one of the first members, and has proven to be engaged and level-headed during the discussions you’ve had over action planning. After one member repeatedly uses the chat to share gossip about unrelated neighborhood news, like business openings and closures, the three of you start a smaller group chat to discuss this issue, and others that may require admin action.
After a couple months, your group has finished planning its first action: a protest at city hall demanding the city abandon its plan to build a gas-fired power plant. Instead of risking losing track of the details for this day of action, you, Maia, and Fernando pin the details to contact a local legal hotline group, the time and location of the protest, and the rules around the expected behavior of everyone attending.
Everything in the group starts off well, but a few months in, one of the members, Rachel, moves away but hasn’t bothered to leave the group and doesn’t respond to any messages. You and the remaining group decide that it’s best to remove Rachel from the chat since they are no longer part of the local community. To do so, tap the group name, then go down to the members section and find Rachel. Tap the name, then Remove from group and then Remove again to confirm.
Removing someone from a group chat does not delete old messages from their phone. Neither does setting a new disappearing messages timer. If you delete your own message within 24 hours of sending it to the group, however, that message will be removed from the phones of everyone in the group.
If you know that a member of your group chat is under criminal investigation or their phone has been seized by law enforcement, it is a good idea to consult a lawyer before changing administrative settings in the chat.
Manage Notifications and Organization
Silence Notifications in Massive Group Chats
If you’re managing a large group chat with hundreds of members, make sure your participants know how to mute the chat so they aren’t flooded with notifications if they only want (or need) to check in on their own time. From the Chats screen, long press on the chat thread you want to mute and then tap the mute icon.
Folders Can Help Keep Things Organized (on Android)
If you’re an Android user, you get an organization tool that’s not available yet on iPhone: folders. Chat folders work exactly as you’d expect. You can create folders, then move different chats into them. For example, you can create folders for “Work,” “Personal,” “Neighborhood parents,” and “Activism” and then organize your chats into them so they’re easier to manage. For a full breakdown of how this works, check out Signal’s support page.
Use Nicknames to Keep Track of Who’s Who
Because people can set their profile name to be whatever they want, it’s very easy to lose track of who is who in a group chat, especially if you have half a dozen contacts with the same first name.
This can cause all sorts of issues beyond confusion in the group chat itself, like accidentally inviting the wrong “Jeffrey” into a group chat. One way to solve this problem is to utilize Signal’s “Nicknames” feature.
- Tap the person’s profile picture in an existing chat.
- Tap Nickname and type whatever you’d like for their first and last name to help you remember who they are. You can also add a note. This information will not be shown to them and Signal itself cannot see it.
Once you set up a nickname, you’ll see the nickname when you search for it, or inside group chats. Note that doing so can create a potential new risk if law enforcement gains access to your device and that person is using a pseudonym . In some cases it may be best to keep your note generic enough that it doesn’t reveal personal information about that person, or in higher risk situations, to not use the note system at all.