How to: Get to Know iPhone Privacy and Security Settings
Last Reviewed: September 15, 2025
Open up your iPhone’s Settings app and you’ll find dozens of different options with little guidance on what those options do. Some of these settings have a serious impact on your privacy and security, altering what data gets shared automatically with apps, data brokers, and Apple itself.
What sorts of changes you should make depends on how you use your phone and your security plan. There is no one-size-fits-all collection of recommended settings to change, instead, we’ll explain what settings do to help you decide if they’re worth altering. This guide cannot cover everything, so for a deeper dive, check out our Privacy Breakdown of Mobile Phones guide.
How to use this guide: because of the sheer amount of privacy and security choices in iOS, we’ve broken this into three sections, starting with the settings everyone should consider changing, and moving deeper from there. This guide is written for and is accurate as of iOS 18.
- Enable Two-Factor Authentication on Your Apple Account
- Lock Your Phone Behind Biometrics or a Strong Passcode
- Audit Your Privacy Permissions
- Disable Ad Tracking
- Decide How Your Want to Handle Backups
- Set Up "Find My"
- Enable Stolen Device Protection
Level 2: Additional Steps for Some Security Plans
- Mail Privacy Protection
- Tweak Safari Settings
- Lock and Hide Apps
- Lock and Hide Photos
- Keep Apple Notes on Device
- Obscure Lockscreen Notifications
- Change What Siri Can Access
- Disable Apple Intelligence
- Disable Some App iCloud Backups
- Change Your "Shared with Me" Settings
Level 1: Everyday Essentials
No matter what your specific security plan is, everyone should take a look at these settings on their phone to increase their privacy and security.
Enable Two-Factor Authentication on Your Apple Account
Why
If you’ve owned an iPhone for a long time, there’s a reasonable chance you’ve already enabled two-factor authentication—a way to make your online accounts more secure by requiring additional proof (“factors”), alongside your password , to log in. This means that even if someone has access to your password, they wouldn’t be able to get into your Apple account without this second factor. Apple accounts hold loads of sensitive data, including photos, contacts, notes, and just about anything else you’ve saved on your phone or iPad, so it’s crucial to secure it as best as possible.
Once enabled, any time you want to log into a new Apple device, or log into your Apple account from a new web browser , you’ll need to enter a verification code on a “trusted device” (this might be your phone, laptop, or iPad, if you’ve logged into an Apple account there). If this sounds tedious, don’t worry too much. After running through the authentication process one time, you won’t be asked to enter the verification code again unless you sign out of a device completely or erase the device and start over.
What to do
Apple requires two-factor authentication for a number of features, including using Sign in with Apple, and Apple Pay, so you may have already turned this on. If you’re not sure if you’ve turned it on, it’s worth checking to make sure.
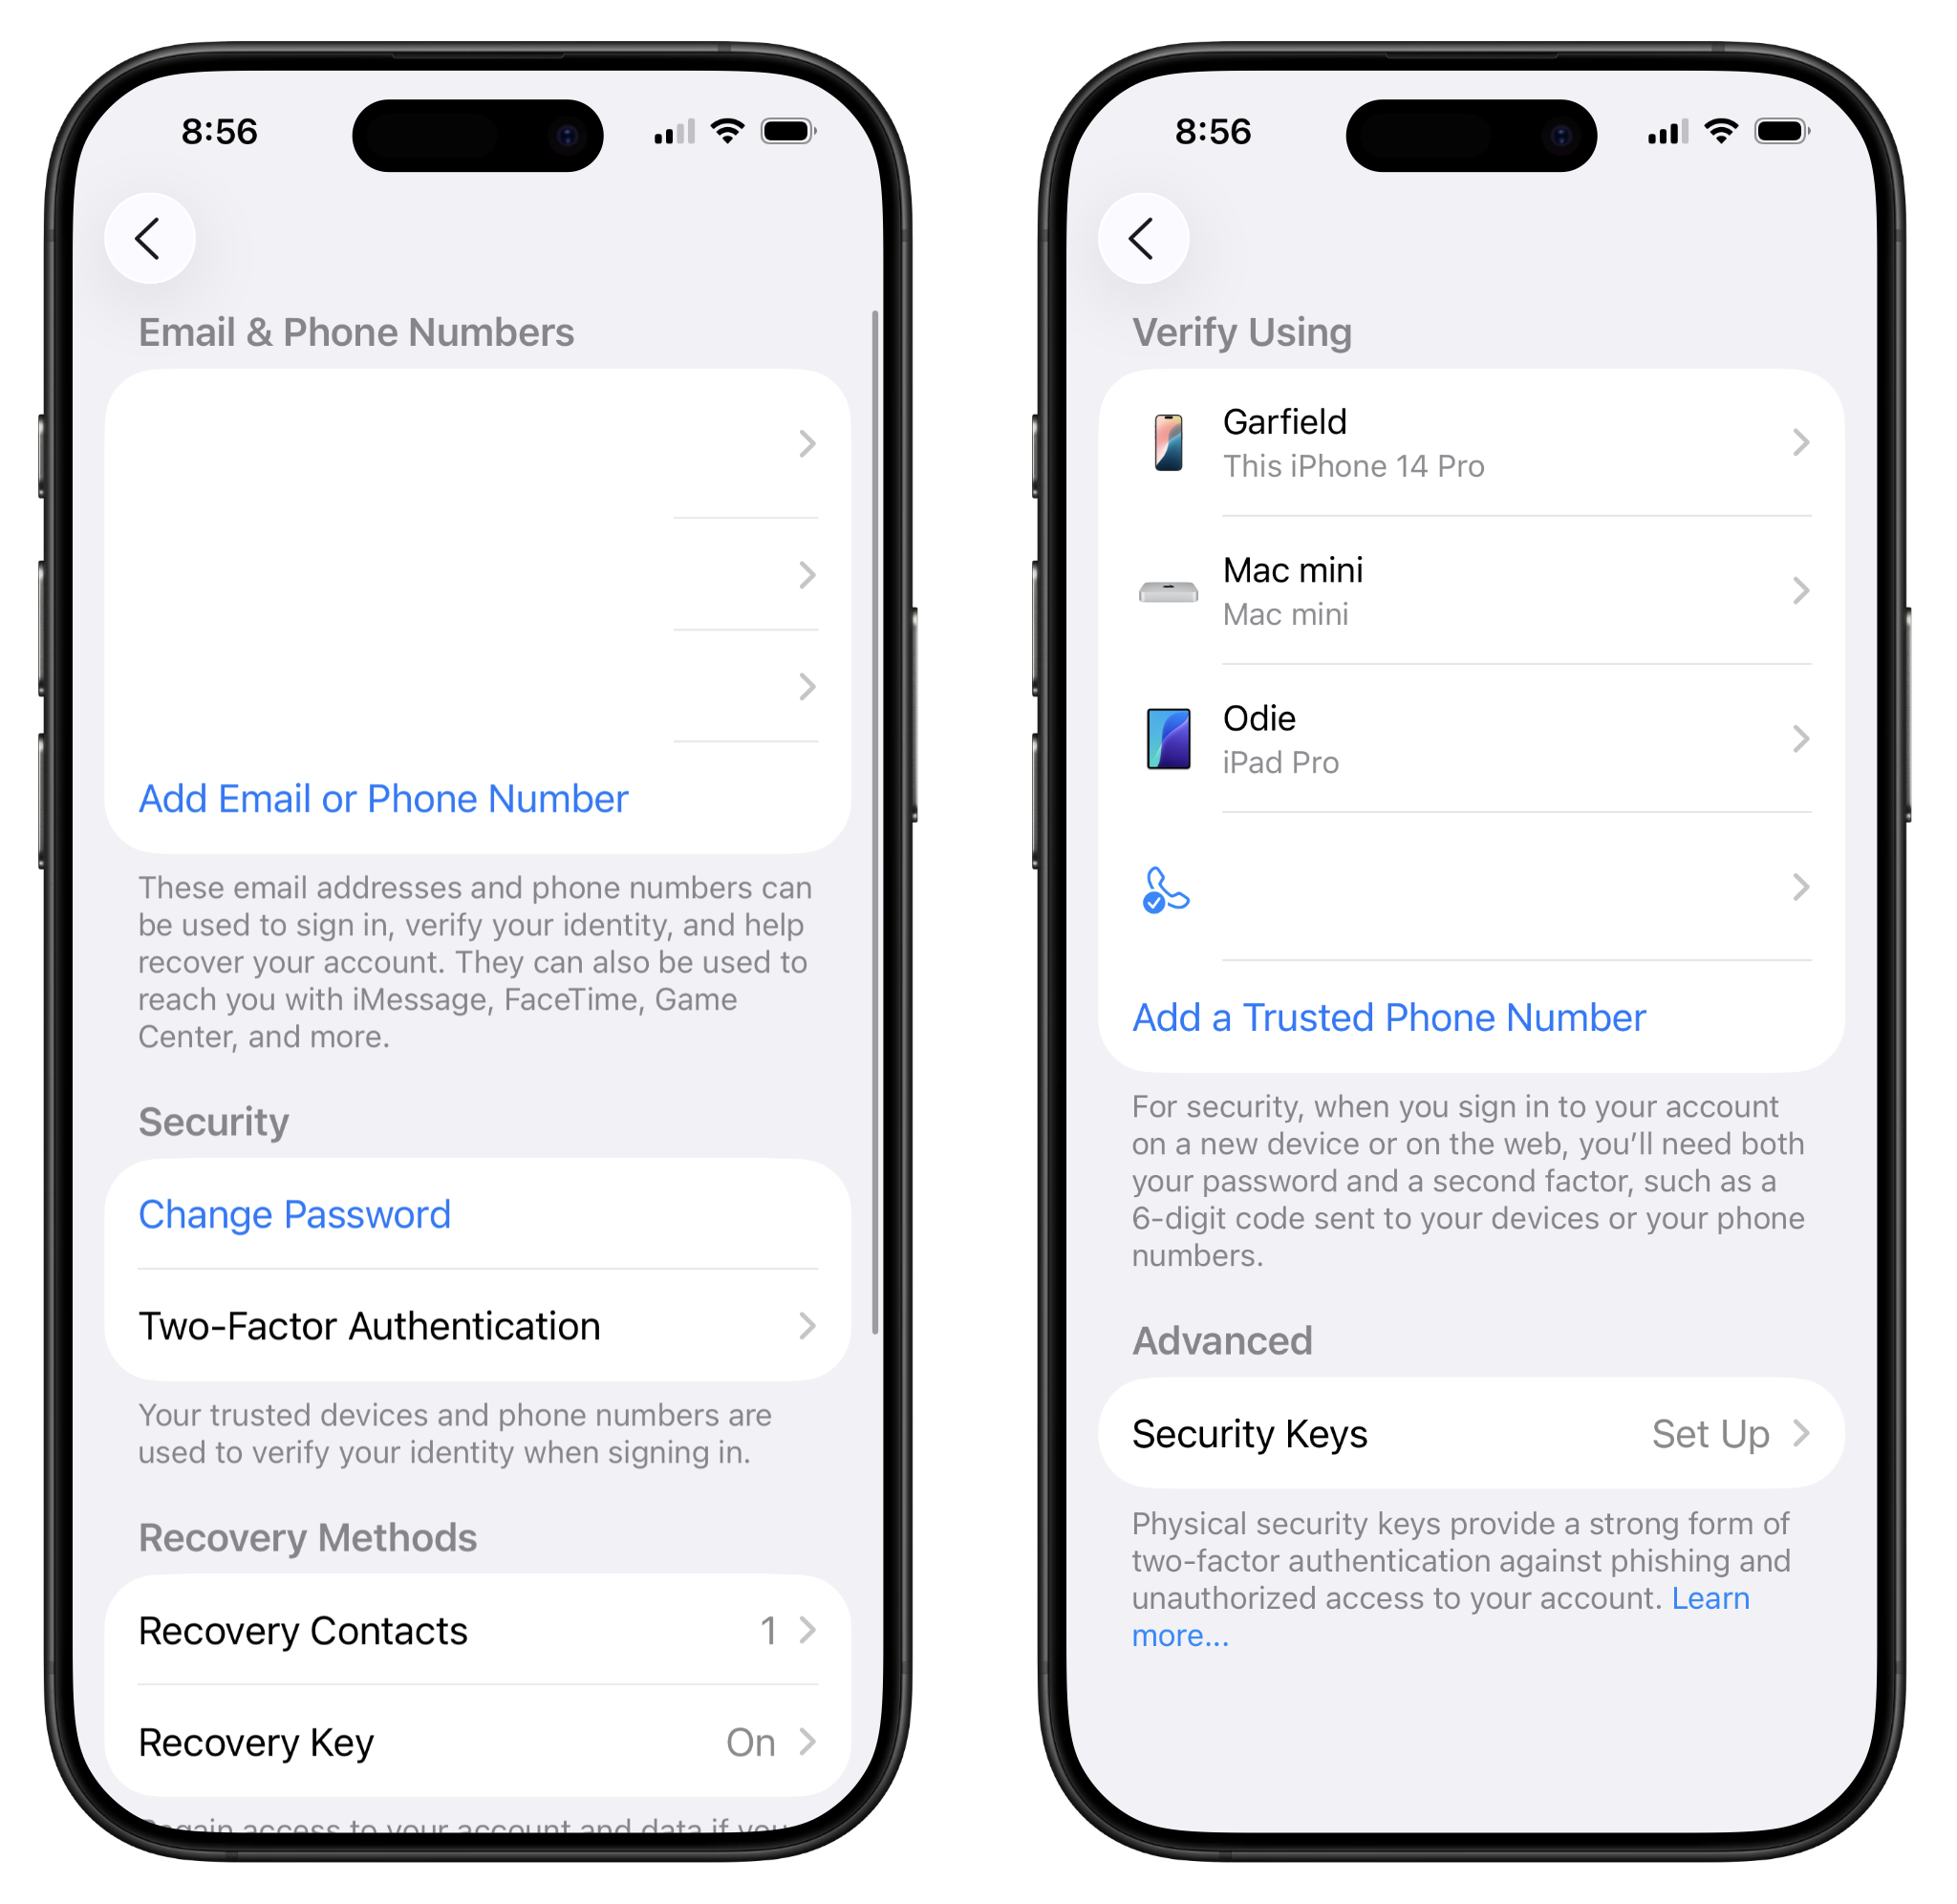
- Open Settings > [your name] > Sign-In & Security, then tap “Two-Factor Authentication” if it says “Off.” Follow the onscreen instructions to enable it.
- If you’ve already turned two-factor authentication on, you’ll see a screen with a list of any other devices you’ve signed into your Apple account on (like an iPad or laptop), as well as your phone number. This means two-factor authentication is enabled on your Apple account, and the devices listed can all be used as the second “factor” for verification. If you see any device here you no longer own or don’t recognize, you can remove it.
If you’re at a high risk of targeted attacks, consider using a security key to lock down your Apple account even stronger. Security keys are phishing resistant, but carry the risk of locking you out of your account forever if you lose the key. Apple requires that you register two keys, a primary and a backup, for this reason. Here’s more information on how to set up a security key on your Apple account.
Lock Your Phone Behind Biometrics and a Strong Passcode
Why
If your device is lost or stolen, or confiscated by police, “device encryption ” helps protect the data stored on your device. iPhones have device encryption capabilities built into them.
What to do
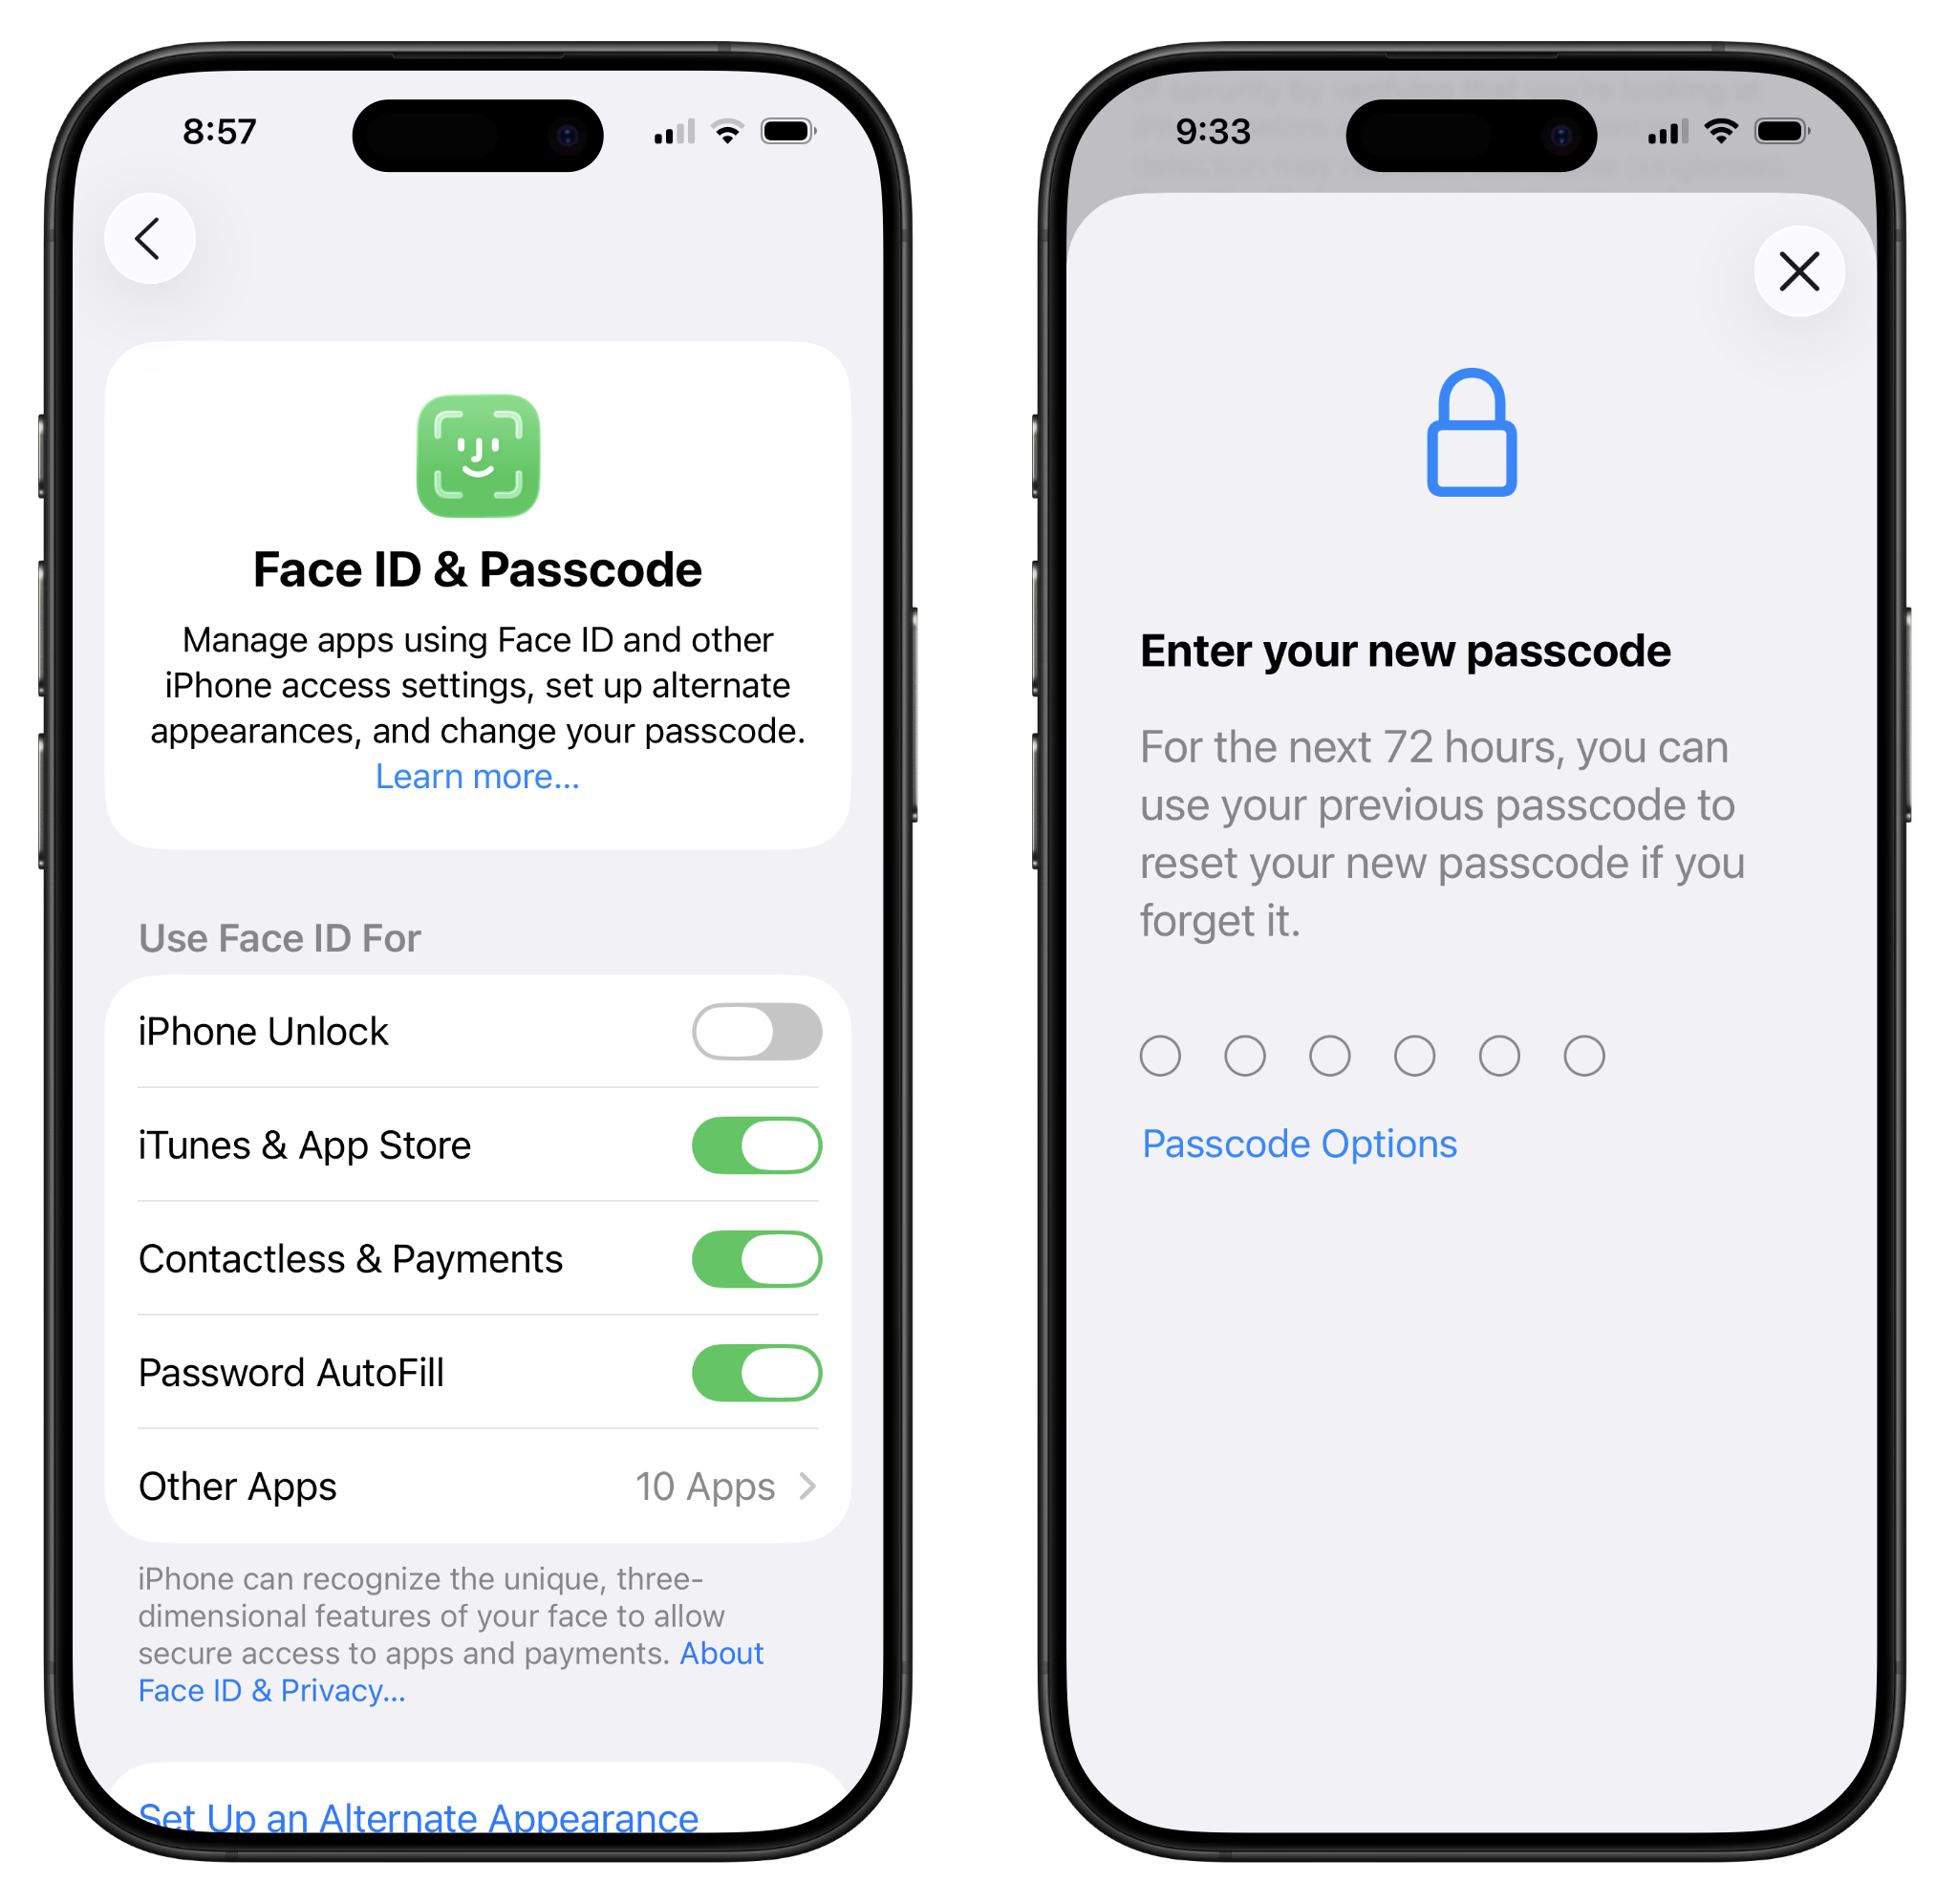
You should protect your iPhone with a strong password: 8-12 random characters that are easy to remember and type in when you unlock your device. If devices are not protected by a strong password, your phone will be easier to break into. To enable or change your passcode:
- Open Settings > Face (or Touch) ID & Passcode > then tap "Turn Passcode On" or "Change Passcode," then tap "Passcode Options" and choose the type or length of passcode you'd like to use.
Once a passcode is set, you can choose to enable biometric login, using either your face or fingerprint , depending on which type of login your phone supports. This is optional and speeds up the process of unlocking your phone, but doesn’t have the same legal footing that passcodes do. Only you can decide if it's a safe choice to enable biometric login for your device, but if you want to turn it on, here’s how to do so:
- Open Settings > Face (or Touch) ID & Passcode. Follow the onscreen instructions to register your face or fingerprint.
In the United States, using a biometric—like your face scan or fingerprint—to unlock your phone may compromise legal protections for the contents of your phone afforded to you under the Fifth Amendment privilege against compelled incrimination. Under current law—which is still in flux—using a memorized passcode generally provides a stronger legal footing to push back against a court order of compelled device unlocking/decryption. While EFF continues to fight to strengthen our legal protections against compelling people to decrypt their devices, there is currently less protection against compelled face and fingerprint unlocking than there is against compelled password disclosure.
Audit Your Privacy Permissions
Why
Just about every app you download asks to access some sort of information about you or your device. This includes everything from obvious uses, like a camera app asking to access your camera and photos, to less obvious ones, like a newspaper app asking to access your local network.
All these permissions can be hard to keep track of. For that reason, it’s good to go through and double-check app permissions now and again. Doing so can ensure you are not sharing any data you do not intend or need to share.
Before auditing your privacy permissions, it’s a good idea to go through all your apps and delete any you don’t need. This makes the audit easier, and the fewer apps you have installed on your phone, the fewer chances there are for your data to end up in the wrong hands.
What to do
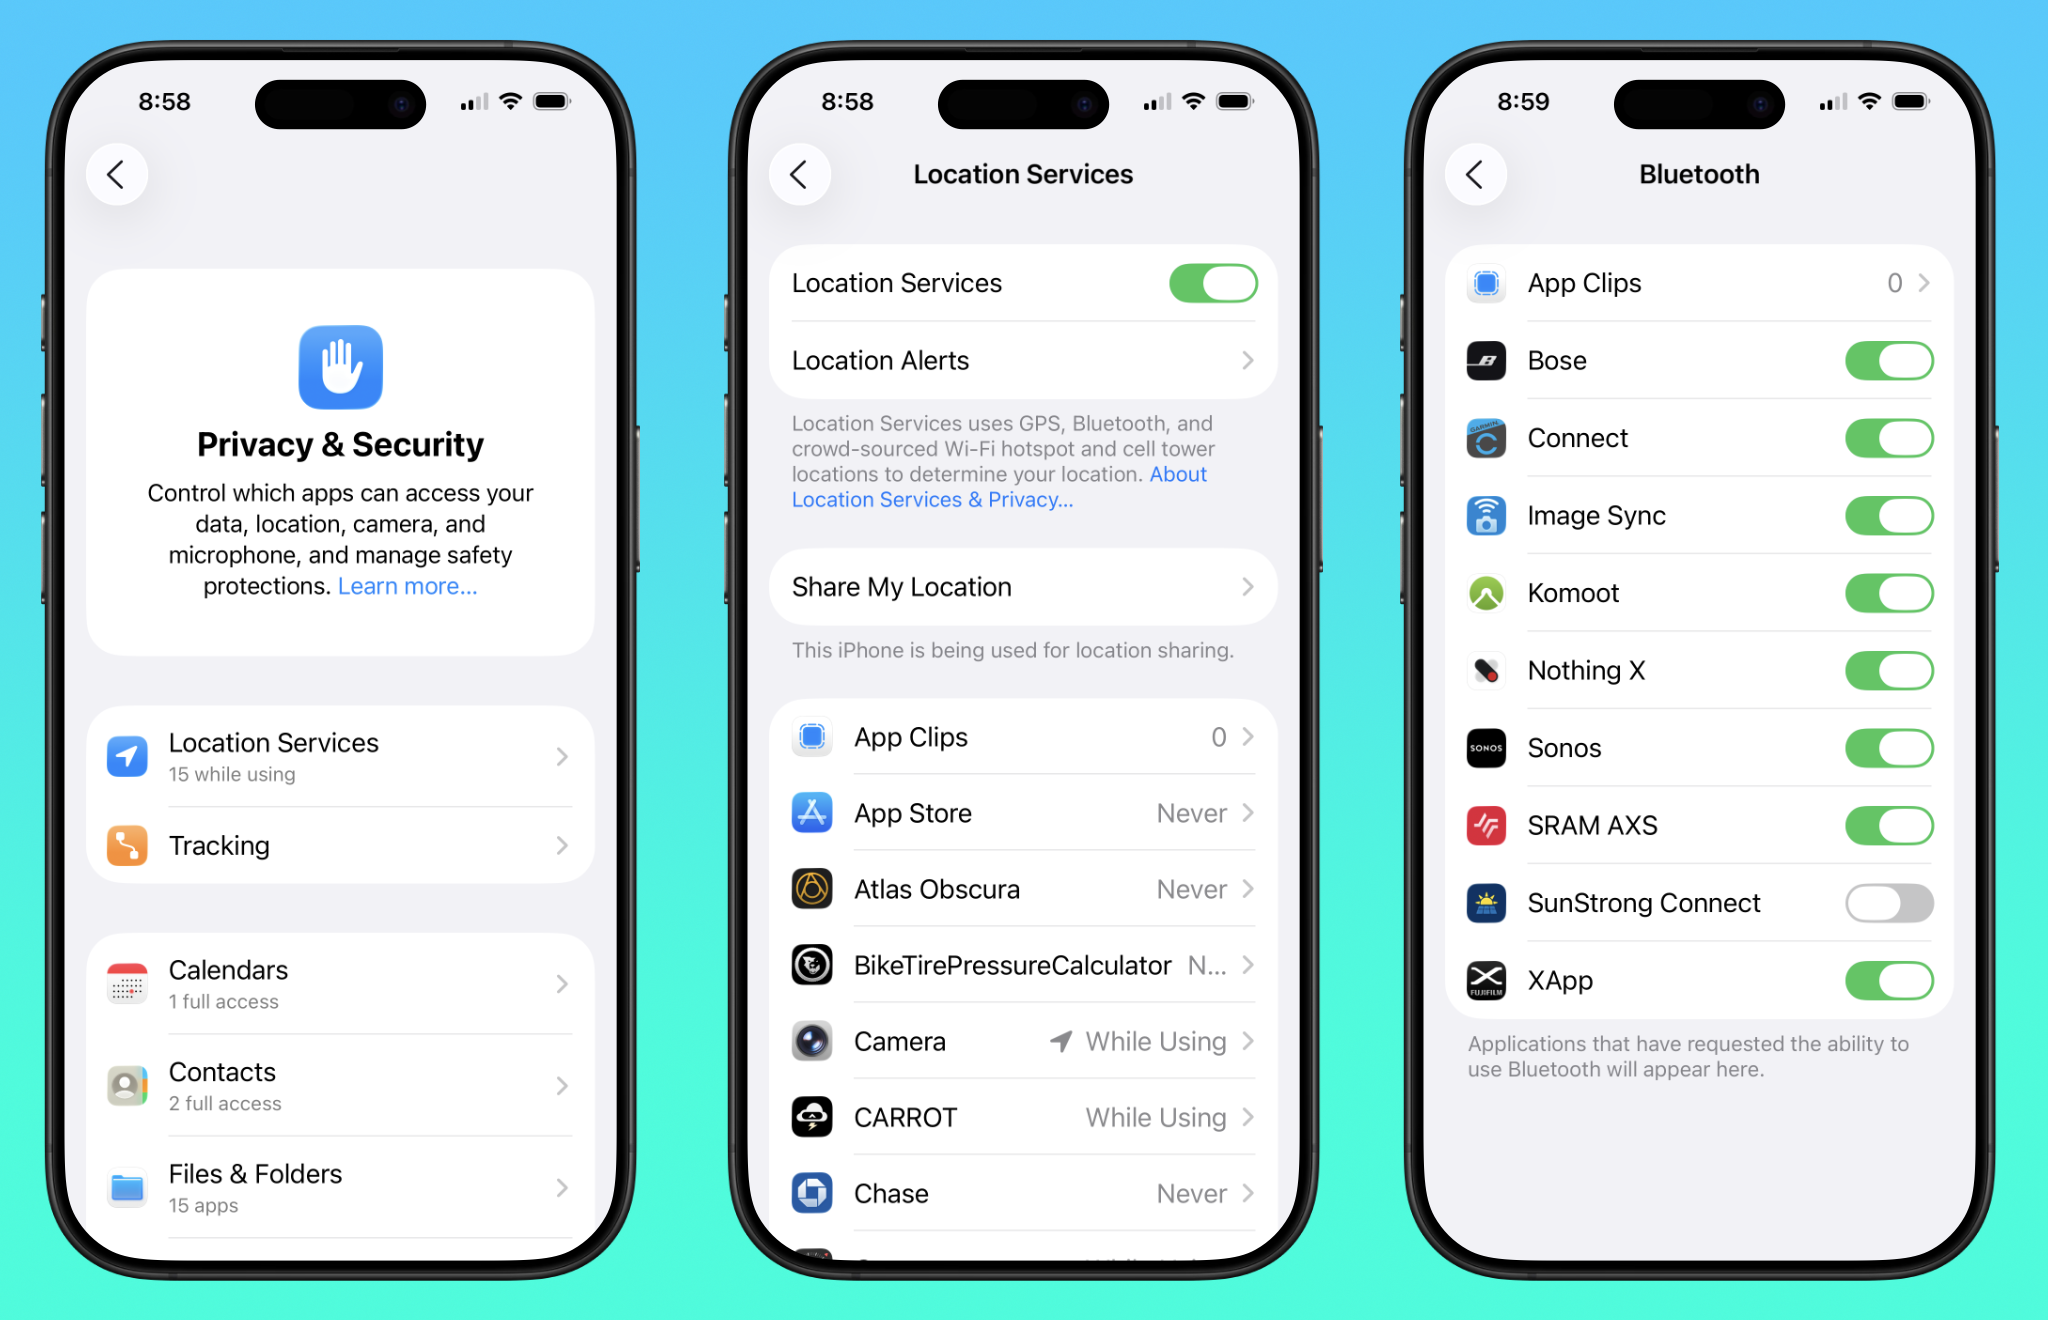
To get started, open Settings > Privacy & Security. Here, you’ll get to a page with an abundance of different permissions, each listing how many apps have access to that permission. Not all of these are only “on” or “off.” Some, like photos, location, and contacts, offer more nuanced permissions. It’s worth going through each of these to make sure you still want that app to have that permission. If not, revoke the permission. Don’t worry about breaking anything, you can always reverse the decision if an app loses functionality.
These permissions are broken into a few different sections, and there are a lot of them. It’s worth going through them all, but the most important permissions to focus on are:
Location Services
Location services are one of the most critical permissions that many apps overstep in asking for. This permission gives apps access to your GPS location so it knows where you’re at. Take a look through your apps listed here and ask yourself if they really need your location in order to function. If not, then it’s worth disabling location access completely or limiting it to only when you have the app open. Location services have a lot of variety for when an app can access your location:
- Never: the app will not get any location information from your iPhone.
- Ask Next Time or When I Share: Any you open the app, it will ask for your location info.
- While Using the App: The app can only access your location information when you have the app open and when you close the app, it’ll stop getting that information.
- Always: The app will receive your location information all the time.
You can also change how exact the location information an app gets is, granting access to either your precise location, or a more generalized location. Disabling the precise location option means the app will only be able to access your general location. Precise location is necessary for mapping apps in particular, but may not be needed for many others.
System services: Scroll all the way to the bottom of the Location Services page and you’ll find “System Services.” These are operating system level services that mostly only communicate with Apple directly. Some, like “Find My iPhone,” are necessary for specific services to work. Others, like “Suggestions and Search” may not be as critical. You can read Apple’s explanation about these options here. One specific option you may want to consider disabling is “Significant Locations,” which stores the locations you go most often.
Contacts
If an app needs access to your contacts, you can either grant it full access—which provides the app with your entire contact list, including all the information stored on their contact card—or you can choose “Limited Access,” where you grant the app access to specific contacts.
This is useful in situations where you want a communication app, like Signal or WhatsApp, to only have access to information about a handful of contacts to make connecting with them easier.
Health
This grants an app access to either read or write specific health data. After tapping an app’s name, you will see individual health permissions that you can toggle, like heart rate, steps, weight and more. Some apps will only request to write new information to the health apps, while others will ask for both the ability to read and write.
Consider disabling any individual health details you do not think an app needs.
Photos
You can change a number of aspects around how apps access your photo roll:
- Full Access: an app can access your entire photo roll.
- Limited Access: you pick and choose specific photos an app gets access to.
- Add Photos Only: an app can only add photos to your camera roll.
- Private Access: the app doesn’t get access to your camera roll at all. If you want to upload a picture to the app, you’ll still get the photo picker menu, but it will never see anything else in your camera roll.
Consider limiting access to your photo library in any app where you’d prefer some photos couldn’t get uploaded, even by accident. For example, if you use Slack at work, it may be best to limit access so you don’t accidentally upload your full set of vacation photos when you just intend to share one photo from the beach.
Camera
Here, you’ll find apps that have asked to access your camera. The most obvious use is third-party camera apps, but you may also see apps that use QR code scanning for two-factor authentication, notes apps, and more.
If an app has access to your camera and you do not understand why, disable it. You can always turn it back on if you need to.
Microphone
For the most part, you’ll find only apps you use for voice calls or video here. But if there’s an app that appears to be accessing your microphone and you can’t figure out why, disable it.
If this all seems like too much, you can also run through the “Safety Check,” feature, which, alongside providing a review process to see who you are sharing information with, also provides an option to reset all app permissions. You can find more information about this feature below.
Disable Ad Tracking
![]()
Why
The ad identifier—aka “IDFA” on iOS—enables most third-party tracking on mobile devices. Disabling it will make it substantially harder for advertisers and data brokers to track and profile you, prohibit advertisers from tracking what you do across every app you use, and will limit the amount of your personal information up for sale.
What to do
If preventing advertisers from tracking you is important, you can disable the advertising ID entirely on an iPhone:
- Open Settings > Privacy & Security > Tracking, and set the toggle for “Allow Apps to Request to Track” to off.
Apple also does some internal ad tracking of its own for some of its services, like the App Store and Apple News. You can also disable this:
- Open Settings > Privacy & Security > Apple Advertising, and disable “Personalized Ads.”
Finally, if you use the default web browser, Safari, you might consider turning off “Privacy Preserving Ad Measurement,” which sends limited information to websites and advertisers about whether an ad was seen or clicked on:
- Open Settings > Apps > Safari > Advanced, and disable “Privacy Preserving Ad Measurement.”
Decide How You Want to Handle Backups
Why
Device backups are an important way to protect your data in case you lose your phone or it breaks. Backups are also useful in cases where you intentionally wipe your phone, like when you get a new phone, or if you’re going into a situation where you do not want to carry any personal data. With an up-to-date backup, you can restore your phone with your personal settings and data without needing to manually redownload a bunch of apps and data. An iPhone (or iPad) handles this data in two ways: backing up and syncing. A device backup can be stored either on your personal computer or on Apple’s iCloud. Synced data is stored on Apple’s iCloud.
An iPhoned device backup includes information like app settings and data, device settings, and home screen layout. Backups may also include photos or messages, (depending on if you use Apple’s syncing services, iCloud Photos or Messages in iCloud). If you turn on iCloud Photos or Messages in iCloud, your photos and messages will not be included in your backup (because they are instead synced and stored in iCloud). If you never enabled those services, then your messages and photos will be in your backup.
It’s easy to get confused about which data is included in a backup and which data is saved or synced to iCloud. For example, you can choose to sync and store your Health app data in iCloud, but the only information from the Health app included in the backup is your Medical ID.
As a general rule, if an app uses iCloud Drive to store and sync data between devices, that information is typically only stored in iCloud Drive and is not included in the backup (though other data might be stored in a backup, like app preferences). To learn more, check out Apple’s documentation.
Regardless of whether the information is stored in the backup or iCloud Drive, when you set up a new device (or reset your existing one) from that backup, all the data from both places will be accessible to you.
You have two options for where you want to store iPhone backups, each with their own trade-offs to consider: back up to iCloud or to your personal Mac or Windows computer.
Backing up to iCloud is free up to 5 GB of storage and happens automatically when the phone is locked, connected to power, and connected to WiFi. But many people will have more than 5 GB of data in their backup, so you may need to pay a monthly fee to use iCloud for backups. The backup is encrypted, but Apple has access to the keys to decrypt it, which means it can access your data and provide it to law enforcement if required to do so. If you choose to back up to iCloud, consider turning on Advanced Data Protection (more info below), which enables end-to-end encryption on your backups, making it so Apple cannot access them or most of your synced data.
Backing up to your Windows or Mac computer is free but depends on your computer’s available storage space. You can optionally encrypt these local backups with a passphrase . In order to backup to a computer, you’ll need to manually plug your phone into that computer each time you want to back it up, and if you lose access to your computer, you lose that backup forever.
What to do
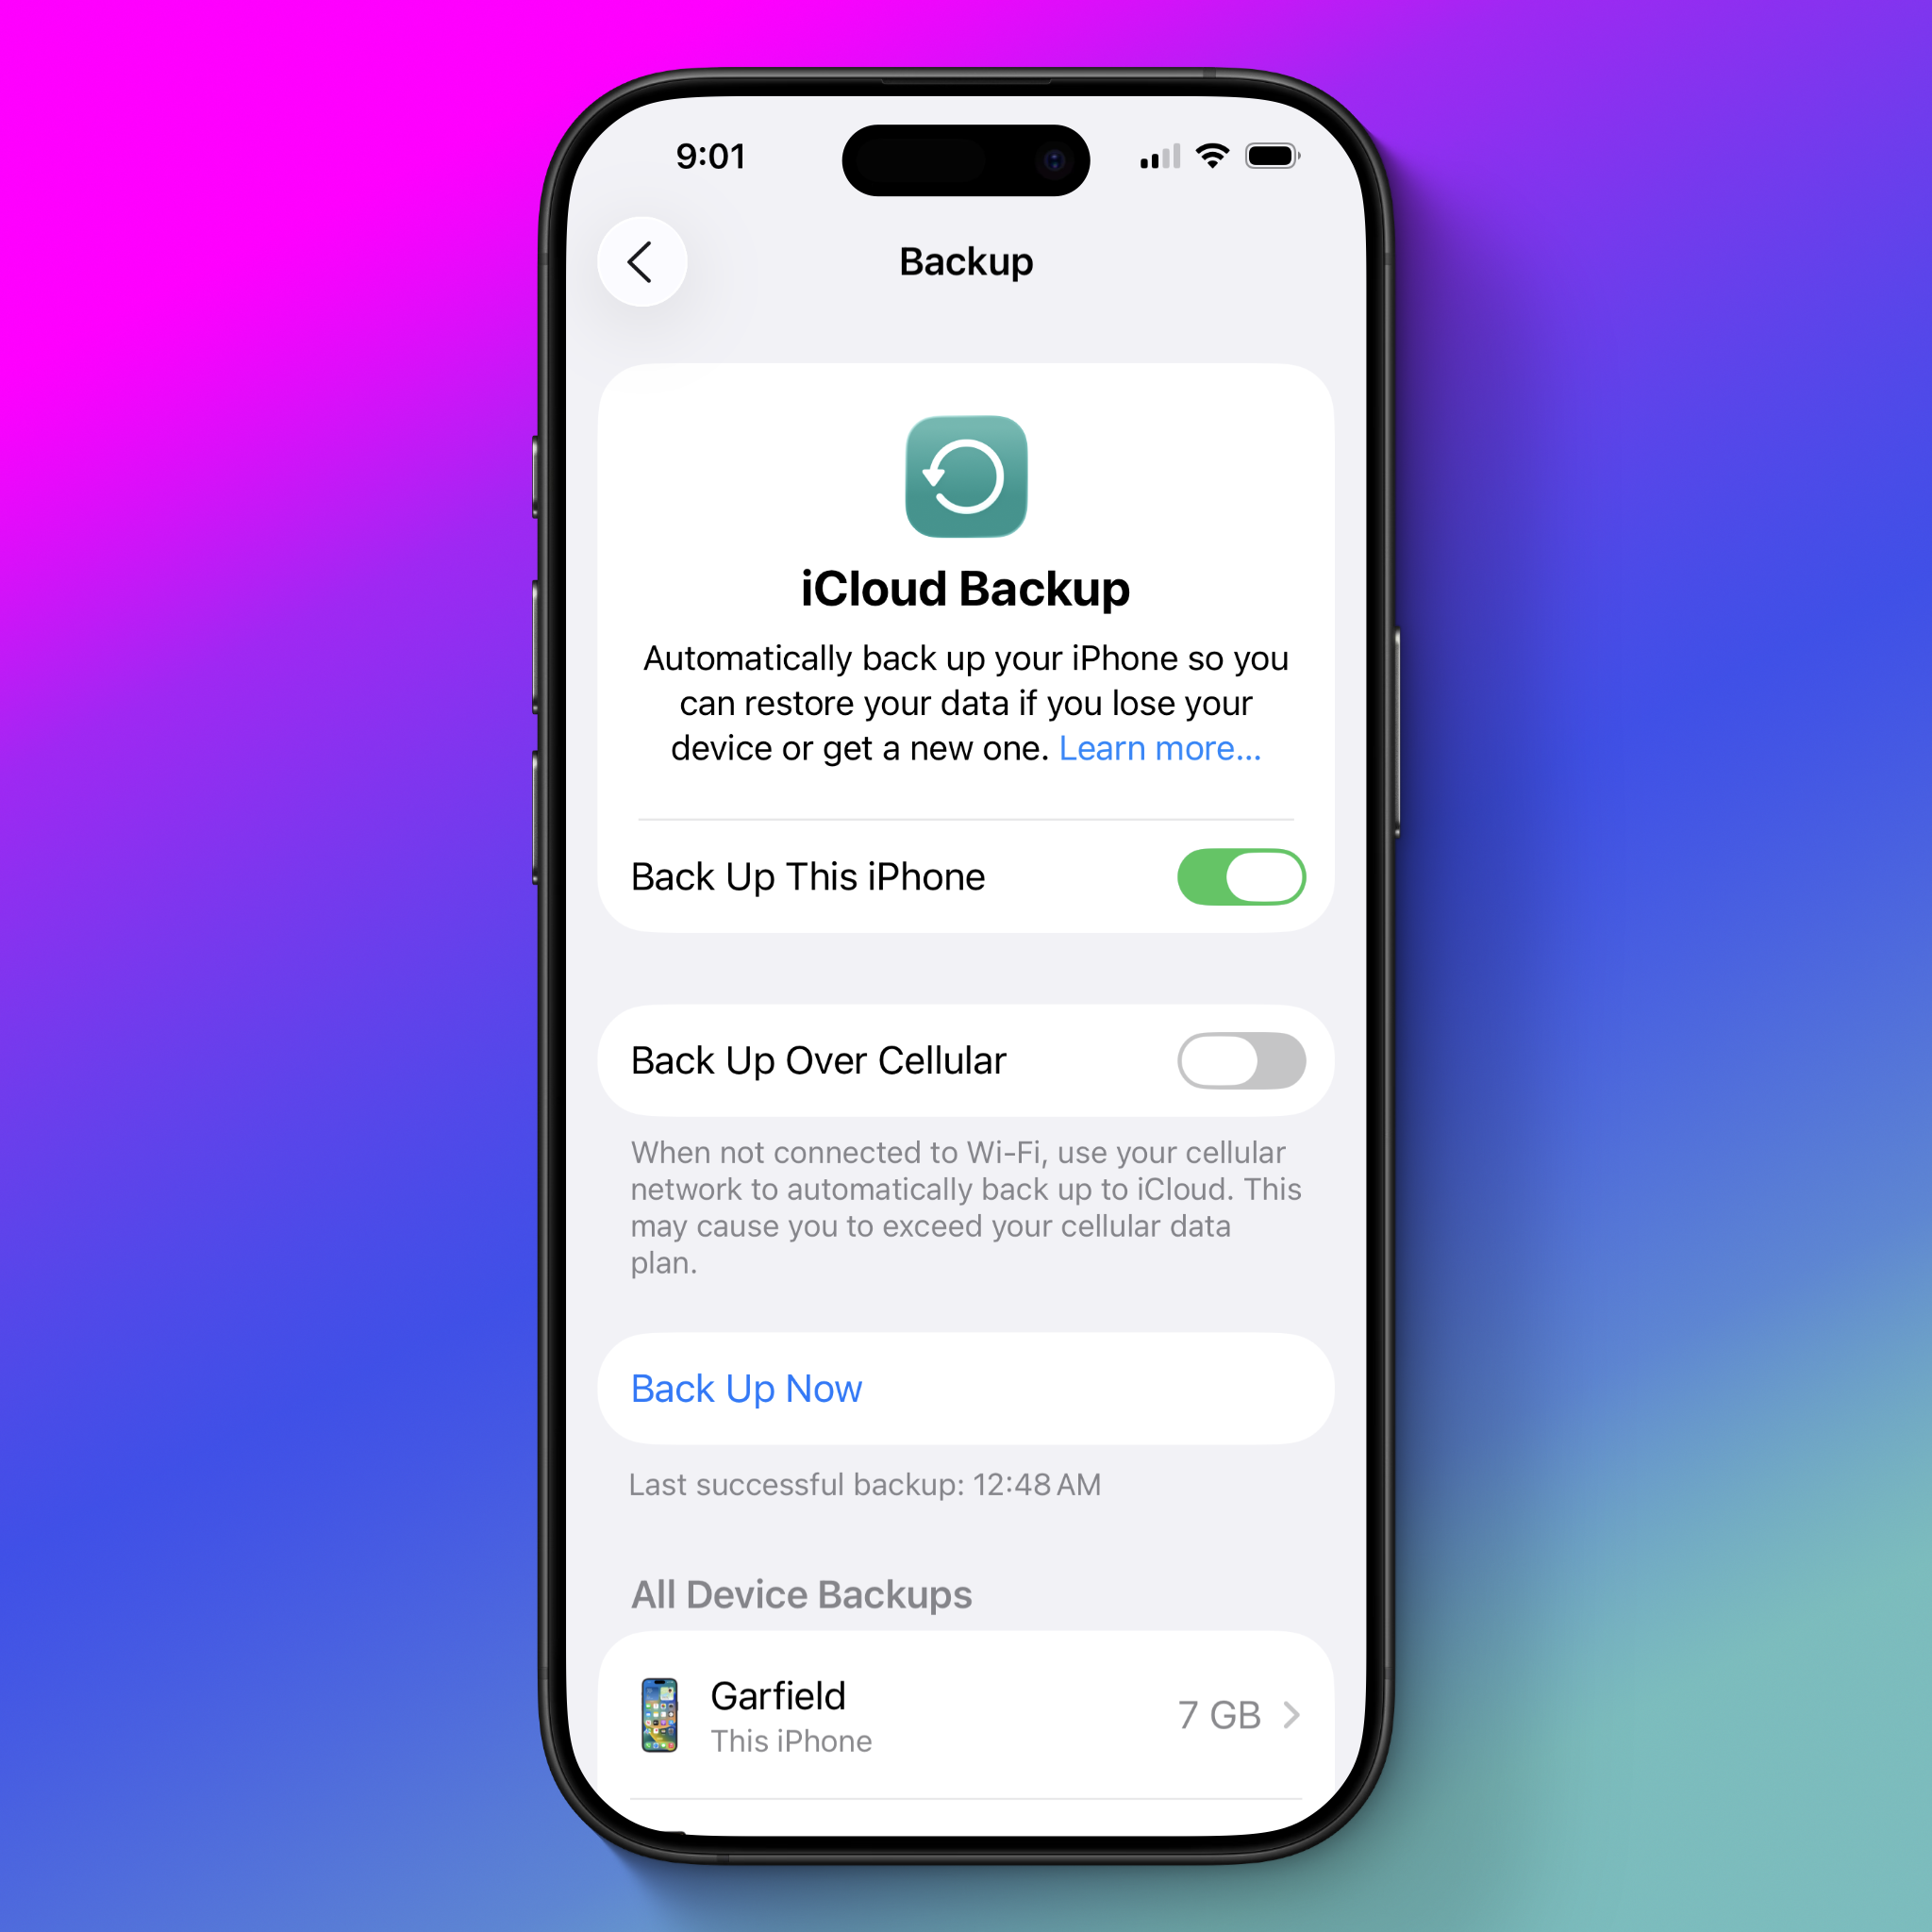
iCloud Backups are enabled by default on most iPhones. You should still check the status of yours to make sure it’s set up how you’d like:
- Open Settings > [your name] > iCloud > iCloud Backup.
- Enable the toggle for “Back Up This iPhone” if you want to back your phone to iCloud. You can tap “Back Up Now” if you need to do an immediate backup.
- If you tap your device name at the bottom of the iCloud Backup page, you’ll go to a screen that lists all the apps that back up data inside the iCloud Backup. These backups can include app settings or specific data, depending on the app. For details on what is backed up, consult the app developer. If there’s any app you do not want included in the backup, set the toggle to off.
If you’d prefer to back up your iPhone locally to your own computer, follow Apple’s directions for your device. Windows users will need to download new software, but it’s free to use. Mac users can use the built-in Finder app.
If you are selling or giving away an iPhone, or if you want to wipe it temporarily for any reason, follow Apple’s directions to complete a factory reset. To restore from the backup, just be sure to log into a phone with the same Apple account and follow the on-screen directions to restore the backup.
Set Up “Find My”
Why
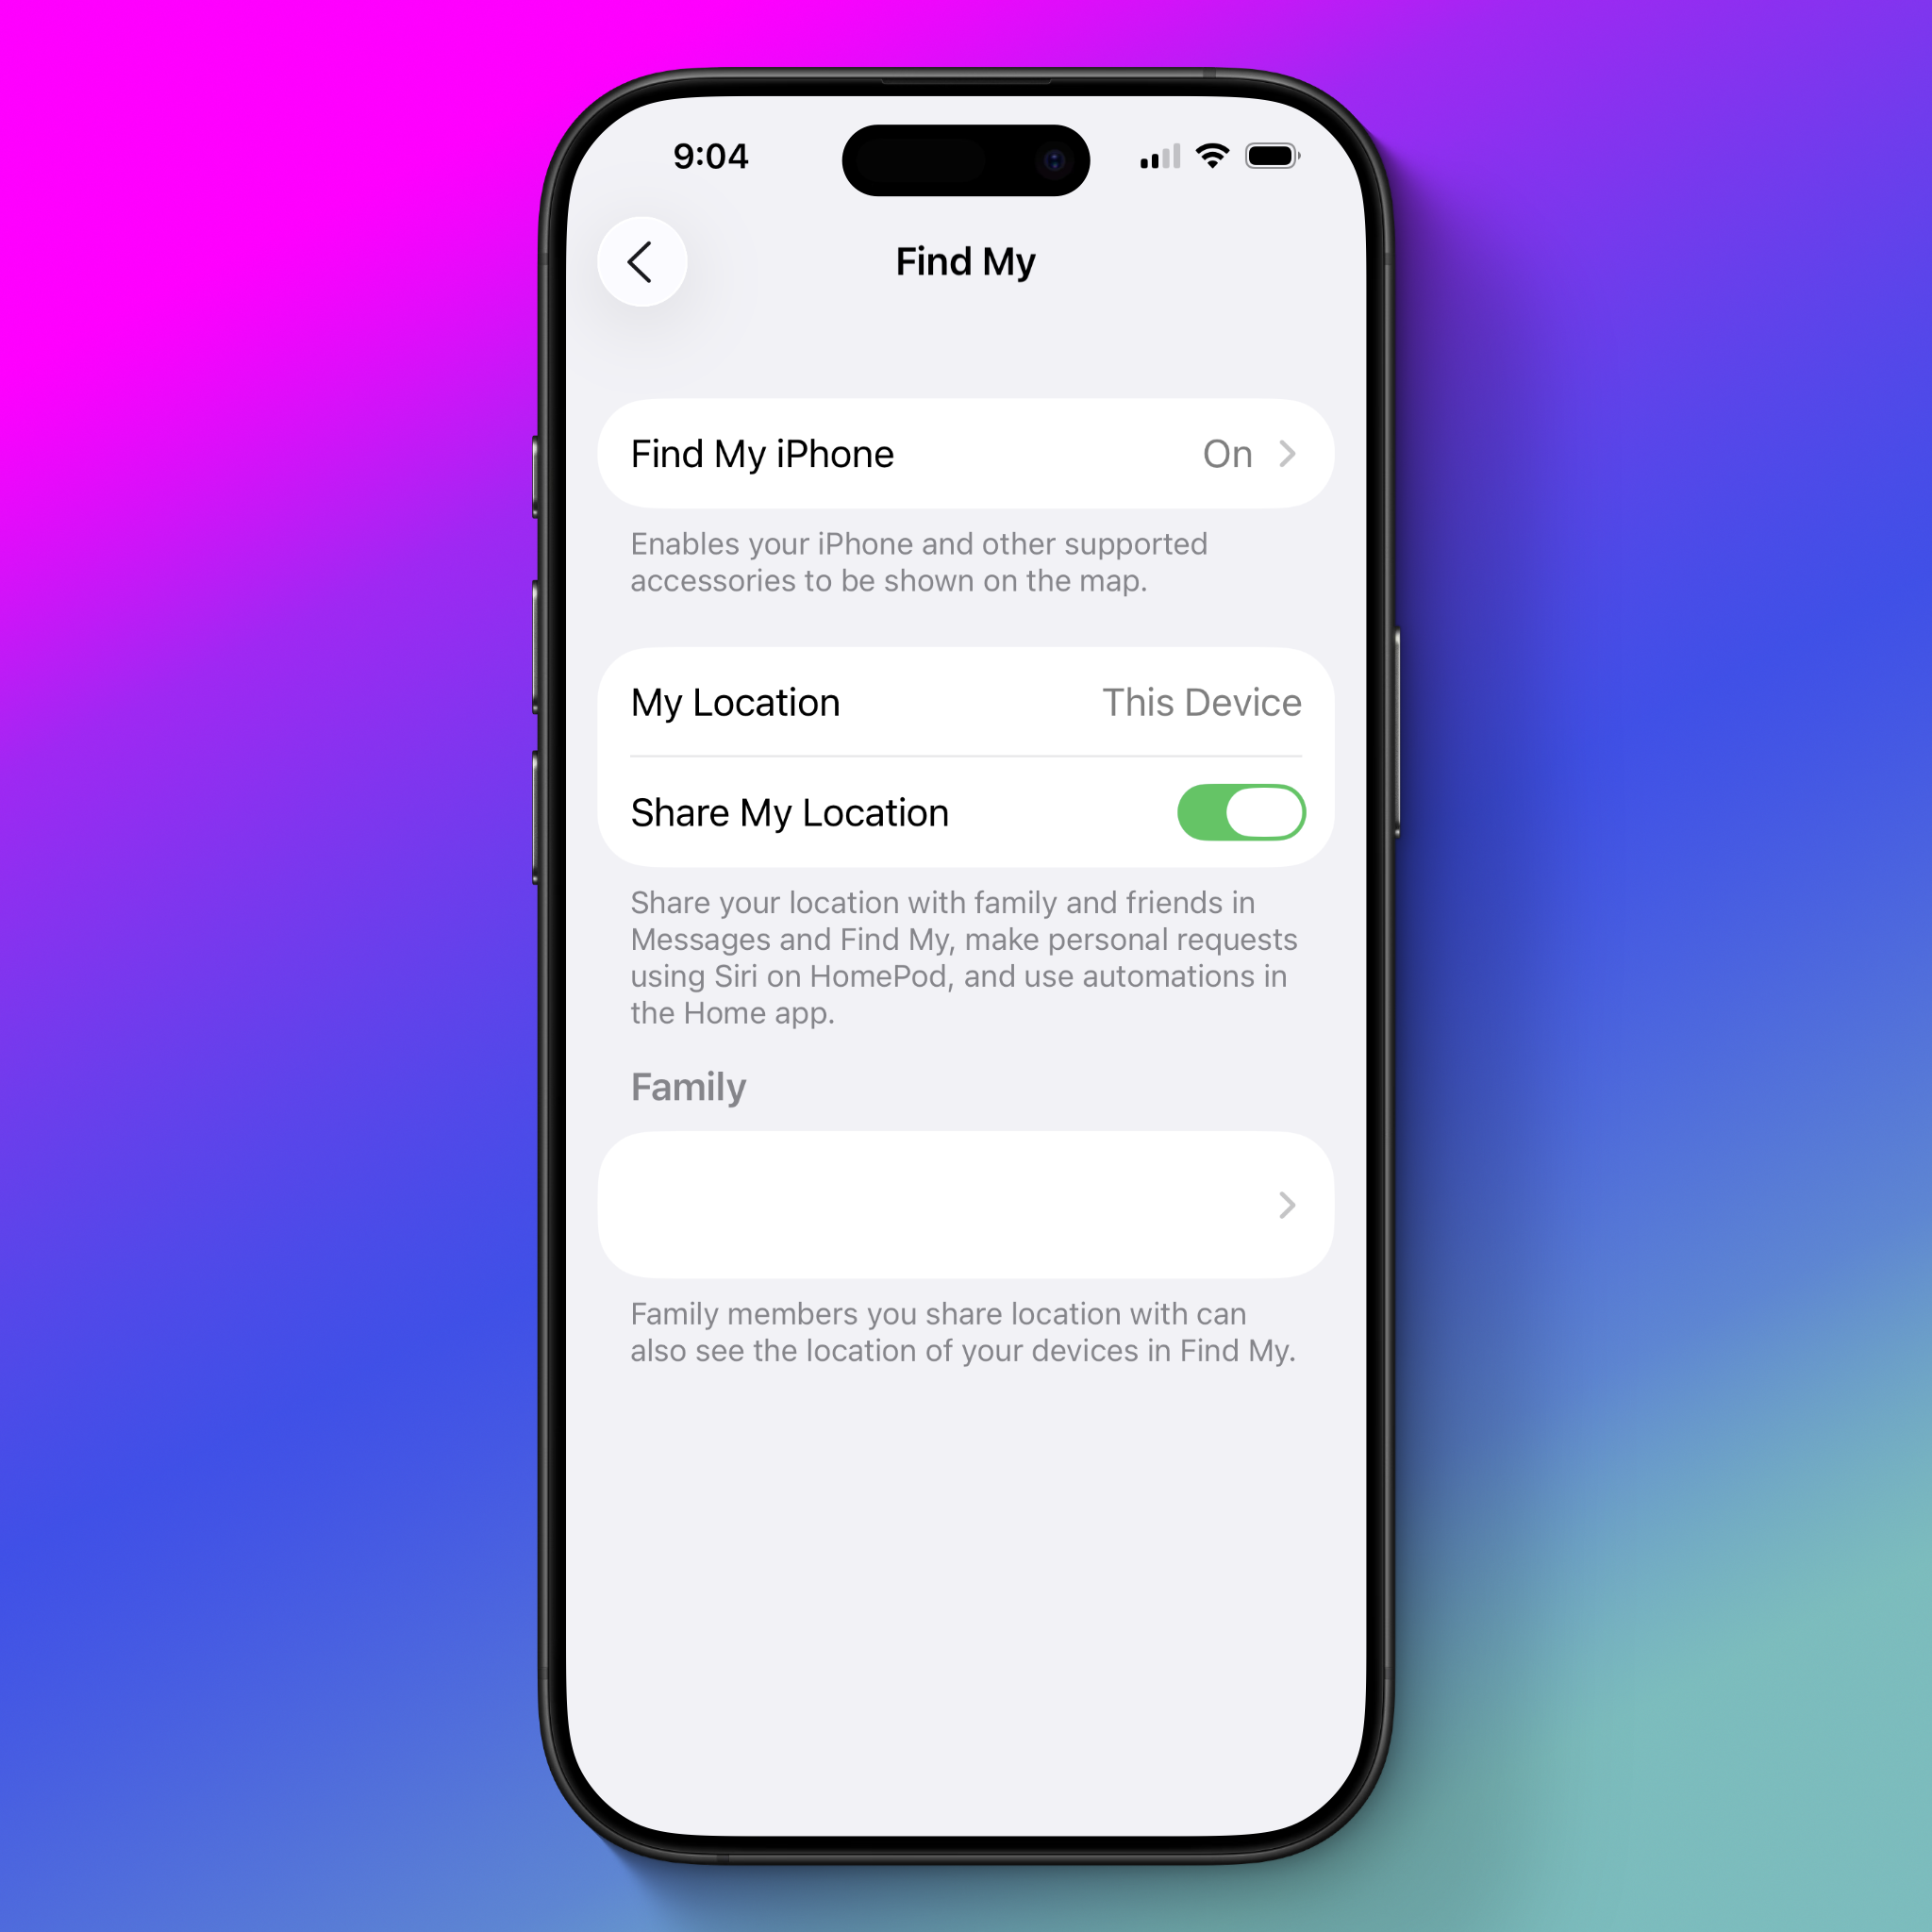
Find My is best known as a tool that allows you to see the location of your iPhone if you lose it or it’s stolen. This is helpful, but the security and privacy benefits of setting this up are more about the assumption you won’t get your phone back. If you think your phone is long gone, you can remotely wipe it and delete everything on it.
Once enabled, if you lose a device or it’s stolen, you can find it on a map, or more importantly, remotely wipe its contents. You can find directions for doing so here.
What to do
- Open Settings > [your name] > Find My, then enable “Find My iPhone.”
By its nature, Find My uses location information to find your phone. To do this, it uses a combination of Wi-Fi, cellular, and other nearby Apple devices with Bluetooth. Apple claims this information is end-to-end encrypted and private. There is always some risk with using any sort of location-based tracking that the information will leak or be used in a surprising way.
Enable Stolen Device Protection
Why
As the name suggests, Stolen Device Protection attempts to mitigate the damage from a thief getting their hands on your phone. It does this by requiring biometric authentication for some settings, and more importantly, putting a timer on making any major alterations to your accounts, like changing your Apple Account password.
Stolen Device Protection is designed specifically for situations where someone steals your phone and knows your passcode. This can happen if you’ve shared your passcode with someone, or if a person looks over your shoulder when you unlock your phone without you realizing it. With knowledge of your passcode, a thief can change important passwords, access bank accounts, and more. Most importantly, a thief can also change your Apple ID, which then makes it possible for them to disable Find My and sign you out of your Apple account on any other devices you might own, completely cutting you off from any sort of remote solutions you might have.
If you often use your phone in public spaces where someone might see you enter your passcode, particularly bars or restaurants, you should consider turning this feature on.
What to do
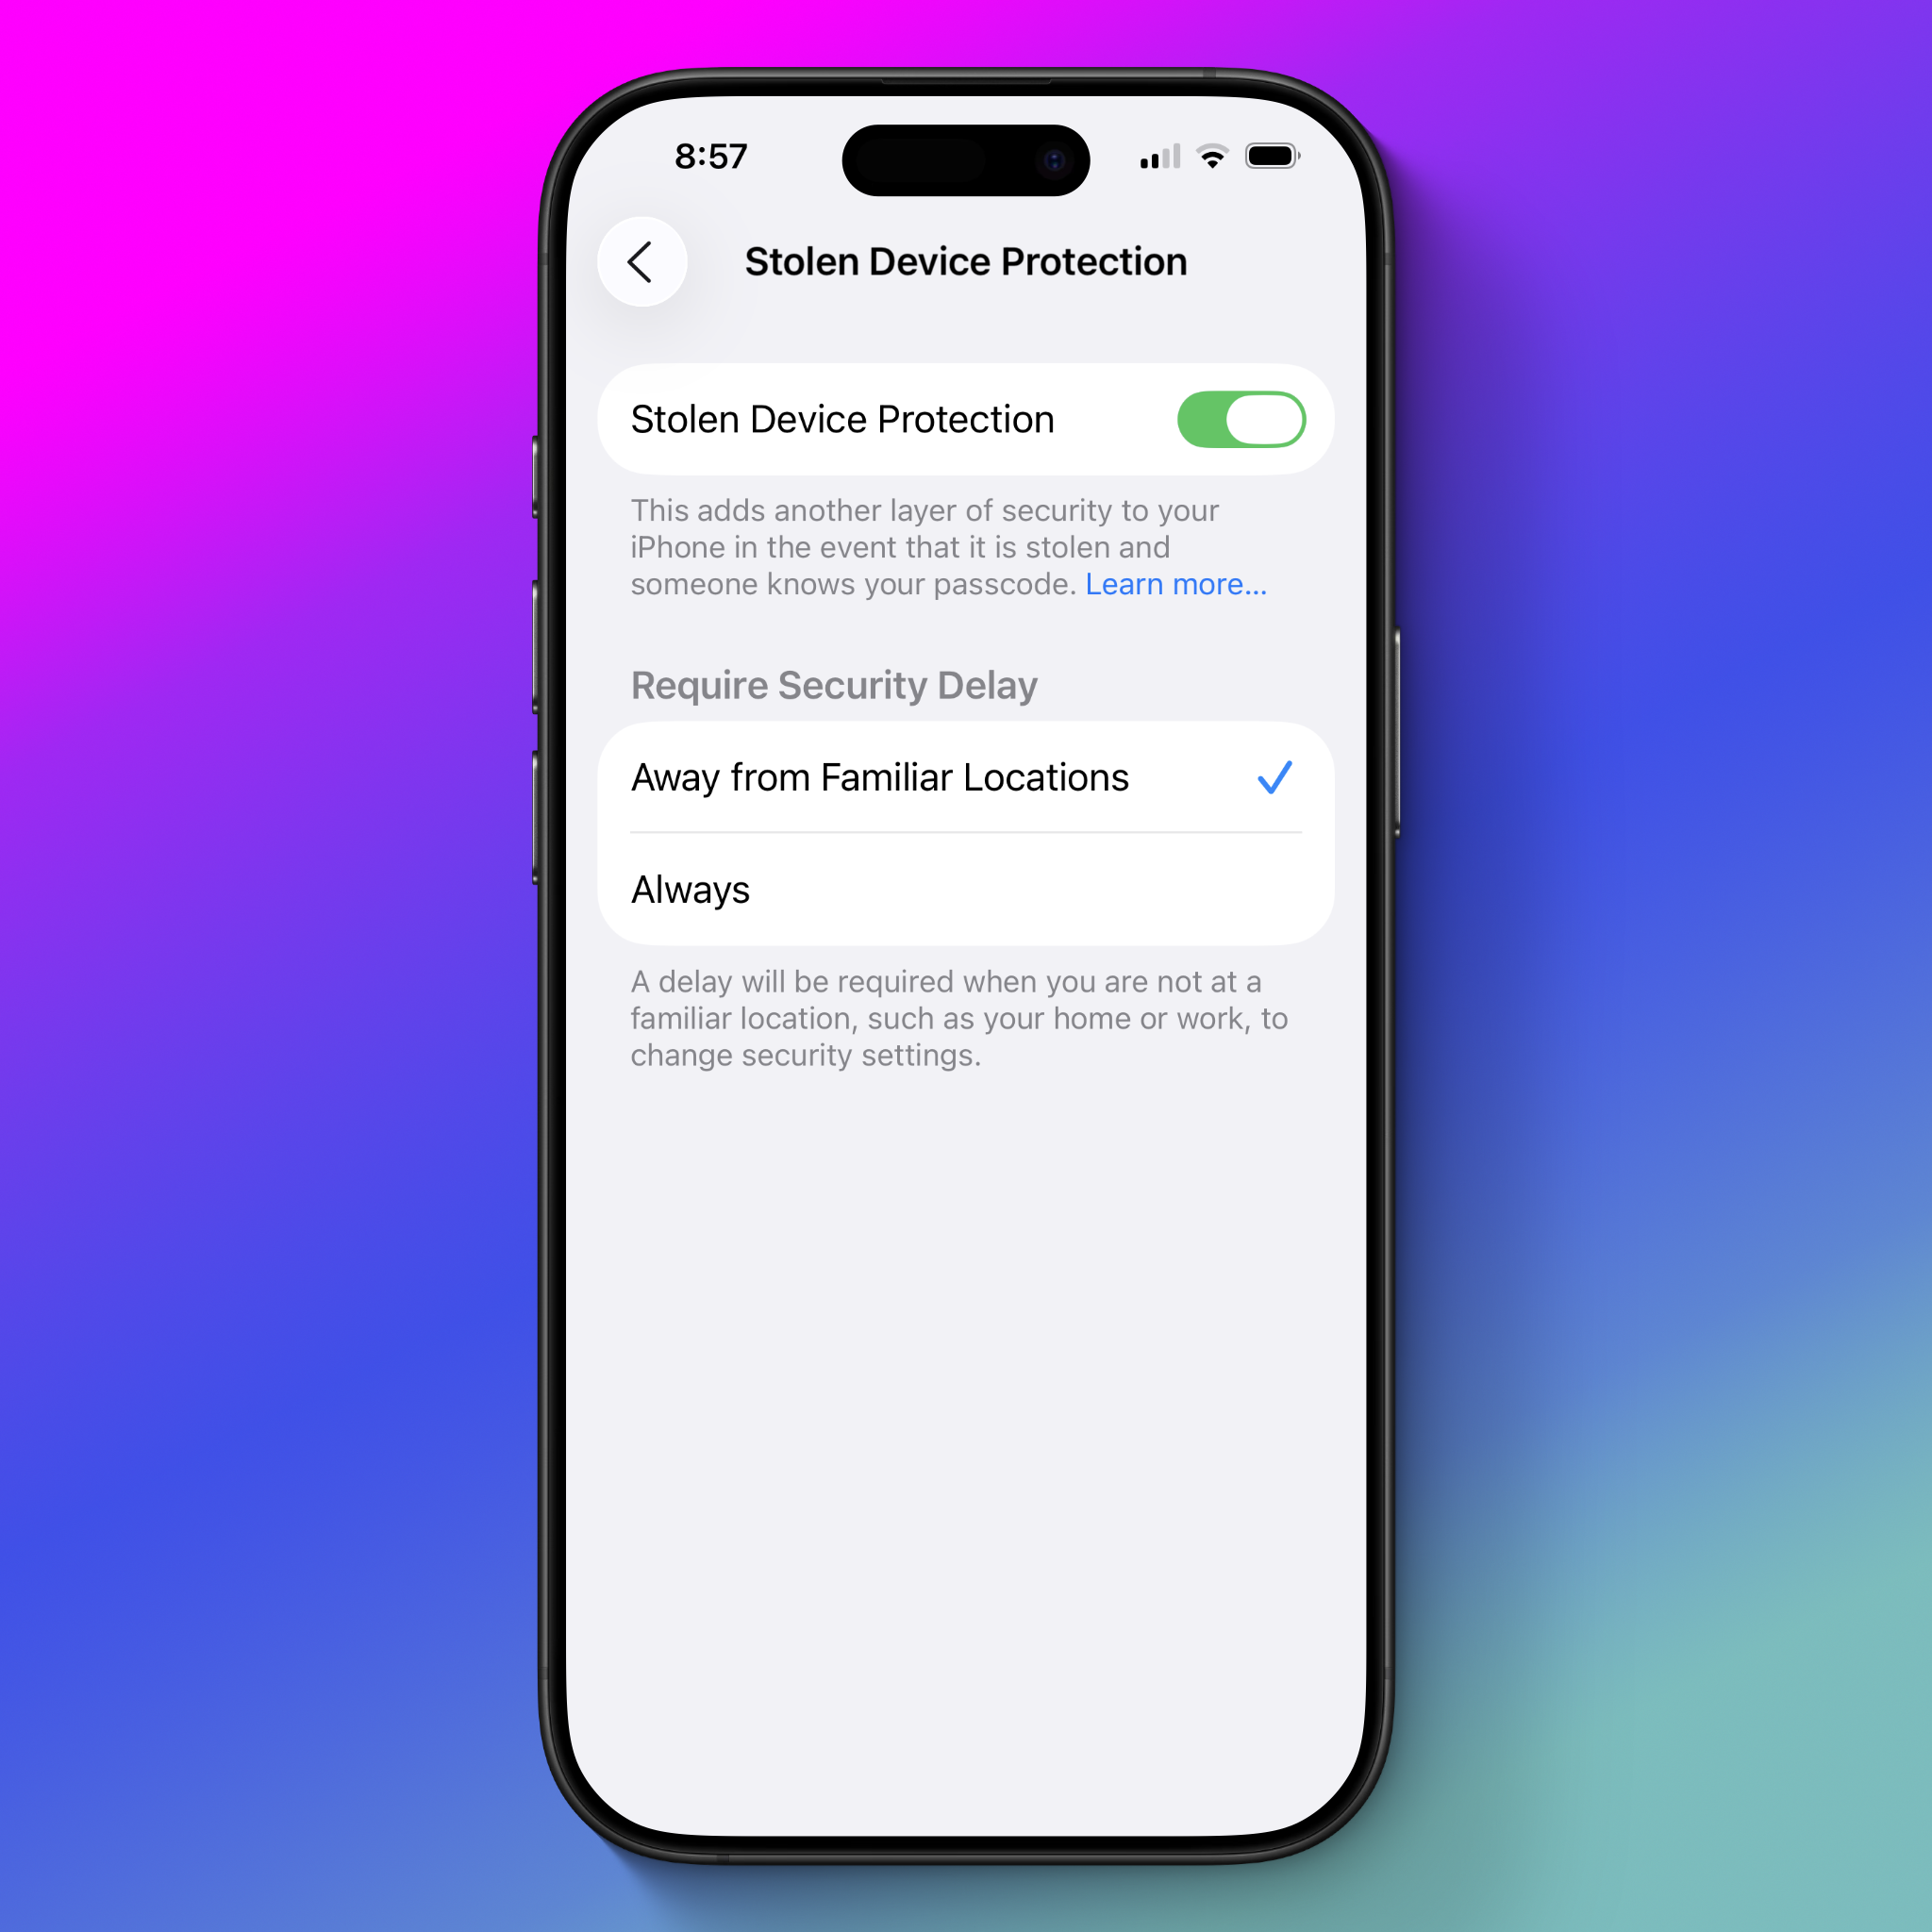
- Open Settings > Face (or Touch) ID & Passcode, and tap “Turn On Protection.”
- On the next screen, you’ll see two options underneath “Require Security Delay:” “Away from Familiar Locations,” and “Always.” With “Away from Familiar Locations” enabled, the Stolen Device Protection will not be enabled when you’re at any “Significant Location,” (if you turned off Significant Locations in the Location privacy section above, this won’t work).
Level 2: Additional Steps for Some Security Plans
With a strong set of basic security options out of the way, it’s time to dive a little deeper. These are settings or features that not everyone will need to change, but depending on your security plan, they may still be critical changes to make.
Enable Advanced Data Protection
Why
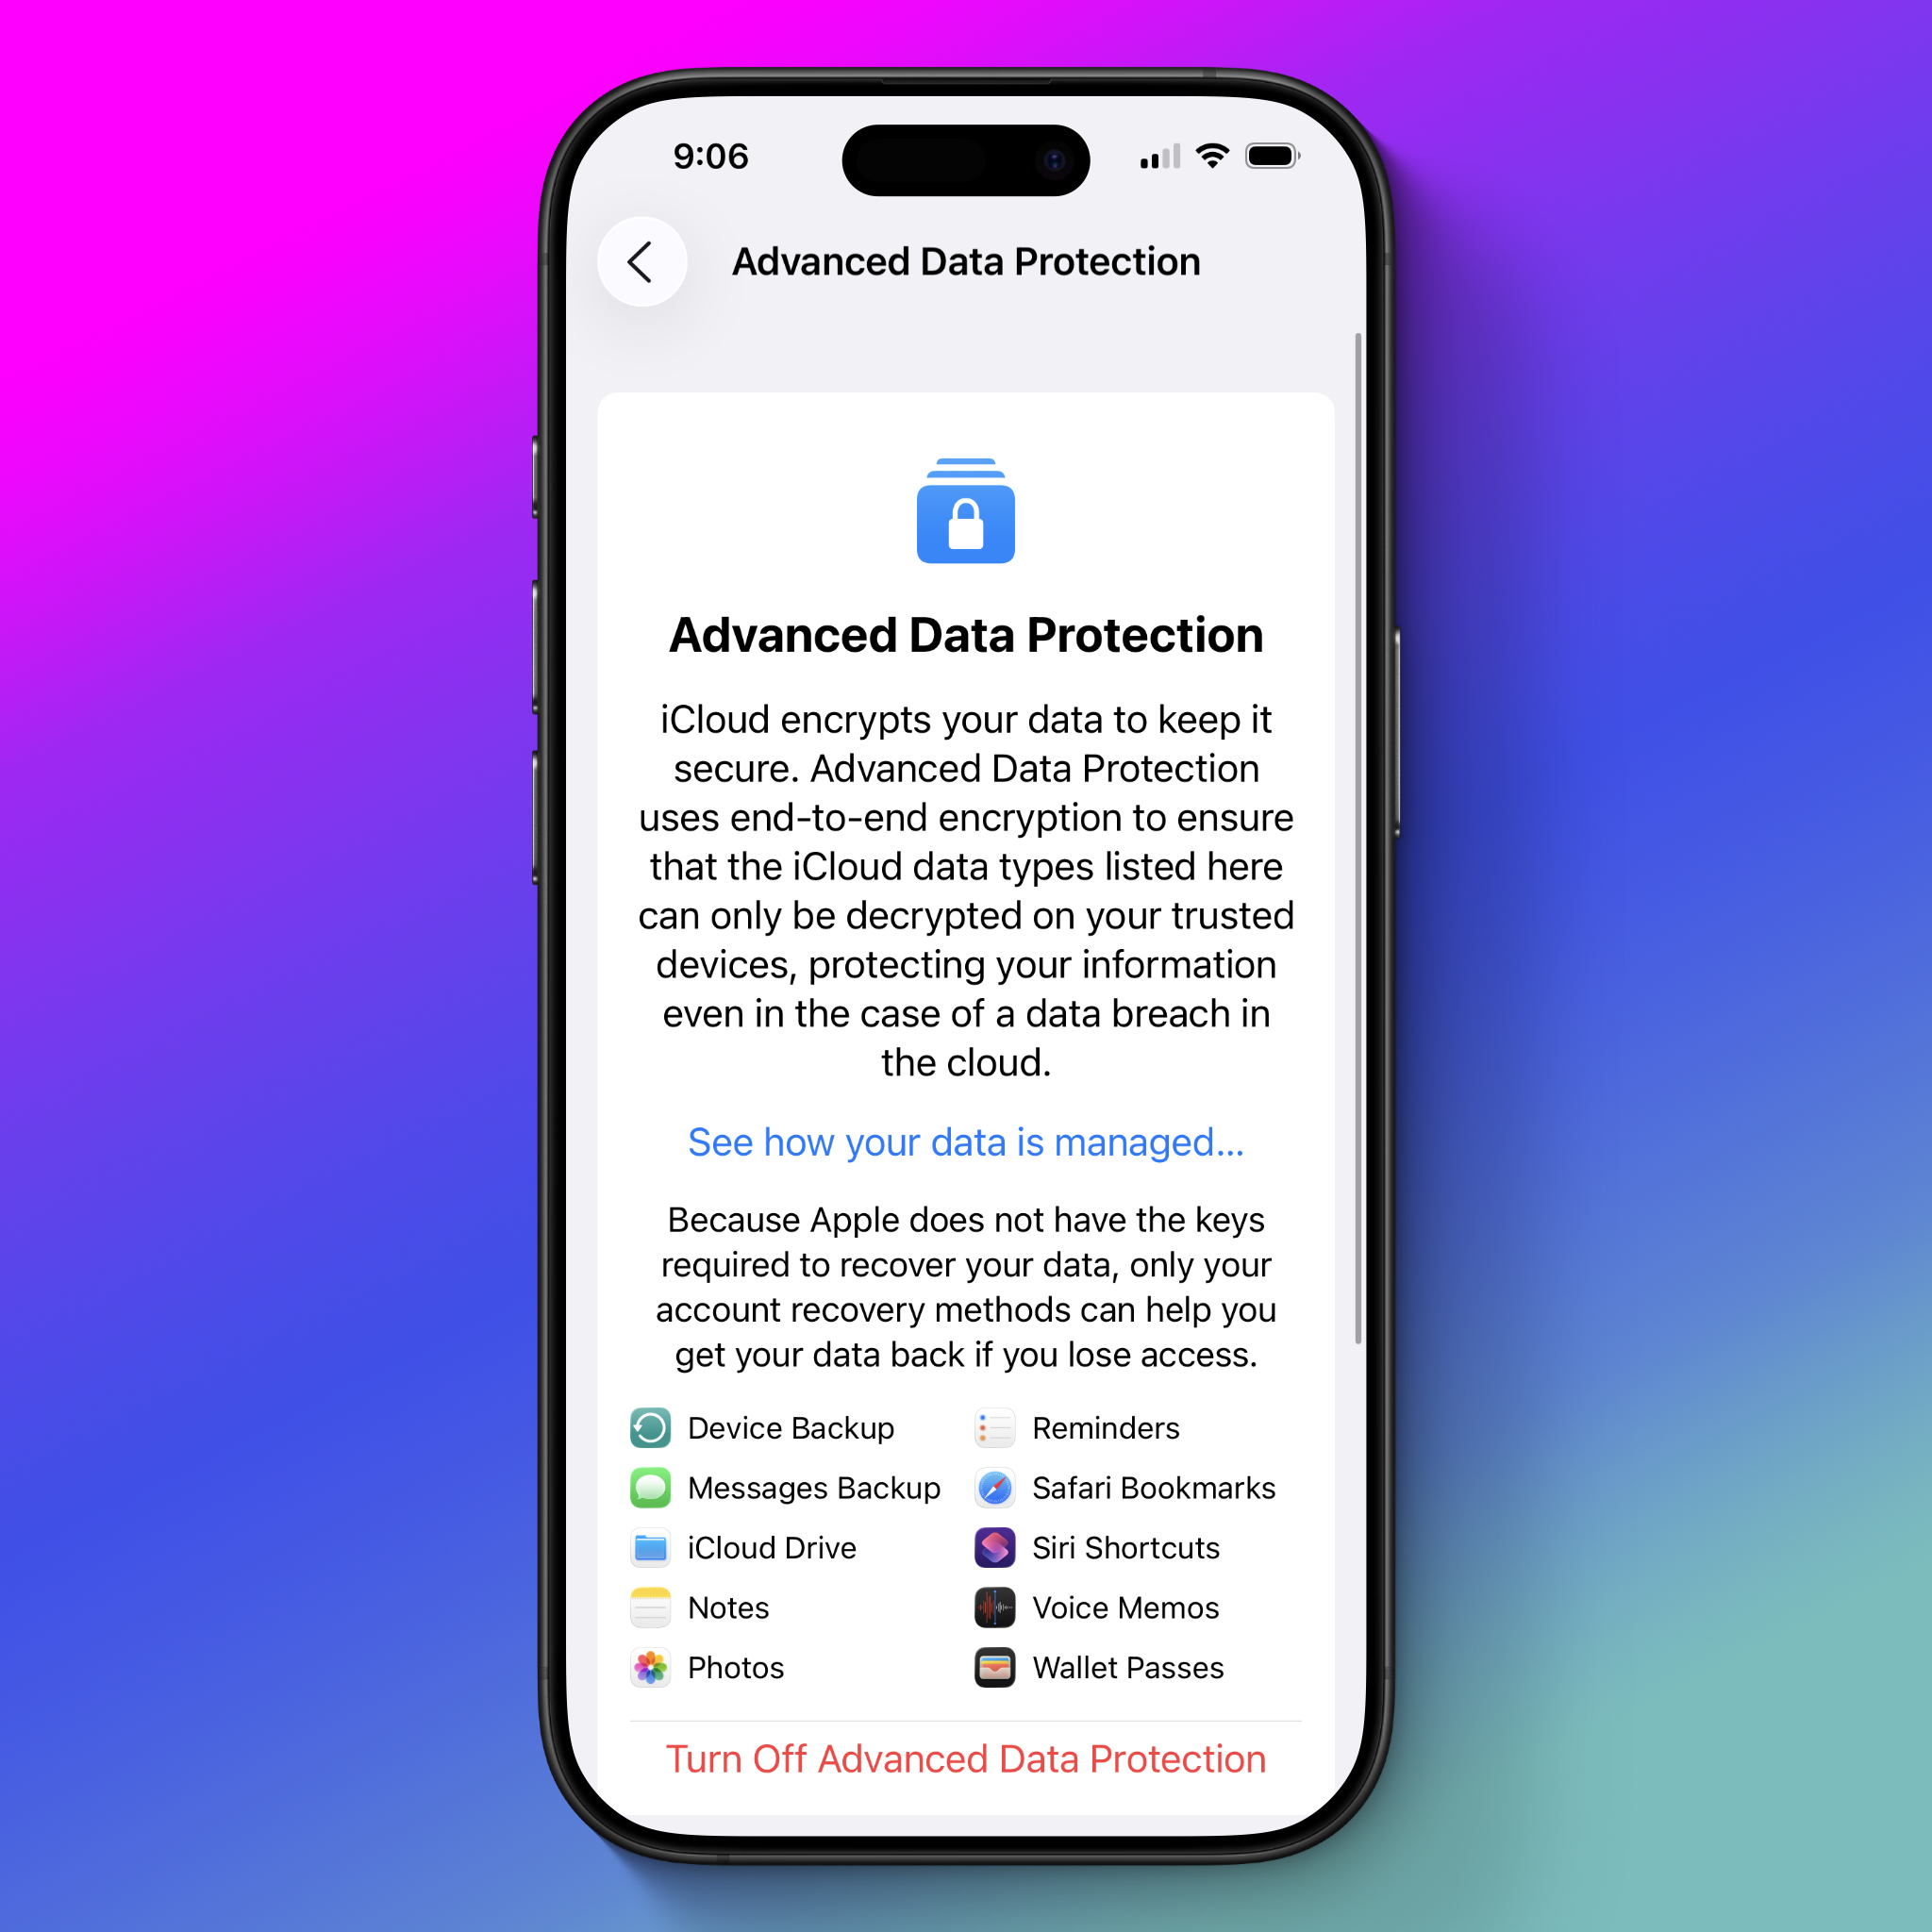
Advanced Data Protection enables end-to-end encryption of nearly everything associated with your Apple account. In other words, you can now control the encryption keys and Apple will not be able to access any of this data. It also means Apple may not be able to help you regain access to your account. Advanced Data Protection includes a lot of crucial information, including your iCloud backup (which includes the backup of Messages), iCloud Drive, photos, notes, reminders, and more detailed in the table below.
With Advanced Data Protection enabled, your backups and most important files get the end-to-end encryption benefit, better securing your files against mass surveillance, rogue Apple employees, or potential data leaks. The trade-off is that Apple cannot help you recover this data if you lose access to your account, or any devices where the keys are stored.
What to do
If you’re comfortable with the trade-offs, we have an in-depth guide to setting up Advanced Data Protection here.
Learn About Lockdown Mode
Why
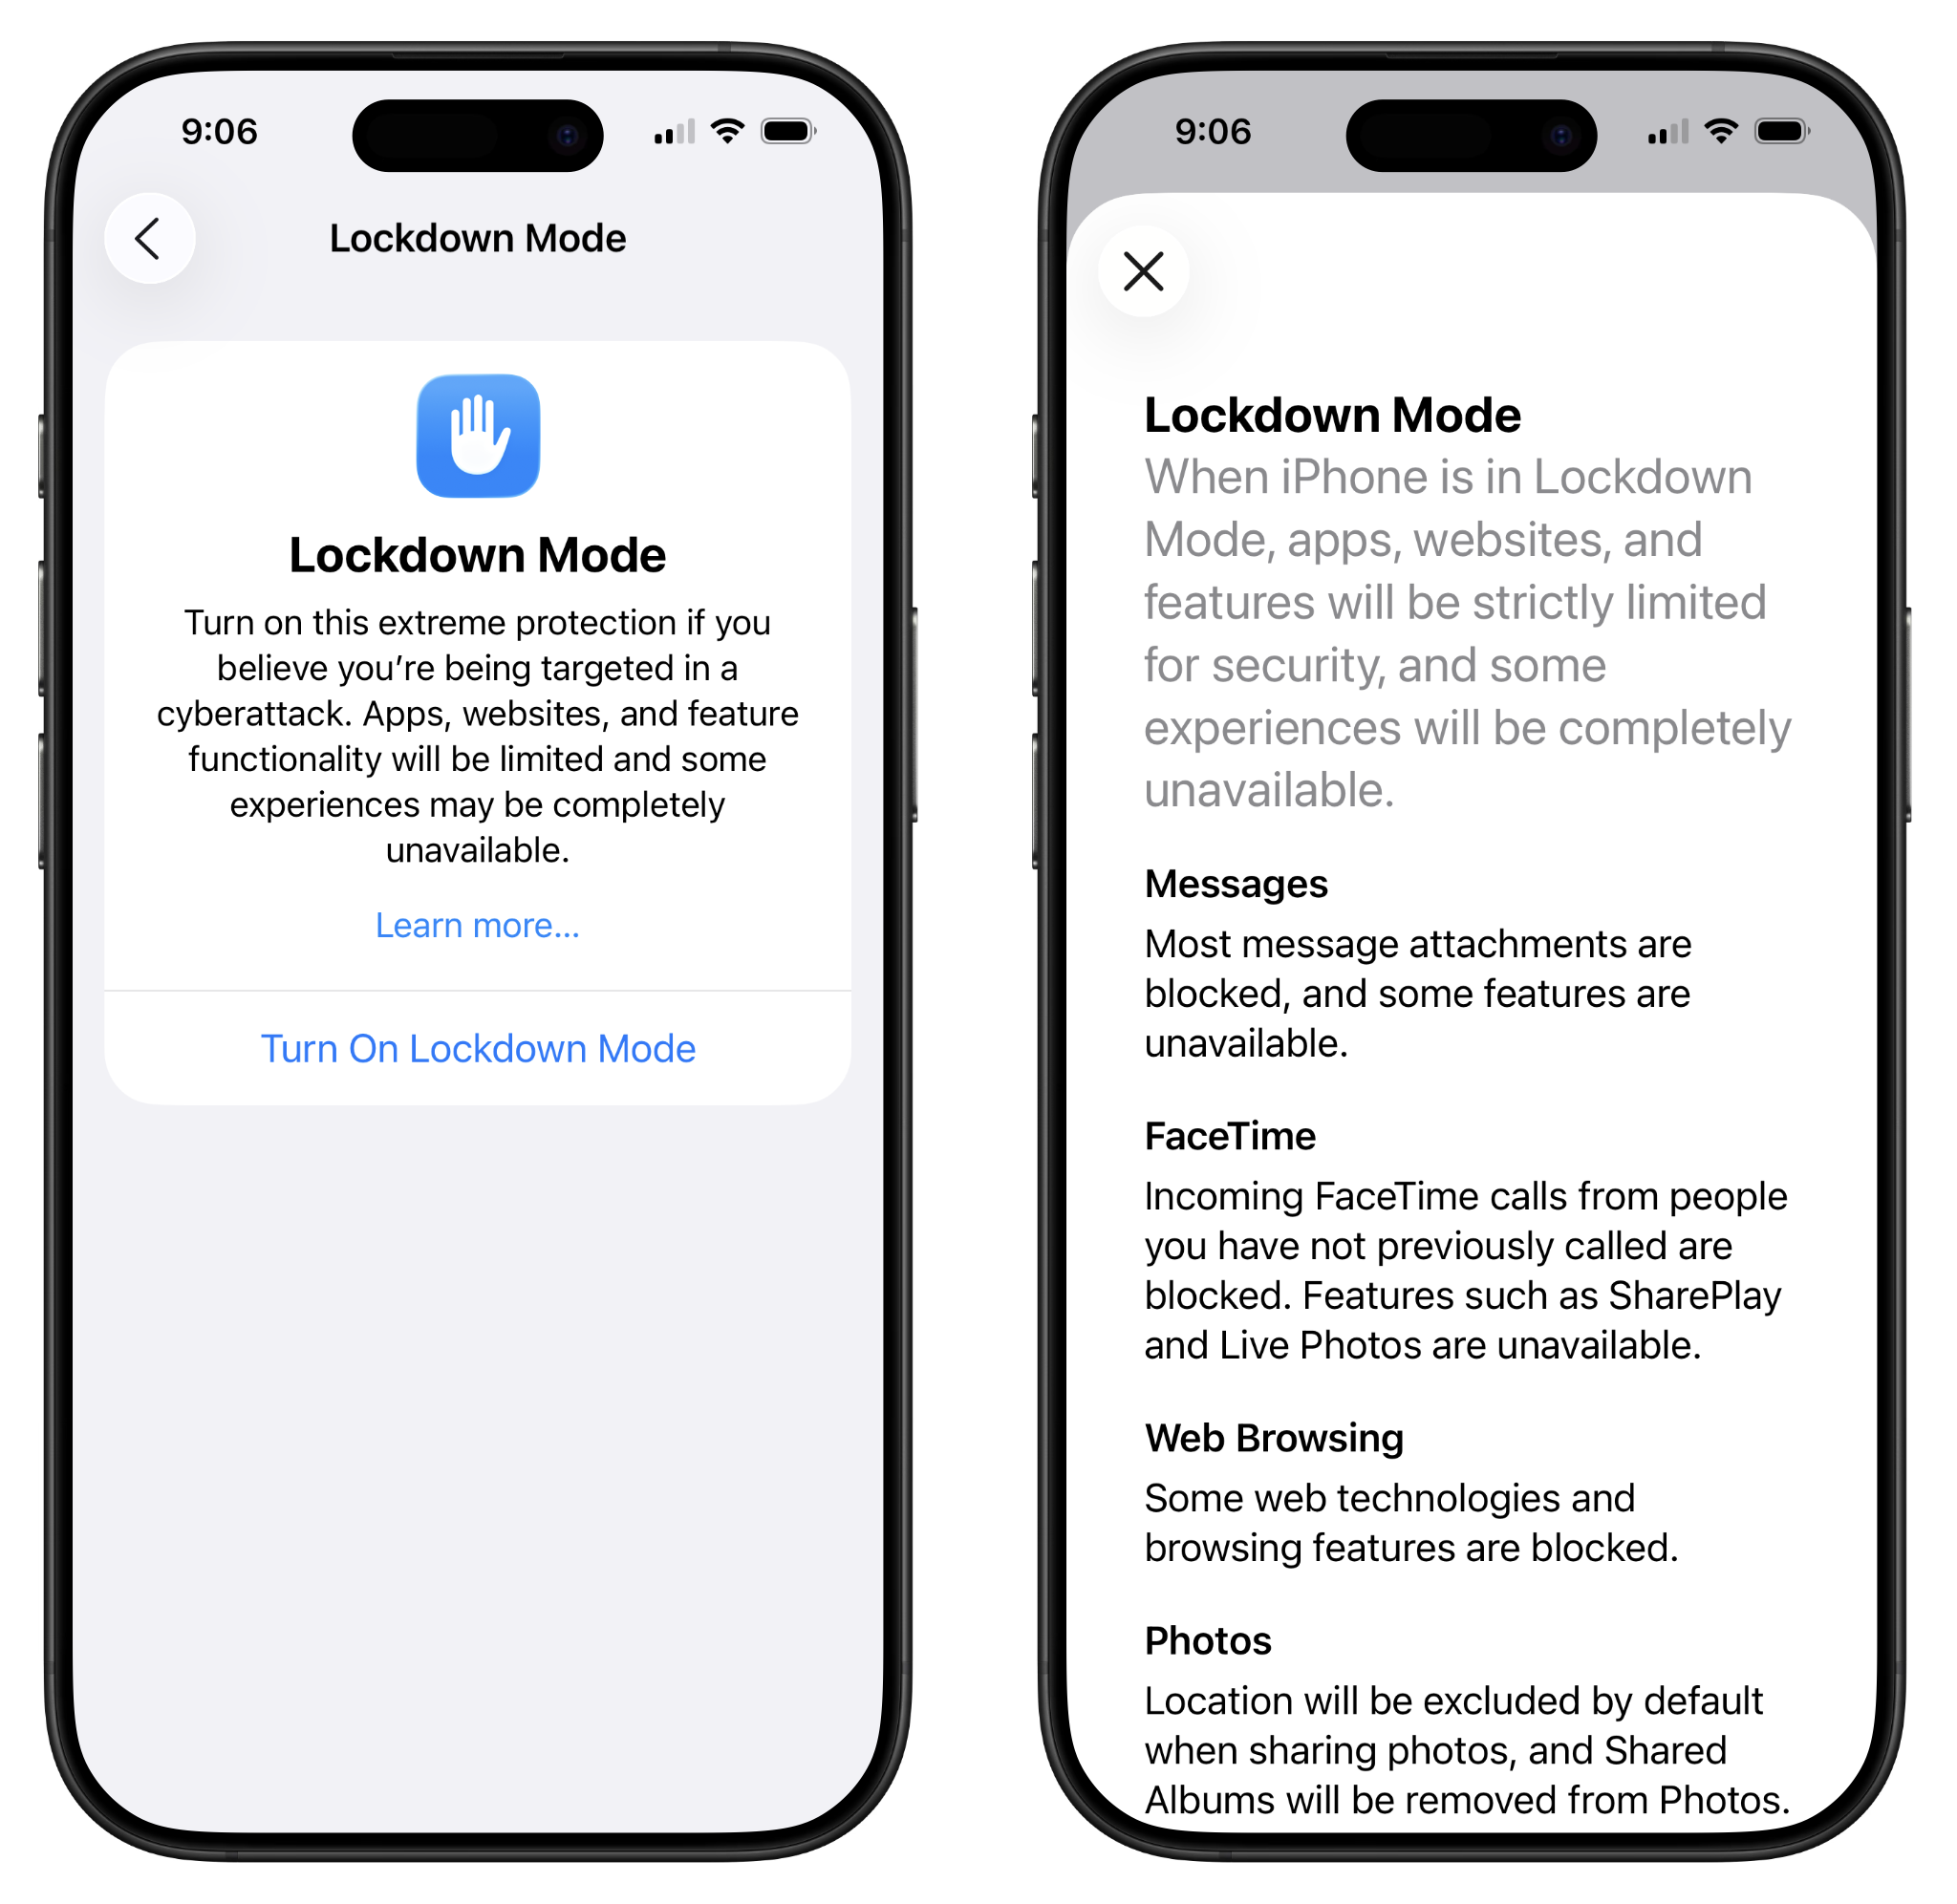
Lockdown Mode is an optional setting for iPhone, iPad, and Macs, designed to protect high risk people from specific types of digital threats. It’s available on any device that can run iOS 16, iPadOS 16, macOS 13, and newer.
When Lockdown Mode is enabled, your device loses a number of features often targeted by certain types of spyware or other malicious programs. For example, many attachments are blocked in the Messages app, your location is stripped from any photos you share, and incoming FaceTime calls from anyone not in your contacts are blocked.
Not everyone needs to use Lockdown Mode, and even if you would benefit, you may not need to have it turned on all the time.
What to do
We have a detailed guide for Lockdown Mode that can help you decide if and when to use it.
Run Through the “Safety Check”
Why
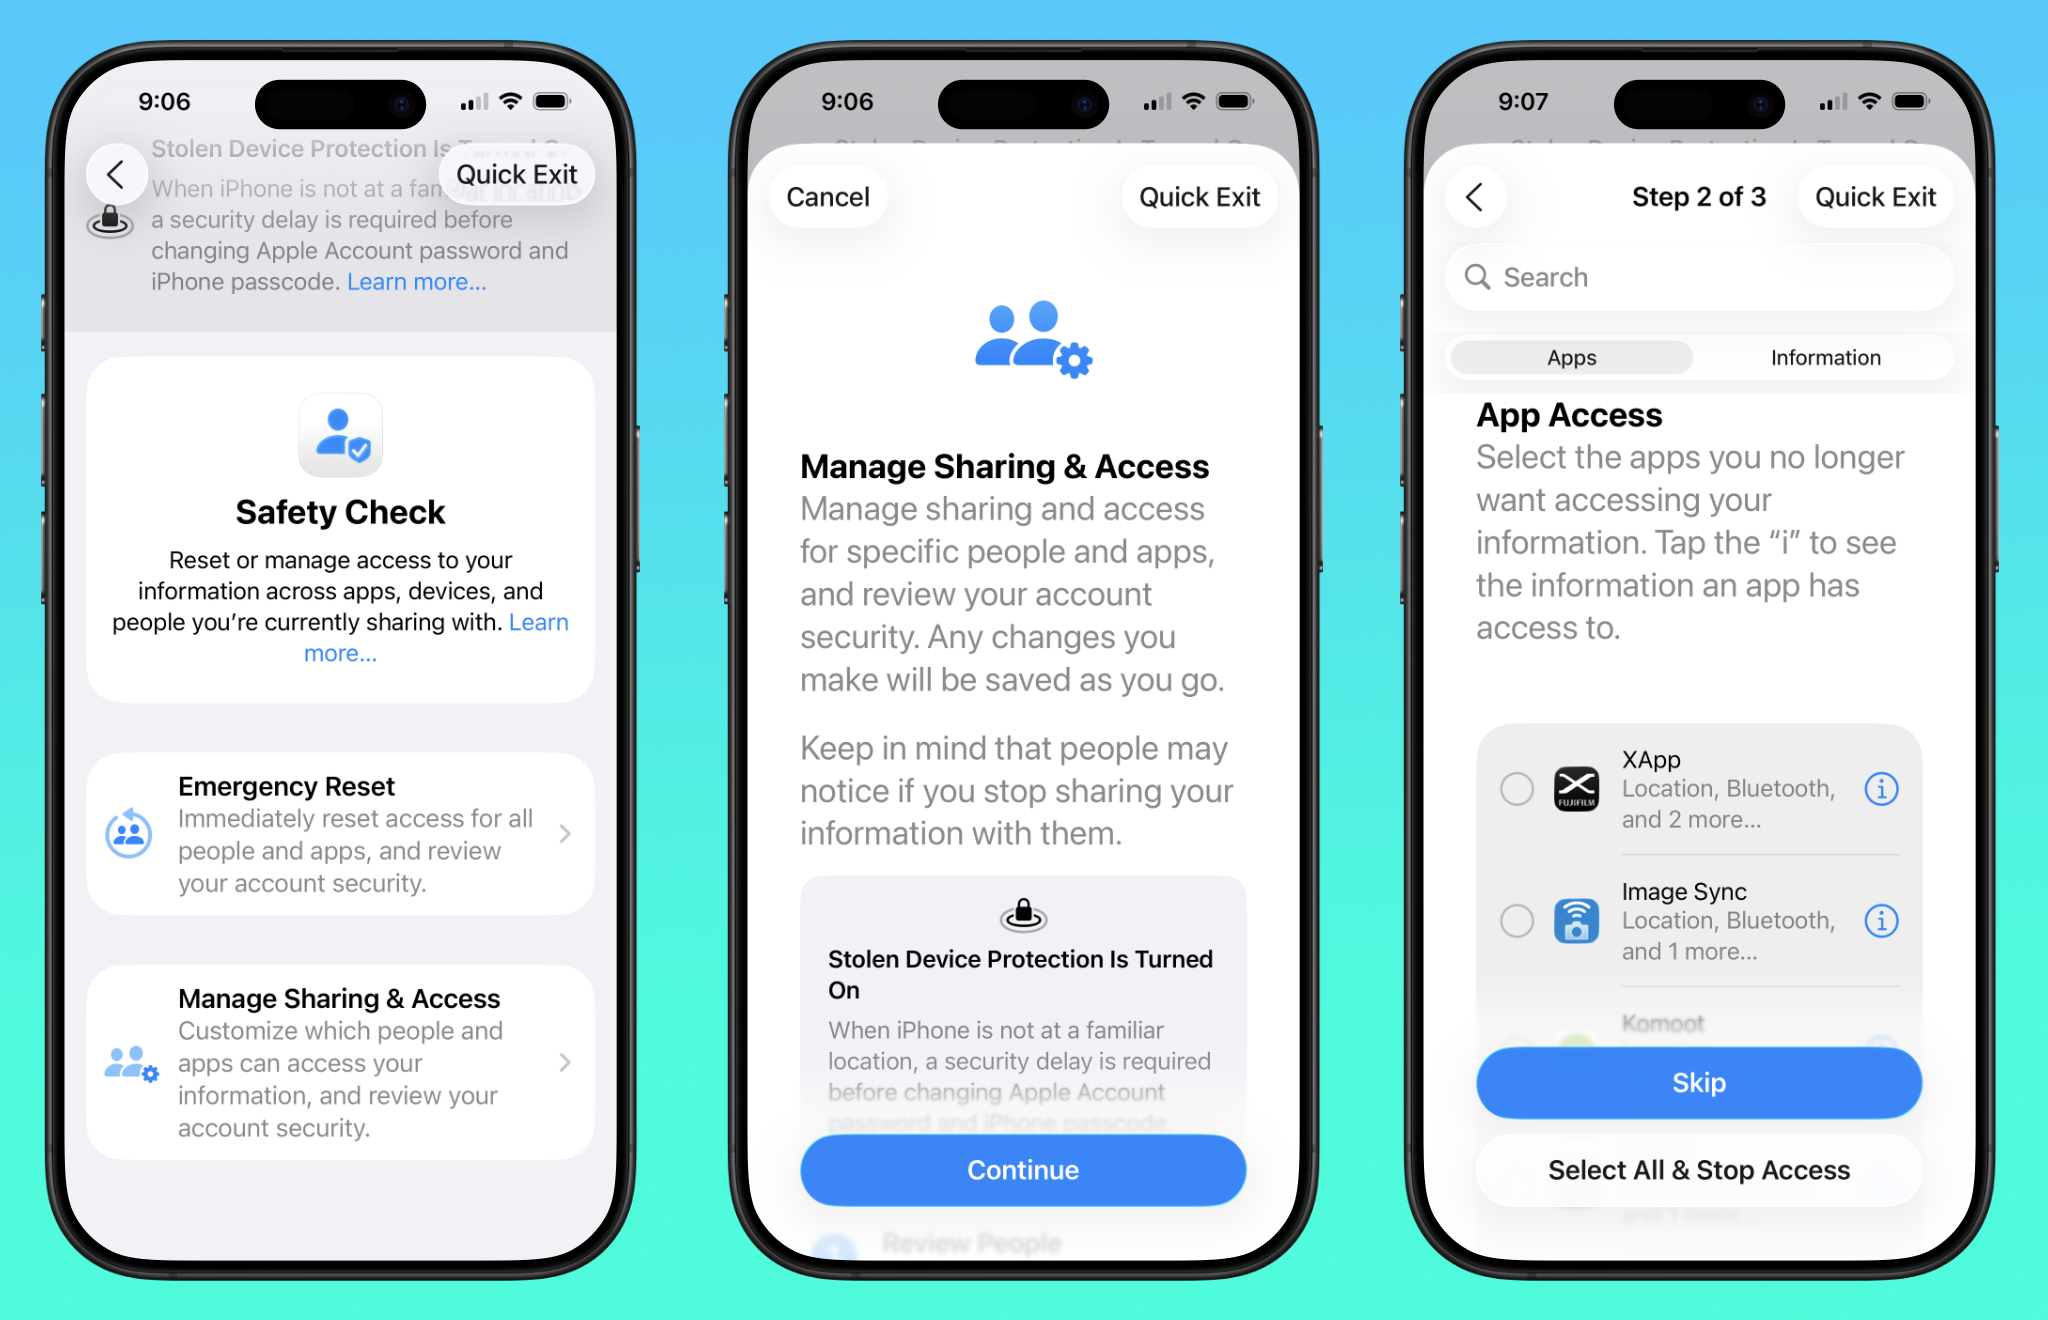
Safety Check is a guided tour to help you review: who you’re sharing information with, Messages and FaceTime restrictions, privacy permissions for apps, and more. It is designed around guiding people through the most crucial information to cut off when they’re personal safety is at risk, but it also applies more broadly to anyone who has shared accounts or information with family or friends.
If your personal safety is at risk, if you’ve separated from a partner who you once shared Apple accounts with, or if you would like a single place to review who you have shared data with, then it’s worth running through Safety Check.
What to do
- Open Settings > Privacy & Security > Safety Check.
- You’ll be shown two options:
- Emergency reset: This option will stop sharing everything—including information with other people and permissions in apps—immediately.
- Manage Sharing & Access: This option will guide you through a three step process where you’ll individually review data shared with other people, app access to data, and other information, like emergency contacts. It will also ask if you’d like to reset your PIN and account password.
- Follow the on-screen directions for whichever option you choose. When completed, you’ll get a screen that says “Safety Check Complete” with a handful of additional tips to secure your phone.
If you need to exit Safety Check at any point in the process, tap the “Quick Exit,” button in the top right and you’ll be sent back to the home screen. Any progress you’ve made will be saved.
If you stop sharing information with someone, including your location, they may notice that you’ve made the change.
Level 3: Extra Credit
iPhones are packed with dozens of menus with a variety of options. Not all of them are useful for everyone. For example, if you frequently share your screen, you may not want links that have been shared with you in text messages appearing on Safari’s new windows. If you don’t share your screen, then this isn’t likely a concern.
Here are settings to consider changing, depending on your needs:
Mail Privacy Protection
If you use the Apple Mail app, Mail Privacy Protection hides your IP address from senders and disables the ability for senders to see that you’ve opened an email. This can help protect against some types of email tracking.
- Open Settings > Apps > Mail > Privacy Protection, and turn on “Protect Mail Activity.”
Tweak Safari Settings
If you use Safari as your main web browser, there are a number of somewhat hidden settings you can change to increase your privacy and block more trackers, though they come at the cost of making some websites not render correctly:
- Open Settings > Apps > Safari. Here, you can change your default search engine to something less privacy-invasive than Google. If you scroll down, you’ll also see options that may be worth turning on: “Prevent Cross-Site Tracking,” “Hide IP Address,” “Required Face (or Touch) ID to Unlock Private Browsing.”
- You can go one layer deeper by heading into Settings > Apps > Safari > Advanced. Here, some options to consider changing are setting “Advanced Tracking and Fingerprinting Protection” to “All Browsing,” which turns on the tracking prevention techniques used in Private Browsing all the time.
Lock and Hide Apps
If you frequently share your phone with someone else, consider adding a biometric lock requirement for certain apps. Tap and hold on an app icon, and you’ll get a menu with the option to “Require Face (or Touch) ID.” Tap this, then “require Face (or Touch) ID,” or “Hide and Require Face ID,” if you want to also hide the app from your homescreen. With the hide feature, your app will be hidden away inside a hidden folder on the App Library screen. Requiring Face (or Touch) ID also disables notification previews for the app, and prevents anything in the app from showing up in Spotlight search.
Lock and Hide Photos
Just like apps, you can also hide photos. Doing so makes it so they will not appear in your photo library, which can decrease the chances of revealing any embarrassing photos. Open the Photos app, then tap and hold on a photo. Tap the “Hide” option, then “Hide Photo.” By default, this hidden folder should already require Face (or Touch) ID to unlock, but if you turned this feature off, you can change it by heading into Settings > Apps > Photos, and enabling “Use Face ID.”
Keep Apple Notes on Device
If you have some notes you do not want to ever leave your phone, there’s a way to lock those down. Open Settings > Apps > Notes, then check the option for “”On My iPhone” Account. Then, open the Apple Notes app and scroll down to the bottom and you’ll see a “On My iPhone,” section. Any notes here will not sync to other devices. For increased Notes security, you should also enable Advanced Data Protection.
Obscure Lockscreen Notifications
By default, the notifications you receive are visible on the lockscreen, meaning if you leave your phone sitting out, someone could see any messages you receive without needing to unlock your device. If you want to disable these previews, open Settings > Notifications > Show Previews, then change the setting to either “When Unlocked,” which only shows the previews when you unlock your device, or “Never,” so you’ll never get previews at all.
Change What Siri Can Access
Siri can access and display information from all your apps. In most cases, this is probably fine. But depending on how you use your device, it can lead to some information being more easily available than you want. For example, an app might appear as a suggestion in a widget, or the text inside an app might show up in Spotlight search. To ensure you’re not giving Siri access to more than you intend, open Settings > Siri (or Apple Intelligence & Siri), and review your settings.
Disable Apple Intelligence
If you have a newer iPhone, then you may see an option for “Apple Intelligence.” This is Apple’s artificial intelligence features. Apple has noted that many of these features run on the device itself, but some also use cloud computing through the company’s “Private Cloud Compute.” When it comes to privacy or security concerns, the level of personal data access in Apple Intelligence is generally similar to what Siri already does, but since it’s a new feature, there may be unpredictable issues. You can turn it off under Settings > Apple Intelligence & Siri, and uncheck the box next to “Apple Intelligence.”
Disable Some App iCloud Backups
You may not want every app you use included in your iCloud backup, which by default is not end-to-end encrypted (unless you turned on Advanced Data Protection above, then your iCloud backup is end-to-end encrypted). This can be a security issue with certain types of law enforcement requests, where, even if they cannot break into your phone, they can access some information through that backup with a subpoena or warrant. To block apps from being included in your backup, open Settings > [your name] > iCloud > iCloud Backup > [name of device], and disable any apps you don’t want included.
Change Your “Shared with Me” Settings
When someone sends you an image, link, Apple Music album, file, or a handful of other things, from the Messages app, that link may automatically appear in the corresponding app. For example, if someone sends you a link to an article, it will pop up in Safari. Or if someone sends you a Google Maps link to a restaurant, it’ll appear in the Google Maps app. This might reveal private information to others if you share a device, use CarPlay with someone else in the car, or share your screen. To change this behavior, head to Settings > Apps > Messages > Shared with You, and either disable “Automatic Sharing” entirely or turn it off for any apps you don’t want using it.
