Como fazer: Conhecer as configurações de privacidade e segurança do Android
Última revisão: June 23, 2025
Abra o aplicativo Configurações do seu telefone Android e você encontrará dezenas de opções diferentes com pouca orientação sobre o que essas opções fazem. Algumas dessas configurações têm grande impacto sobre a privacidade e segurança, alterando os dados que são compartilhados automaticamente com aplicativos, corretores de dados e com o próprio Google.
Os tipos de alterações que você deve fazer dependem de como você usa o telefone e do seu plano de segurança. Não existe um conjunto único de configurações que recomendamos a serem alteradas. Em vez disso, explicaremos o que as configurações fazem para ajudá-lo a decidir se vale a pena alterá-las. Este guia não pode abranger tudo, portanto, para um mergulho mais profundo, consulte nosso Guia de Detalhamento da Privacidade de Telefones Celulares.
Como usar este guia: devido ao grande número de opções de privacidade e segurança no Android, dividimos este guia em três seções, começando com as configurações que todos devem considerar alterar e aprofundando-as a partir daí. Este guia foi escrito e está correto a partir do Android 15.
Observação: há muitas versões diferentes do Android e as instruções podem ser diferentes, dependendo da empresa que fabricou seu telefone e da versão do sistema operacional que roda. As instruções aqui são para a versão mais recente do Android que o Google fornece aos fabricantes e inclui em seus telefones Pixel.
Nível 1: Fundamentos Cotidianos
Não importa qual seja o seu plano de segurança específico, todos devem dar uma olhada nessas configurações em seus telefones para aumentar a privacidade e a segurança.
Habilite a Autenticação de Dois Fatores em sua Conta do Google
Por que
Se tem um telefone Android há muito tempo, é provável que já tenha ativado a autenticação de dois fatores - uma forma de tornar suas contas online mais seguras, exigindo provas adicionais de que é você mesmo ("fatores"), além da sua senha , para fazer login. Isso significa que, mesmo que alguém tenha acesso à sua senha, não conseguirá entrar na sua conta do Google sem esse segundo fator. A sua conta do Google pode conter muitos dados confidenciais, incluindo fotos, contatos, anotações e praticamente qualquer outra coisa que tenha sido salva na sua conta do Google. Portanto, é fundamental protegê-la da melhor forma possível.
Depois de ativado, sempre que quiser fazer login na sua conta do Google em um novo dispositivo ou em um novo navegador da Web , você precisará inserir um código de verificação ou confirmar o login em um "dispositivo confiável" (pode ser o seu telefone ou laptop, se você tiver feito login na sua conta do Google nesse dispositivo). Se isso parecer tedioso, não se preocupe muito. Depois de executar o processo de autenticação uma vez, você não será solicitado a inserir o código de verificação novamente, a menos que saia completamente de um dispositivo ou apague o dispositivo e comece novamente.
O que fazer
O Google pressionou por requisitos de autenticação de dois fatores em todas as contas, mas ainda é possível configurar uma nova conta sem essa opção ativada. Se não tiver certeza se ativou, vale a pena verificar para ter certeza. Você pode fazer isso em qualquer dispositivo em que esteja conectado à sua conta do Google, mas veja aqui como verificar no Android:
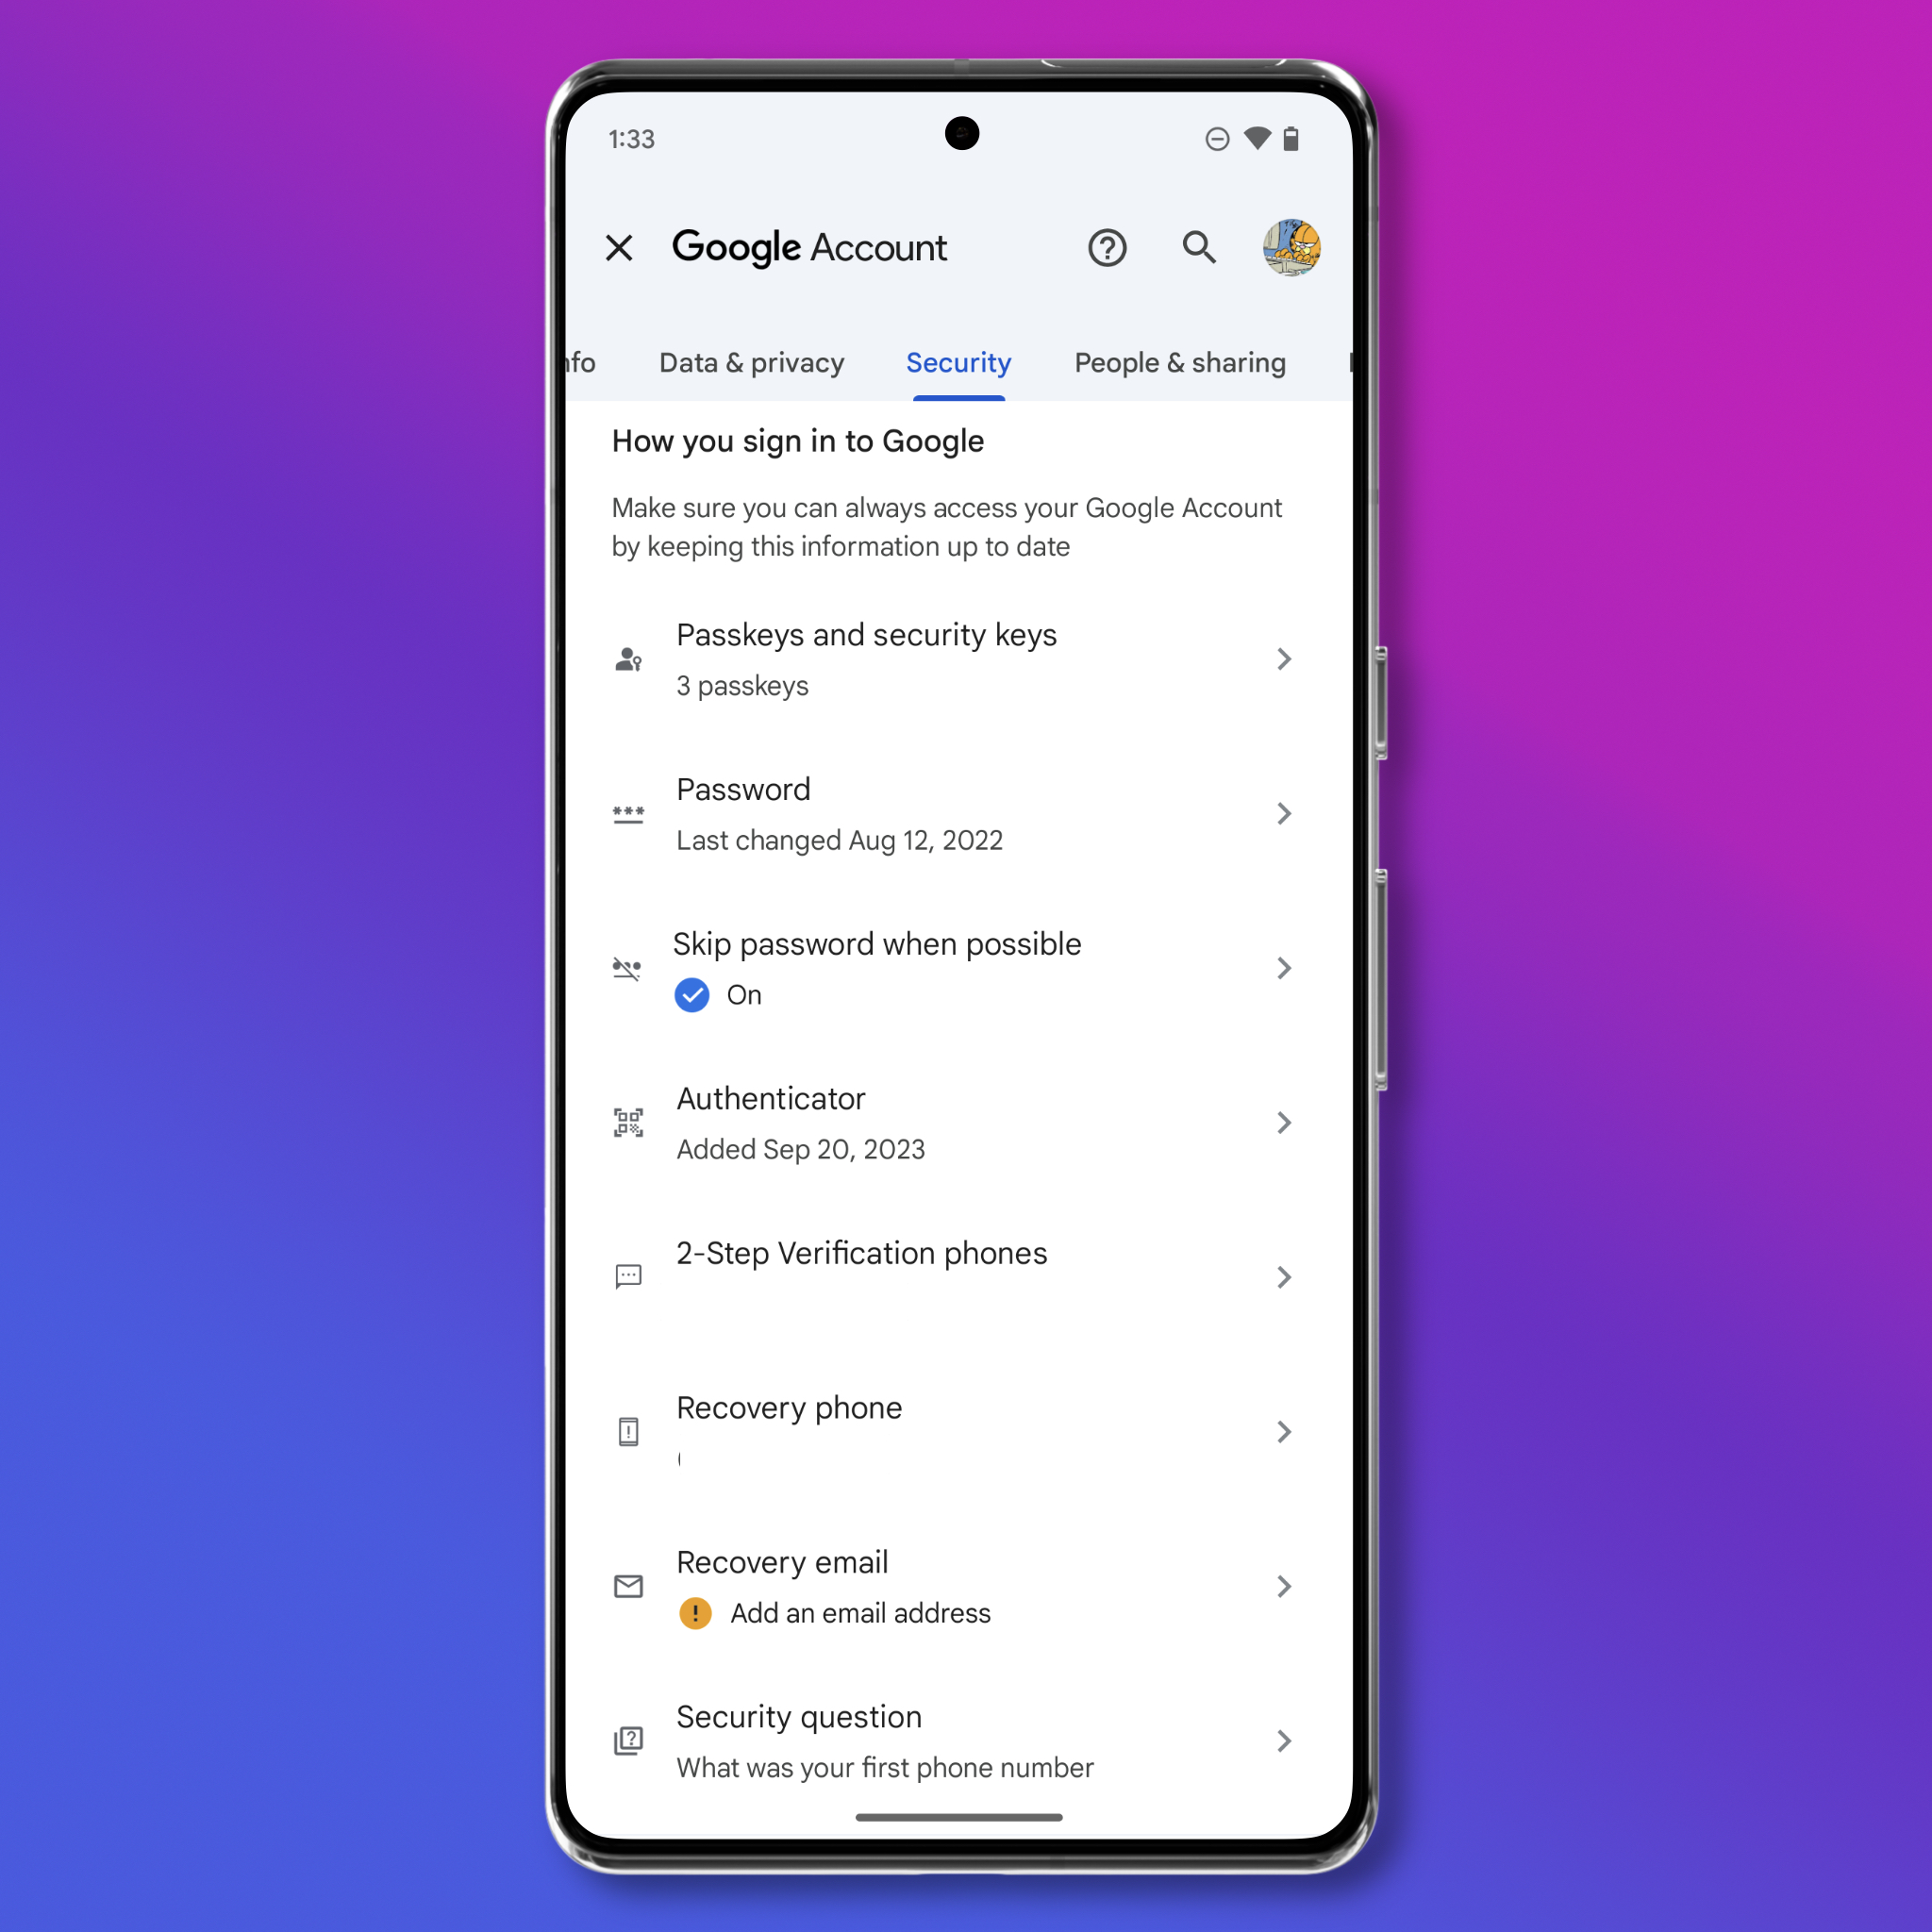
- Abra Configurações (talvez seja necessário rolar para baixo no menu Configurações e tocar em "Conta do Google" em algumas versões do Android), toque na sua foto de perfil e em "Gerenciar sua conta do Google".
- Na parte superior, role até Segurança, à direita. Selecione-a e role para baixo até "Autenticador" ou "Telefones de Verificação de 2 passos" para ativar a autenticação de dois fatores com um aplicativo (preferencialmente) ou seu número de telefone.
- Nesse menu, você também pode configurar uma chave de acesso para sua conta do Google. Em vez de exigir que você digite a senha e um código, as chaves de acesso incluem um segundo fator do seu dispositivo. Sempre que você usar a chave de acesso para fazer login, o navegador ou o sistema operacional poderá solicitar que você insira novamente o PIN de desbloqueio do dispositivo. Para criar uma chave de acesso, toque em "Chaves de acesso e segurança", depois em "Criar uma chave de acesso" e siga as instruções do Google.
Se você corre alto risco de ataques direcionados, considere usar uma chave de segurança para bloquear ainda mais sua conta do Google. As chaves de segurança são resistentes a phishing , mas têm o risco de bloquear sua conta para sempre se perder a chave. Para configurar uma chave de segurança, siga estas instruções.
Há ainda outra maneira de proteger ainda mais sua conta do Google com o Programa de Proteção Avançada de Conta da empresa. O Google recomenda essa opção para contas de risco, como ativistas, jornalistas e campanhas políticas. Uma vez ativada, a Proteção Avançada de Conta adiciona novos recursos de segurança, como o bloqueio de baixar arquivos mais prejudiciais no Chrome, a restrição de quais aplicativos podem acessar suas informações pessoais e uma melhor proteção contra phishing. Para ativar esse recurso, você deve usar uma chave de acesso ou uma chave de segurança física.
Bloqueie seu telefone com uma senha forte ou com biometria
Por que
Se o seu dispositivo for perdido, roubado ou confiscado pela polícia, a "criptografia de dispositivo" ajuda a proteger os dados armazenados no seu dispositivo. Os telefones Android modernos têm recursos de criptografia de dispositivo incorporados.
O que fazer
Você deve proteger seu telefone Android com uma senha forte: 8 a 12 caracteres aleatórios que sejam fáceis de lembrar e digitar ao desbloquear o dispositivo. Se os dispositivos não estiverem protegidos por uma senha forte, a criptografia poderá ser mais fácil de ser quebrada por meio de um ataque de força bruta. Para ativar ou alterar sua senha:
- Abra Configurações > Segurança e privacidade > Desbloqueio do dispositivo > Bloqueio de tela e selecione o tipo ou comprimento da senha que deseja usar.
Depois de definir a senha, pode optar por ativar o login biométrico, usando o rosto ou a impressão digital , dependendo do tipo de login compatível com o seu telefone. Isso é opcional e acelera o processo de desbloqueio do telefone, mas não tem a mesma base legal que as senhas. Somente você pode decidir se é uma opção segura ativar o login biométrico no seu dispositivo, mas se quiser ativá-lo, veja aqui como fazê-lo:
- Abra Configurações > Segurança e privacidade > Desbloqueio do dispositivo > Desbloqueio por impressão digital > Adicionar impressão digital e siga as instruções na tela para registrar seu rosto ou impressão digital.
Nos Estados Unidos, o uso de biometria - como o escaneamento do rosto ou a impressão digital - para desbloquear o telefone também pode comprometer as proteções legais para o conteúdo do telefone, conforme o privilégio da Quinta Emenda contra a incriminação forçada. De acordo com a legislação vigente no momento em que este artigo foi escrito, o uso de senha memorizada geralmente oferece uma base legal mais sólida para resistir a uma ordem judicial de desbloqueio/descriptografia forçada do dispositivo. Embora a EFF continue lutando para fortalecer nossas proteções legais contra a obrigatoriedade de as pessoas descriptografarem seus dispositivos, atualmente há menos proteção contra o desbloqueio obrigatório usando o rosto ou impressão digital do que contra a divulgação obrigatória de senhas.
Auditar suas Permissões de Privacidade
Por que
Quase todo aplicativo que baixa solicita acesso a algum tipo de informação sobre você ou seu dispositivo. Isso inclui tudo, desde usos óbvios, como um aplicativo de câmera que solicita acesso à sua câmera e às suas fotos, até usos menos óbvios, como um aplicativo de jornal que solicita acesso à sua rede local.
Pode ser difícil manter o controle de todas essas permissões. Por esse motivo, é bom verificar as permissões dos aplicativos de vez em quando. Isso pode garantir que você não esteja compartilhando dados que não precisa ou não pretende compartilhar.
Antes de auditar suas permissões de privacidade, é uma boa ideia examinar todos os seus aplicativos e excluir os que não forem necessários. Isso facilita a auditoria e, quanto menos aplicativos tiver instalado no telefone, menores serão as chances de seus dados caírem em mãos erradas.
O que fazer
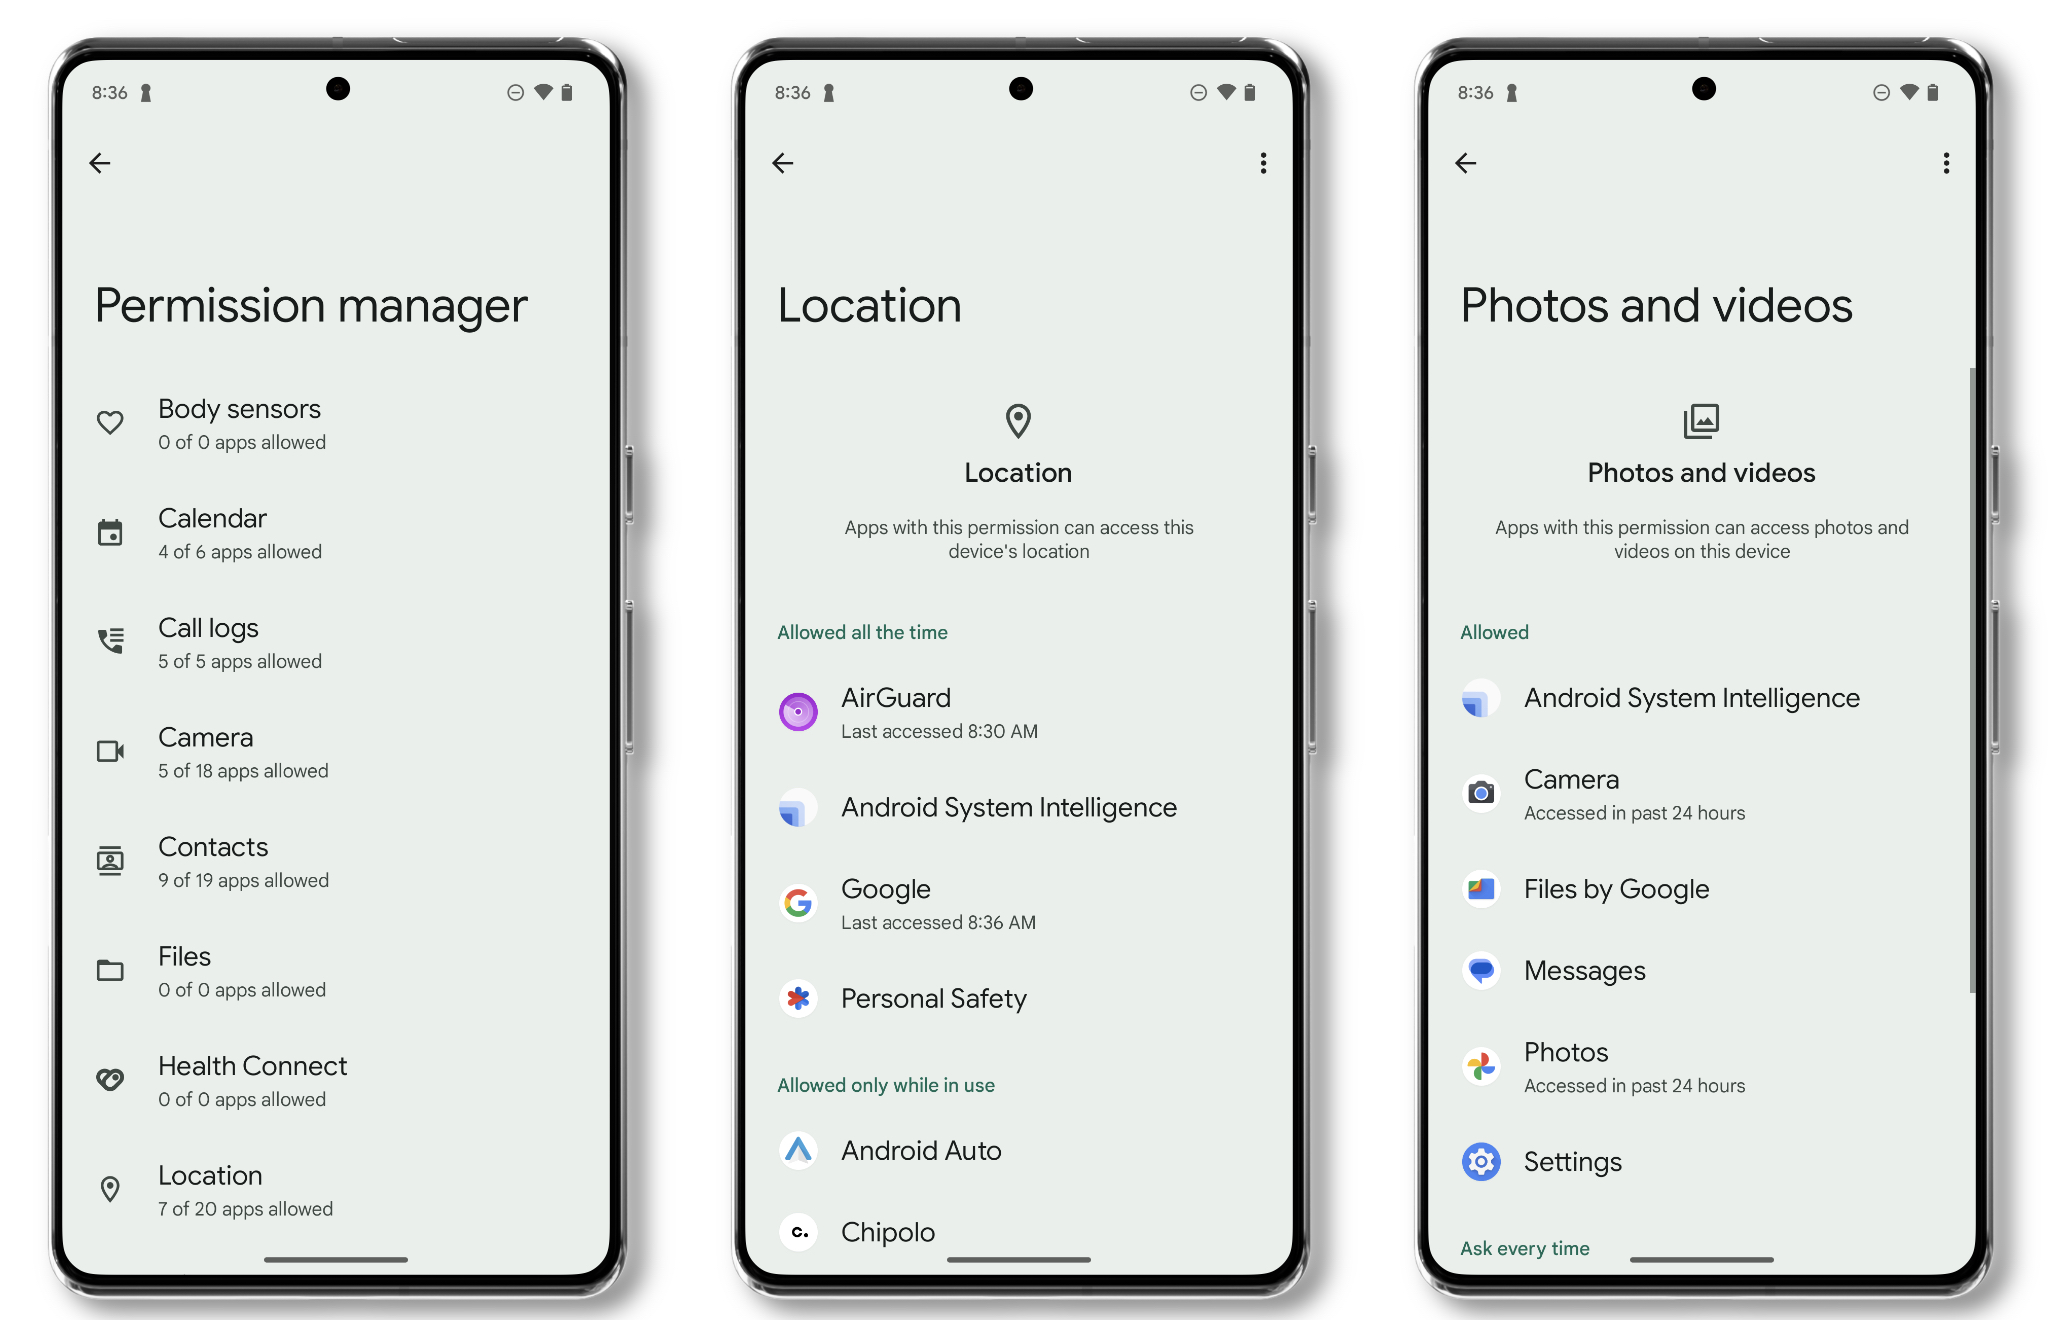
Para começar, abra Configurações > Segurança e privacidade > Controles de privacidade > Gerenciador de permissões. Aqui, você verá a uma página com grande quantidade de permissões diferentes, cada uma listando quantos aplicativos têm acesso a essa permissão. Nem todas elas são apenas "ativadas" ou "desativadas". Algumas, como fotos e localização, oferecem permissões com mais nuances. Vale a pena examinar cada uma delas para ter certeza de que você ainda deseja que o aplicativo tenha essa permissão. Caso contrário, você pode tocar no aplicativo na tela de permissões para revogar a permissão. Não se preocupe em quebrar nada, você sempre pode reverter a decisão se um aplicativo perder a funcionalidade.
Essas permissões estão divididas em algumas seções diferentes, e há muitas delas. Vale a pena passar por todas elas, mas as permissões mais importantes a serem enfocadas são:
Serviços de localização
Os serviços de localização são uma das permissões mais importantes que muitos aplicativos solicitam excessivamente. Essa permissão dá aos aplicativos acesso à sua localização (determinada por sinais de GPS e Wi-Fi) para que eles saibam onde você está. Dê uma olhada nos aplicativos listados aqui e pergunte a si mesmo se eles realmente precisam da sua localização para funcionar. Caso contrário, vale a pena desativar completamente o acesso à localização ou limitá-lo apenas quando você estiver com o aplicativo aberto. Os serviços de localização têm muitas opções de quando um aplicativo pode acessar sua localização:
- Não permitir: o aplicativo não obterá nenhuma informação de localização do seu dispositivo Android.
- Pergunte sempre: Sempre que você abrir o aplicativo, ele solicitará suas informações de localização.
- Permitir somente enquanto estiver usando o aplicativo: O aplicativo só pode acessar suas informações de localização quando você estiver com o aplicativo aberto. Quando você fechar o aplicativo, ele deixará de obter essas informações.
- Sempre: O aplicativo receberá suas informações de localização o tempo todo.
Você pode alterar a exatidão das informações de localização que um aplicativo obtém, concedendo acesso à sua localização precisa ou a uma localização mais generalizada. Desativar a opção de localização precisa significa que o aplicativo só poderá acessar sua localização geral. A localização precisa é necessária para aplicativos de mapeamento em particular, mas pode não ser necessária para muitos outros.
Contatos
Se um aplicativo precisar de acesso aos seus contatos, você pode conceder a ele acesso total - o que fornece ao aplicativo toda a sua lista de contatos, incluindo todas as informações armazenadas no cartão de contato - ou não permitir que ele veja sua lista de contatos.
Fotos e vídeos
É possível alterar vários aspectos relacionados à forma como os aplicativos acessam a coleção de fotos:
- Sempre permitir tudo: um aplicativo pode acessar todo a coleção de fotos.
- Permitir acesso limitado: você escolhe as fotos específicas às quais um aplicativo tem acesso.
- Não permitir: o aplicativo não pode acessar a biblioteca de fotos do seu telefone.
Considere limitar o acesso à sua biblioteca de fotos em qualquer aplicativo em que você prefira que algumas fotos não sejam carregadas, mesmo por acidente. Por exemplo, se você usa o Slack no trabalho, talvez seja melhor limitar o acesso para que você não carregue acidentalmente todo o seu conjunto de fotos das férias quando pretende compartilhar apenas uma foto da praia.
Câmera
Aqui, você encontrará aplicativos que solicitaram acesso à sua câmera. O uso mais óbvio é o de aplicativos de câmera de terceiros, mas você também pode ver aplicativos que usam a leitura de código QR para autenticação de dois fatores, aplicativos de anotações e outros.
Se um aplicativo tiver acesso à sua câmera e você não entender o motivo, desative-o. Você sempre poderá ativá-lo novamente, se necessário.
Microfone
Na maioria das vezes, você encontrará aqui apenas os aplicativos que usa para chamadas de voz ou vídeo. Mas se houver um aplicativo que pareça estar acessando o microfone e você não conseguir descobrir o motivo, desative-o.
Se você não abrir um aplicativo por algum tempo, o Android redefinirá automaticamente suas permissões para o padrão, de modo que um aplicativo não poderá acessar nenhum dado extra do seu dispositivo.
Desativar o Rastreamento de Anúncios
Por que
O identificador de anúncios, também conhecido como "AAID" no Android, permite a maior parte do rastreamento de terceiros em dispositivos móveis. Desativá-lo tornará muito mais difícil para os anunciantes e corretores de dados rastrearem e traçarem seu perfil, além de limitar a quantidade de suas informações pessoais à venda.
O que fazer
Se for importante impedir que anunciantes e corretores de dados o rastreiem, você poderá desativar totalmente a ID de publicidade em um dispositivo Android:
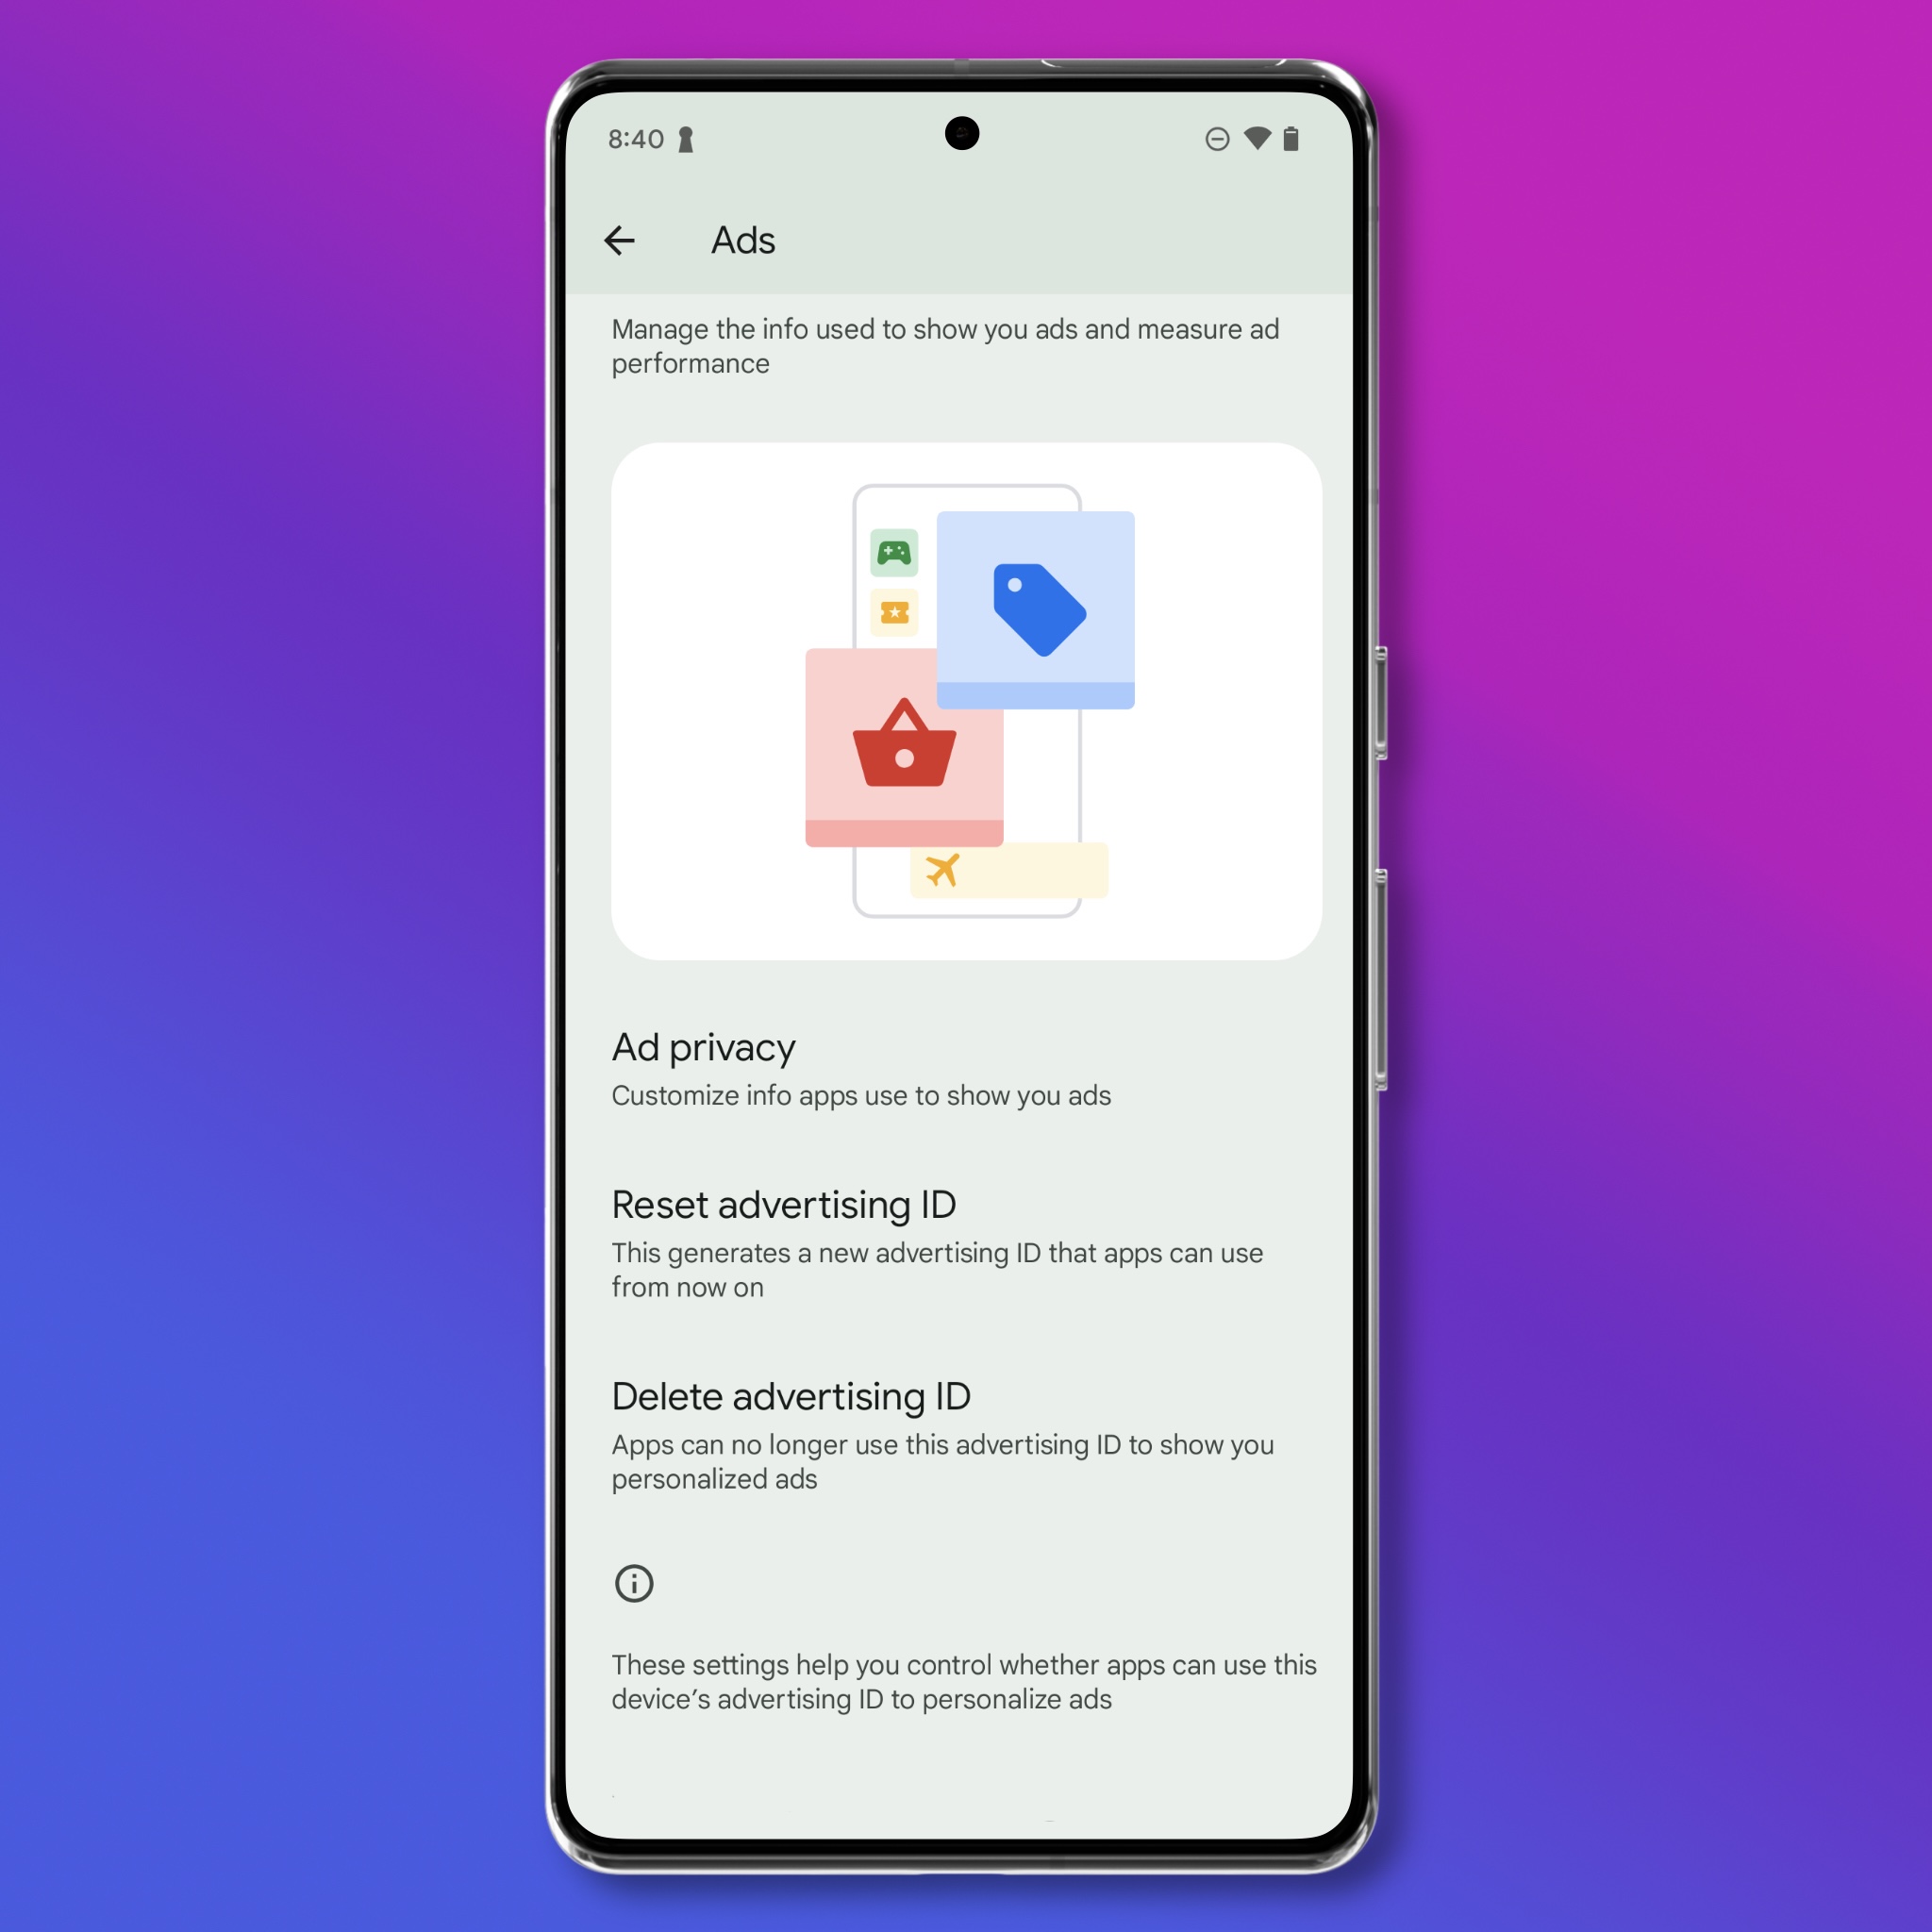
- Abra Configurações > Segurança e privacidade > Controles de privacidade > Anúncios e toque em "Excluir ID de Anúncios".
Configurar "Localizar meu Dispositivo" e Recursos de Proteção contra Roubo
Por que?
O Find My Device (Localizar Meu Dispositivo) é mais conhecido como uma ferramenta que permite ver a localização do seu Android se o tiver perdido ou roubado. Isso é útil, mas os benefícios de segurança e privacidade dessa configuração pressupõem que você não receberá o telefone de volta. Se acha que seu telefone já era, pode apagá-lo remotamente e excluir tudo o que estiver nele.
Uma vez ativado, se você perder ou tiver roubado o dispositivo, poderá localizá-lo em um mapa ou, o que é mais importante, apagar remotamente seu conteúdo. Você pode encontrar instruções para fazer isso aqui.
Por sua natureza, o recurso Localizar Meu Dispositivo usa informações de localização para encontrar seu telefone. Para fazer isso, ele usa uma combinação de Wi-Fi, celular e outros dispositivos Google próximos com Bluetooth. O Google afirma que essas informações são criptografadas de ponta a ponta e a localização é "visível apenas para você e para aqueles com quem você compartilha seus itens no recurso Localizar Meu Dispositivo". Ao usar qualquer tipo de rastreamento baseado em localização, há sempre algum risco de que as informações vazem ou sejam usadas de forma não intencional.
O que fazer
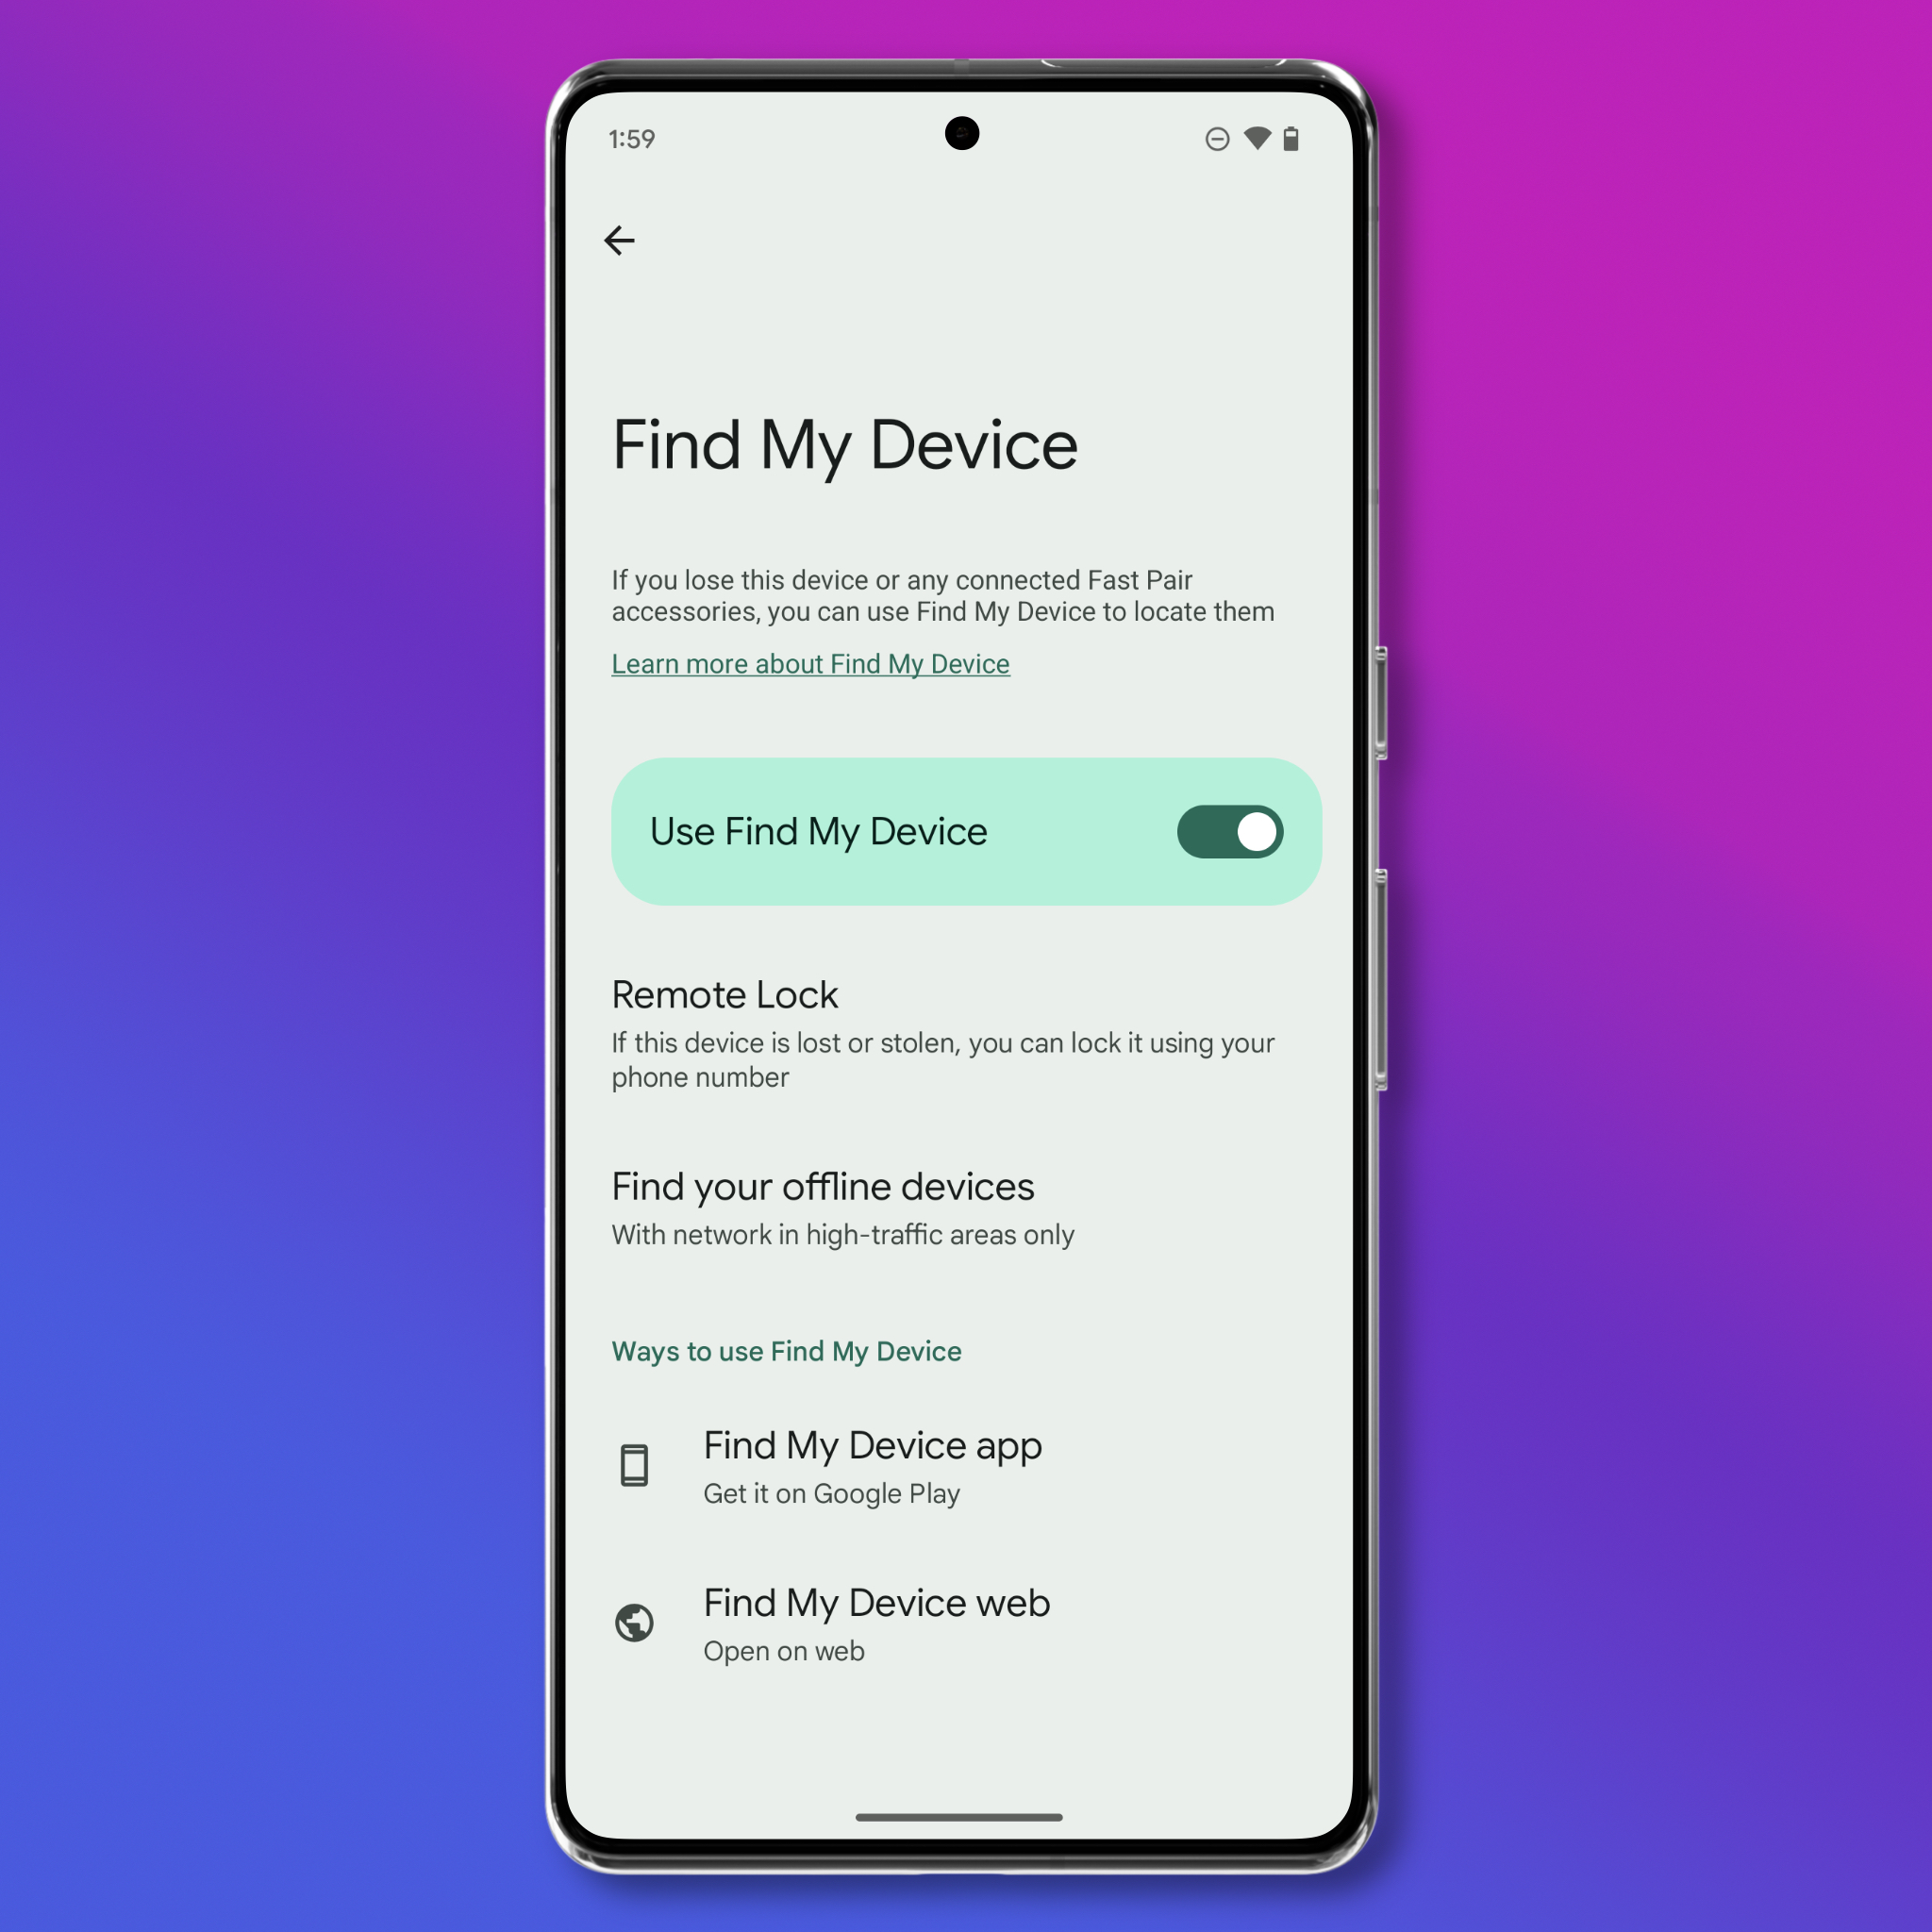
- Abra Configurações > Segurança e privacidade > Localizadores de dispositivos > Localizar meu dispositivo e ative "Usar Localizar meu dispositivo".
- Nessa tela, você também pode ativar opcionalmente o "Remote Lock" (Bloqueio Remoto). Esse recurso permite bloquear remotamente o dispositivo usando apenas o seu número de telefone. Isso é útil se seu dispositivo for roubado ou levado enquanto estiver desbloqueado.
- Você também pode considerar ativar a "Proteção contra Roubo". Esse recurso usa os sensores de movimento, o Wi-Fi e o Bluetooth do dispositivo para detectar se alguém pega o dispositivo e foge. Se um roubo como esse for detectado, sua tela será bloqueada. Abra Settings (Configurações) > Security & Privacy (Segurança e Privacidade) > Device Unlock (Desbloqueio do Dispositivo) > Theft Protection (Proteção contra Roubo) e ative "Theft Detection Lock" (Bloqueio de Detecção de Roubo). Você também pode ativar "Offline Device Lock" (Bloqueio de Dispositivo Off-line), que pode bloquear sua tela se for roubada e o ladrão desativar imediatamente os serviços de localização.
- Nessa mesma página de Configurações, considere a possibilidade de configurar a "Verificação de Identidade", um recurso que adiciona um requisito biométrico para alterar determinadas configurações críticas, incluindo a execução de uma redefinição de fábrica e a desativação do recurso Localizar meu dispositivo. O objetivo é proteger os dados do seu telefone e da sua Conta do Google no caso de alguém roubar seu telefone e tentar alterar configurações críticas para bloqueá-lo. Isso só está disponível em alguns dispositivos Android, mas, se o seu telefone for compatível, você encontrará a configuração "Identity Check" (Verificação de identidade) em Settings (Configurações) > Security & Privacy (Segurança e Privacidade) > Device Unlock (Desbloqueio do Dispositivo) > Theft Protection (Proteção contra Roubo).
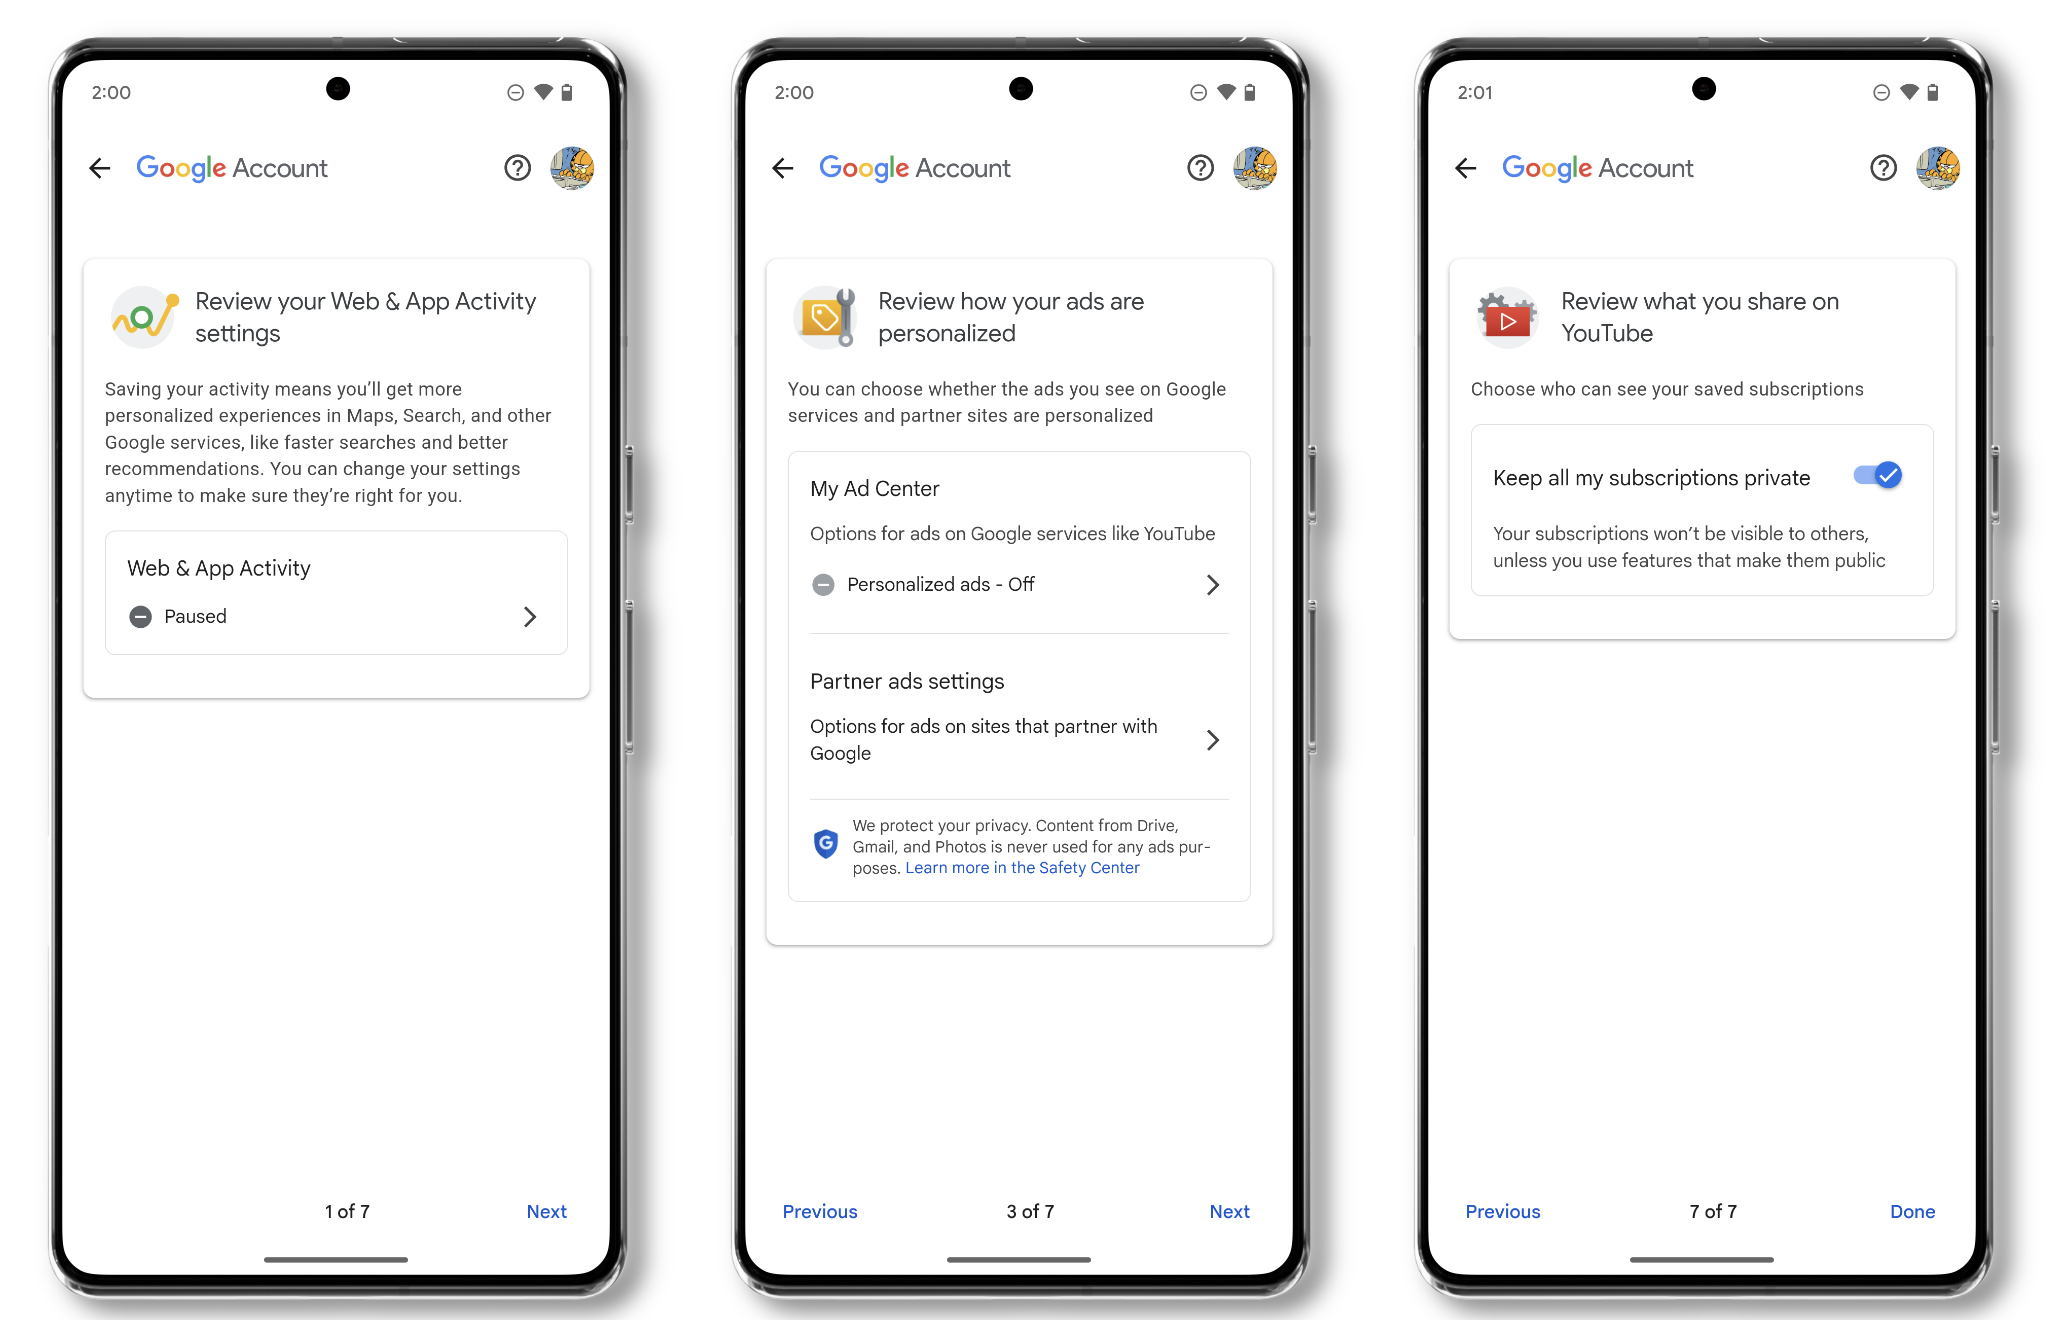
Execute o "Controle de privacidade" do Google
Por que
Você provavelmente usa sua conta do Google em vários dispositivos, como em um computador e em seu telefone Android. Muitas das configurações de privacidade mais importantes estão ocultas, não em alguma página específica das configurações do Android, mas na própria conta do Google. Por esse motivo, é uma boa ideia passar pela "verificação de privacidade" da empresa para garantir que você não esteja compartilhando inadvertidamente informações sobre seus hábitos no YouTube, localização ou qualquer outra coisa.
O que
- No seu telefone, abra Configurações (talvez seja necessário navegar para baixo e tocar em "Conta do Google" em algumas versões do Android) e toque no ícone do seu perfil. Toque na opção "Revisar suas configurações de privacidade", na parte inferior da página, ou, se essa opção não estiver disponível, toque em "Gerenciar sua Conta do Google" e role para baixo até "Sugestões de privacidade disponíveis".
- Em um navegador, você também pode ir diretamente para a página de verificação de privacidade, desde que esteja conectado à sua conta do Google.
- Percorra todas as páginas para certificar-se de que não está salvando ou compartilhando dados que não pretende.
Nível 2: Etapas adicionais para alguns planos de segurança
Decida como você deseja lidar com Copias de Segurança
Por quê?
As copias de segurança de dispositivos são uma maneira importante de proteger seus dados caso você perca o telefone ou ele quebre. As copias de segurança também são úteis nos casos em que você apaga intencionalmente o telefone, como quando adquire um novo telefone, ou se estiver em uma situação em que não deseja carregar nenhum dado pessoal. Com um backup atualizado, você pode restaurar seu telefone rapidamente sem precisar fazer o download manual de todos os seus aplicativos e dados.
Toda conta do Google inclui 15 GB de espaço de armazenamento gratuito, mas a cota de armazenamento é compartilhada entre o Google Drive, o Google Fotos e o Gmail. Dependendo da quantidade de fotos e vídeos que você tiver, isso pode não ser suficiente para armazenar seu backup e talvez seja necessário pagar uma taxa mensal para obter espaço adicional.
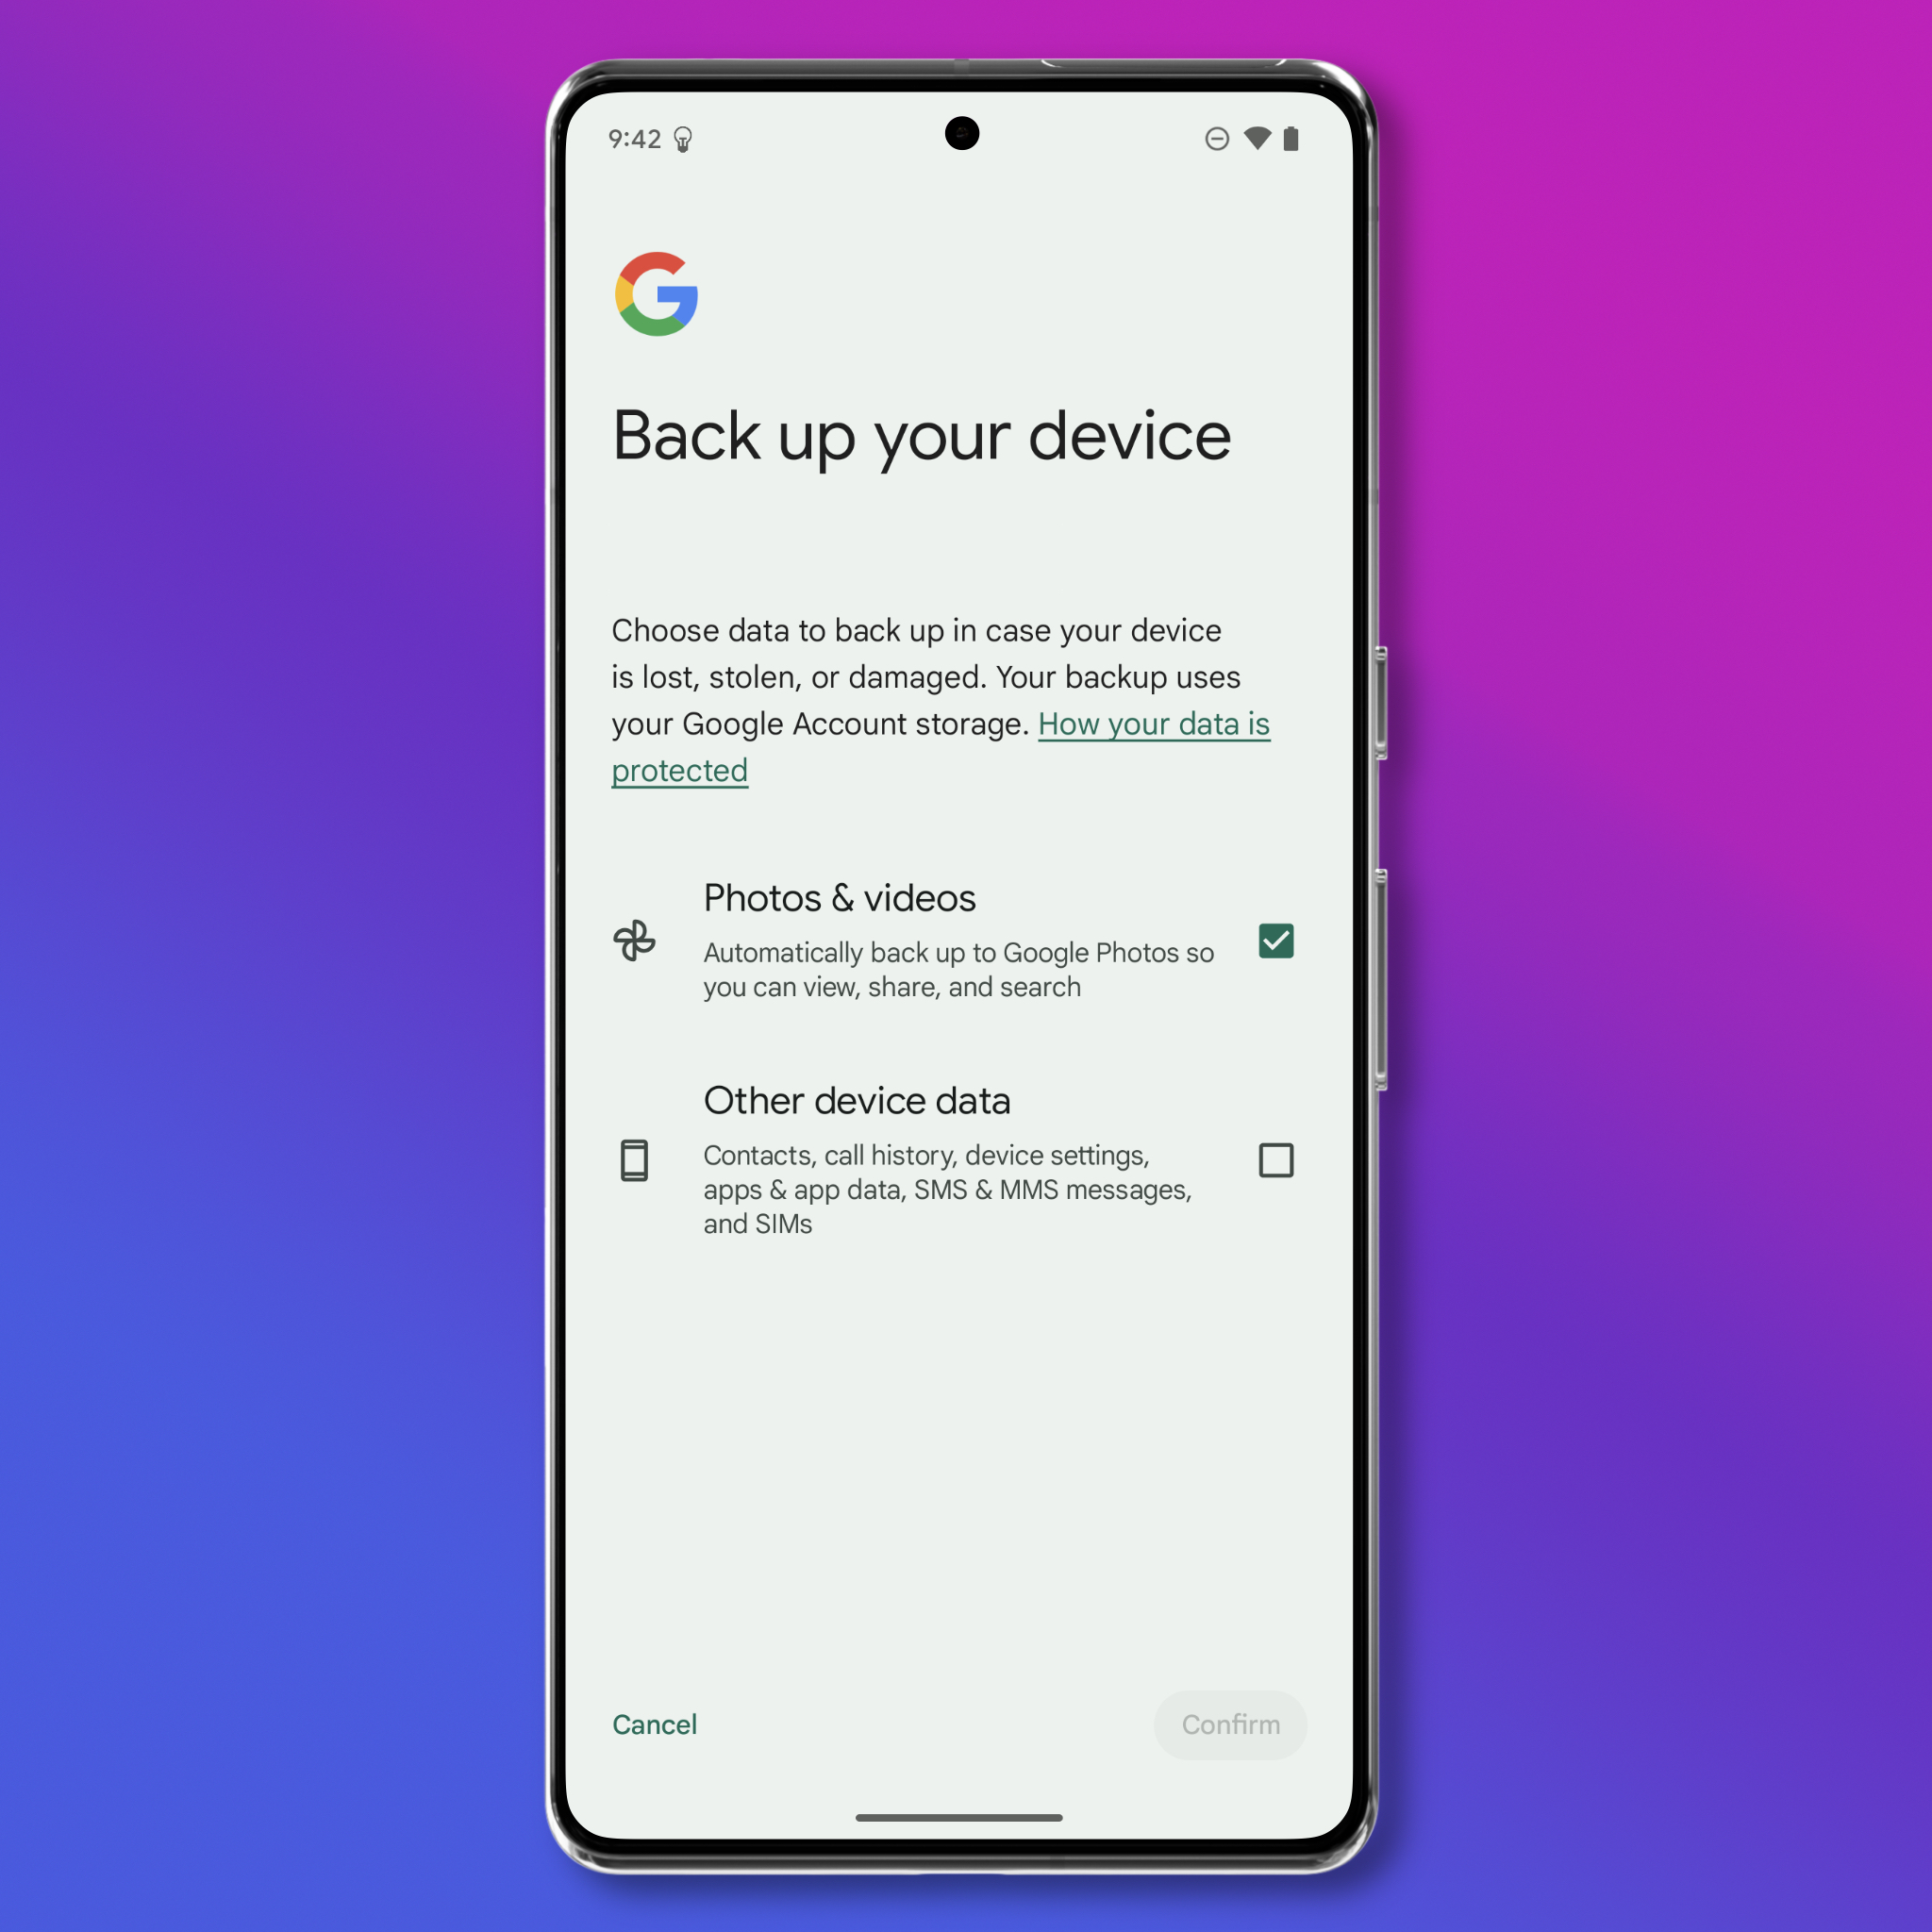
No Android, o processo de backup é dividido em duas opções: fotos e vídeos e todo o resto. Todas as fotos e vídeos são armazenados no Google Fotos e não são criptografados de ponta a ponta. Isso significa que as fotos e os vídeos não usam um tipo de armazenamento de backup que impeça o Google (ou qualquer outra pessoa com acesso ao sistema de backup do Google) de ver esse conteúdo. Você também pode optar por fazer backup de todo o resto: dados do dispositivo, como contatos, histórico de chamadas, configurações, dados de aplicativos e mensagens. Algumas dessas informações, como dados de aplicativos, devem ser criptografadas de ponta a ponta se você usar uma senha do dispositivo, o que significa que o Google não pode acessá-las. No entanto, nem sempre fica claro quais dados são criptografados dessa forma e quais não são.
O que fazer
O Android permite que você personalize até certo ponto a forma que as copias de segurança são tratados, mas não permite muito.
- Abra Configurações > Sistema > Cópia de Segurança (backup).
- Aqui, você pode optar por fazer backup automaticamente apenas de suas fotos e vídeos para o Google ou de todo o resto. Lembre-se de que alguns desses dados são criptografados de ponta a ponta com a senha do seu dispositivo, mas não todos.
Se preferir fazer o backup do seu dispositivo localmente em um computador pessoal, os usuários do Windows podem usar o software Quick Share do Google para fazer isso sem fio ou simplesmente conectar o telefone ao computador com um cabo USB e escolher a opção "Transferência de Arquivo" quando solicitado no telefone. Quando a janela de transferência de arquivos for aberta, arraste os arquivos que deseja salvar para o computador.
No momento, não há uma maneira fácil e gratuita de fazer backup manualmente em um Mac, mas consulte a documentação de suporte oficial do Google para obter atualizações.
Se você estiver vendendo ou doando um telefone Android, ou se quiser apagá-lo temporariamente por qualquer motivo, siga as instruções do Google para concluir uma redefinição de fábrica, que pode ser específica para cada fabricante de dispositivo. Para restaurar a partir de cópia de segurança, certifique-se de fazer login em um telefone com a mesma conta do Google em que armazenou o backup e siga as instruções na tela para restaurar a cópia de segurança.
Configure um Espaço Privado
Por que
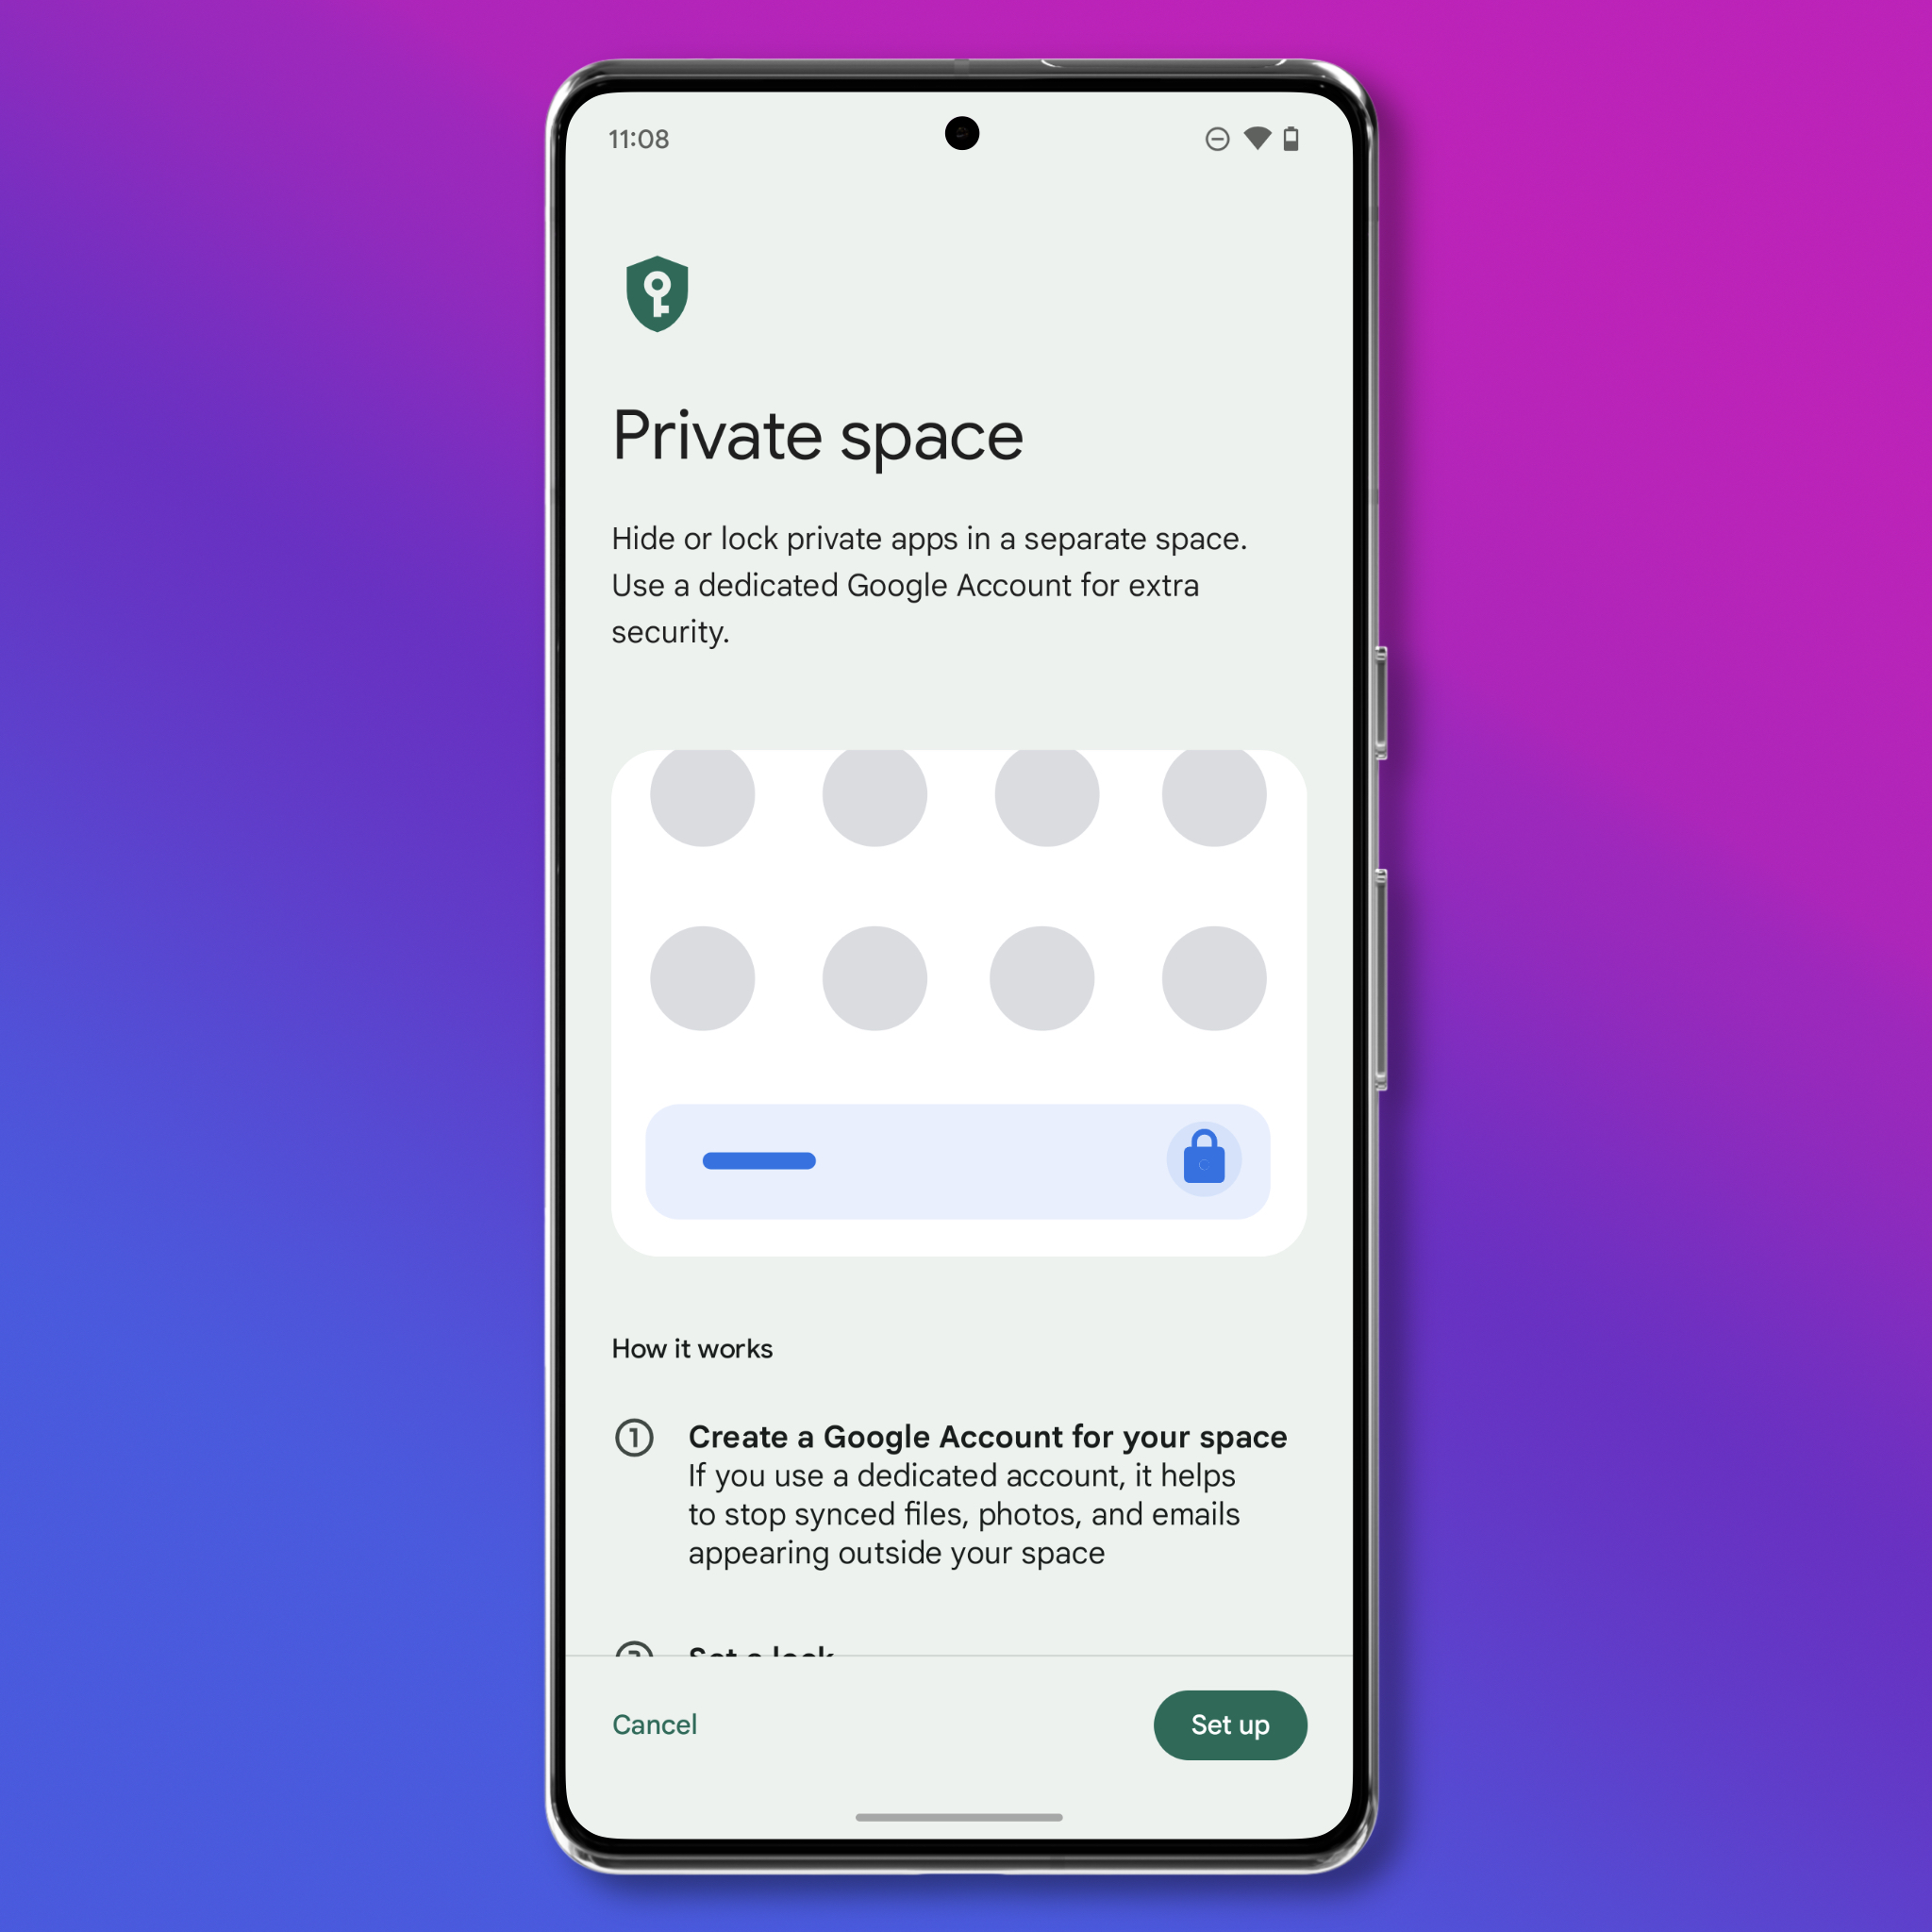
Se você quiser ocultar aplicativos confidenciais, o recurso "espaço privado" é a maneira mais simples de fazer isso. Pense no espaço privado como um dispositivo Android totalmente diferente que funciona dentro do seu dispositivo principal. Uma vez configurado, você obtém um conjunto secundário de aplicativos que, opcionalmente, pode ser vinculado a uma conta do Google completamente diferente. Esses aplicativos têm, então, todos os seus dados isolados do restante do seu telefone. Isso pode ser útil para informações que você deseja que sejam privadas, como aplicativos de comunicação criptografados ou uma biblioteca de fotos, ou para aplicativos que você sabe que não são privados, mas que precisa usar ocasionalmente, como um aplicativo de mapeamento ou um aplicativo de compartilhamento de carona (“rideshare”).
Observação: está disponível no Android 15 e superior para dispositivos com pelo menos 6 GB de RAM. Se você não vir os itens de menu a seguir, seu dispositivo pode não ser compatível.
O que fazer
- Abra Configurações > Segurança e Privacidade > Espaço Privado e siga as instruções para criar um novo espaço. Você pode optar por usar um PIN separado ou o mesmo que usa para desbloquear o telefone.
- Quando solicitado, crie opcionalmente uma nova conta do Google. Isso não é obrigatório, mas configurar uma nova conta significa que você não corre o risco de sincronizar acidentalmente informações com sua conta principal, como histórico de navegação, fotos ou qualquer outra coisa para a qual você decida usar o espaço privado.
- Quando a configuração estiver concluída, os aplicativos do espaço privado poderão ser acessados na parte inferior da gaveta de aplicativos.
Leia a documentação do Google para obter mais informações sobre todas as nuances do que está e do que não está disponível em um espaço privado.
Se você compartilha seu telefone com outras pessoas com frequência ou tem um segundo perfil para o trabalho, vários perfis de usuário podem ser mais adequados do que um espaço privado. Para criar um novo perfil, abra Configurações > Sistema > Vários usuários e ative "Permitir vários usuários". Toque no botão para adicionar um novo usuário, com sua própria conta do Google, ou um usuário convidado, que não precisa de uma conta. Cada perfil é criptografado com sua própria chave de criptografia e uma pessoa que usa um perfil não pode acessar nenhum dado de outro perfil sem uma senha.
Desativar 2G
Por que
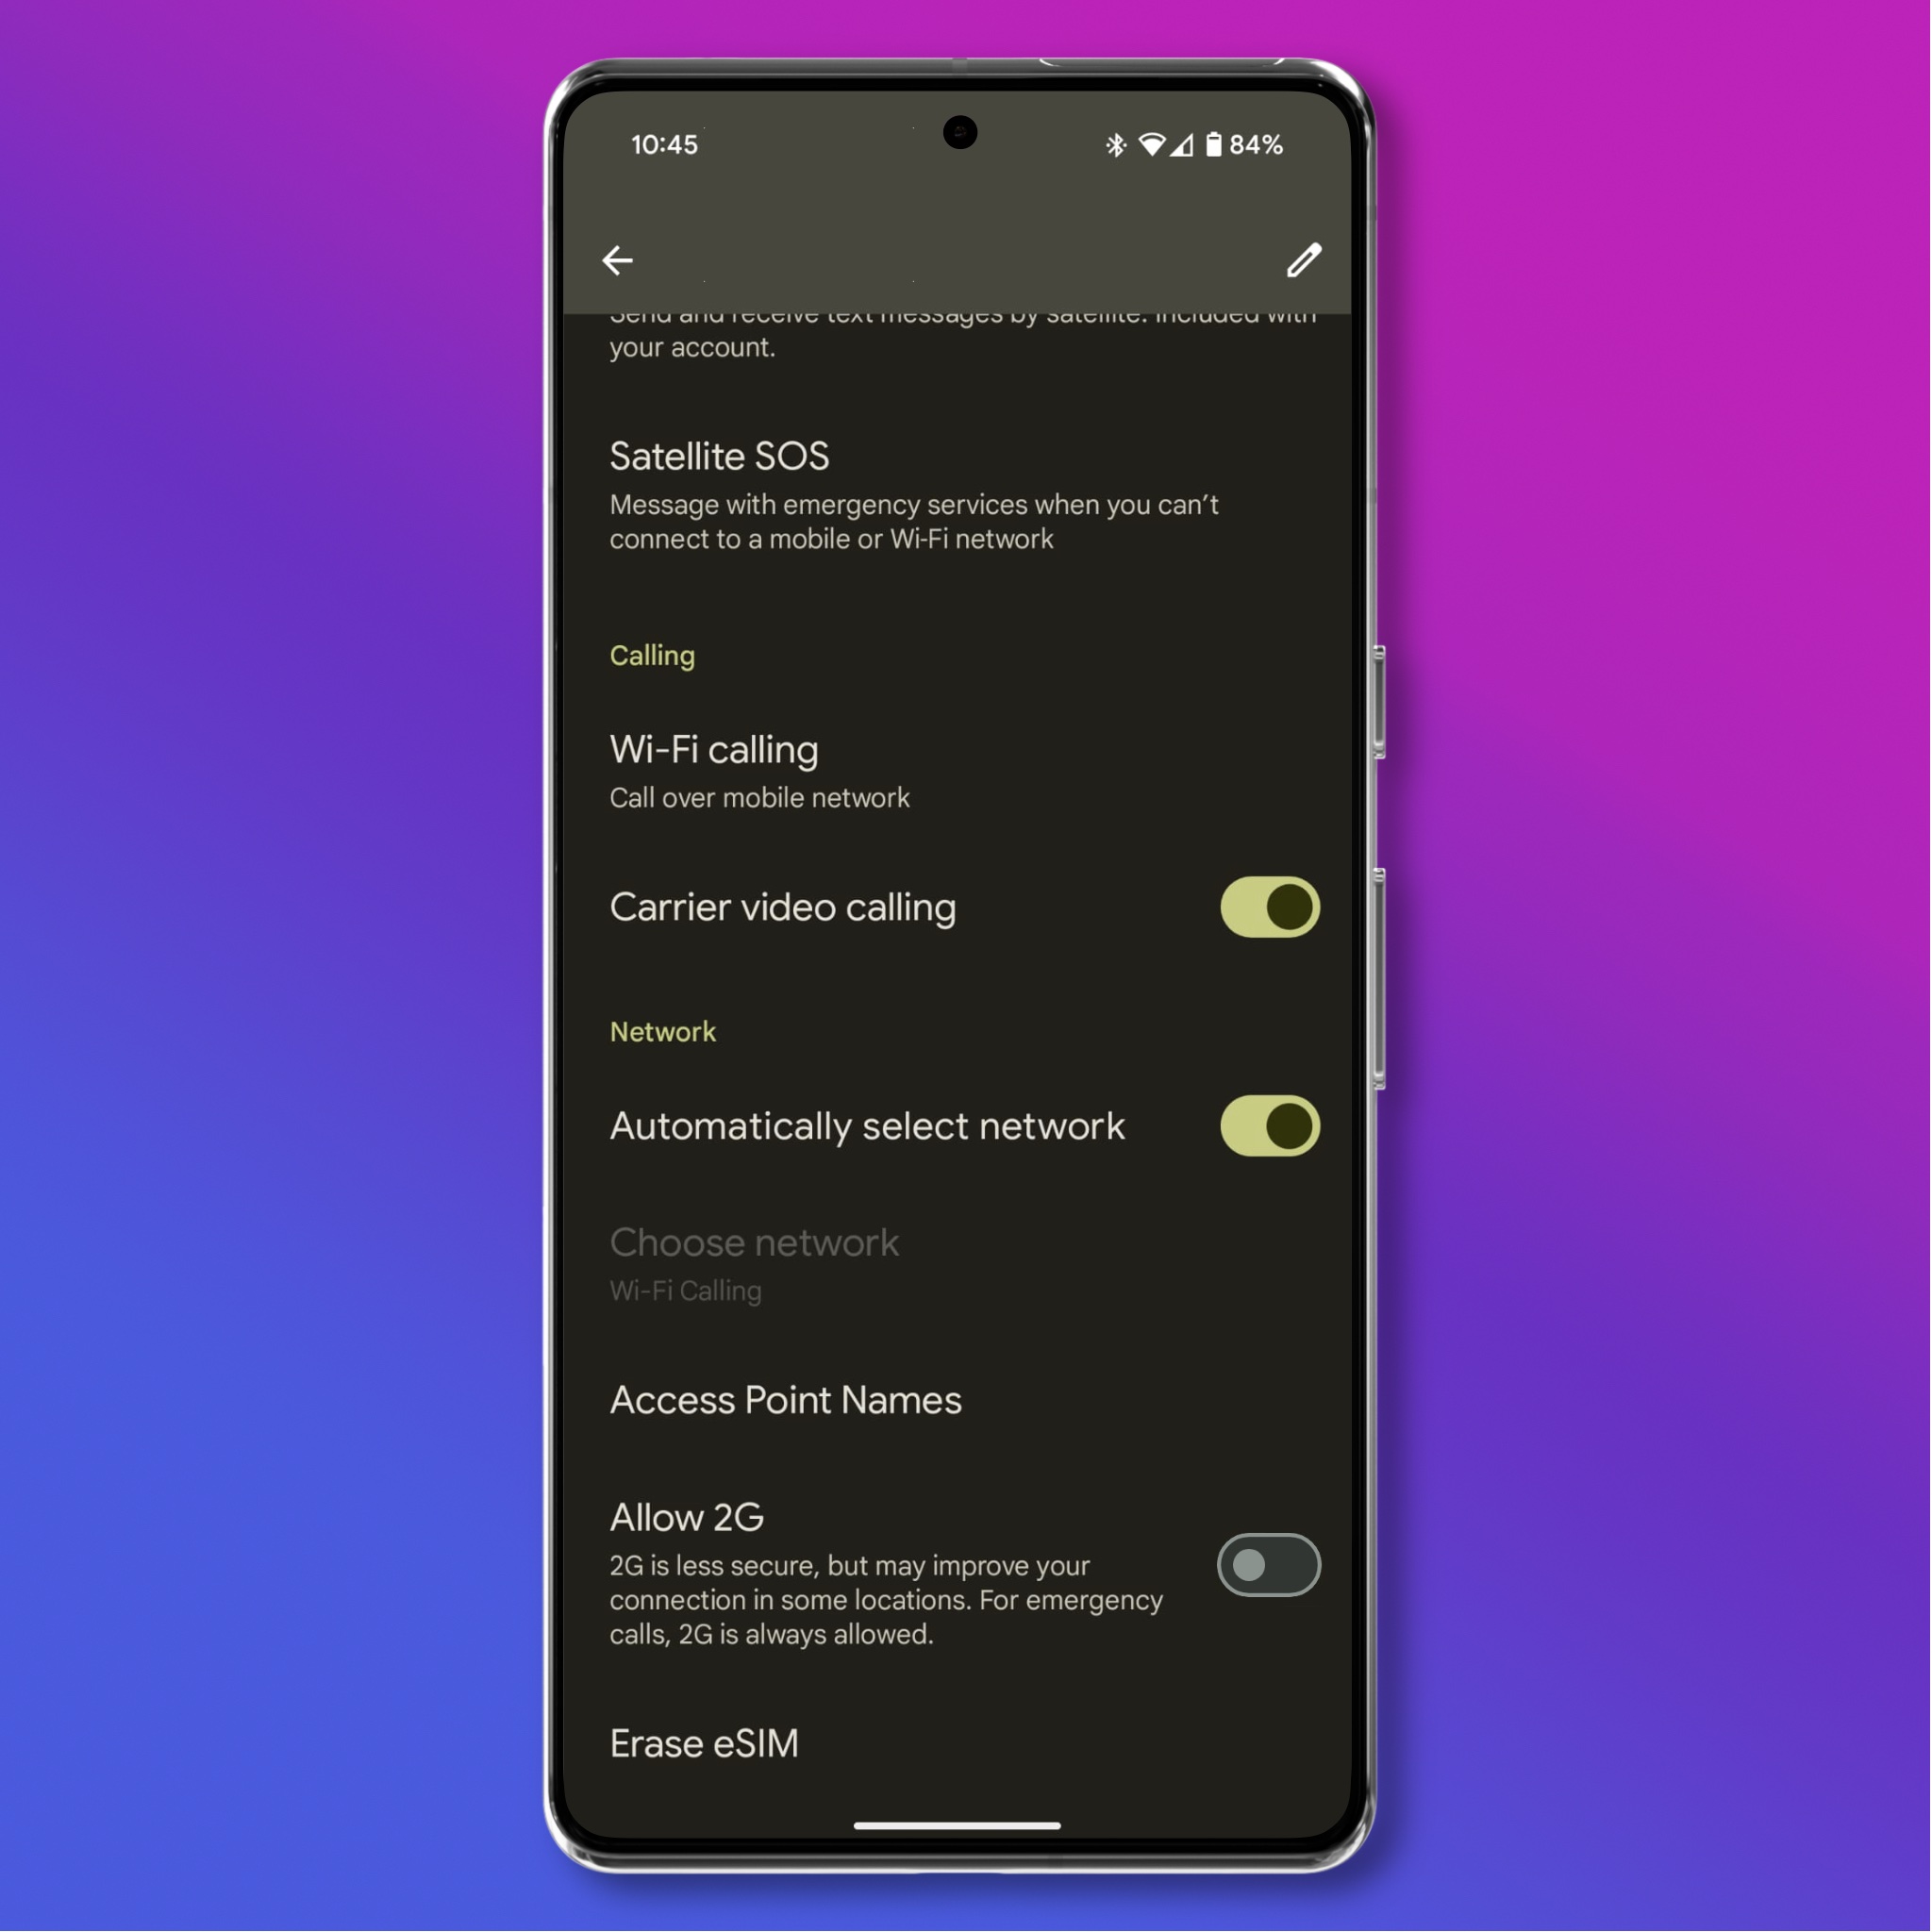
Os coletores de IMSI, também conhecidos como Simuladores de Base Celular e Stingrays, são uma ferramenta que as autoridades policiais e os governos podem usar para rastrear a localização de telefones, interceptar ou interromper comunicações e obter novos pontos de entrada em seu telefone para instalar malware. Os coletadores de IMSI também podem ser usados para enviar spam e participar de fraudes. Os coletores de IMSI podem tentar enganar seu telefone para que ele se conecte a uma suposto torre de celular 2G falsa. Para evitar que seu telefone se conecte automaticamente a uma dessas torres, você pode desativar o 2G no telefone. Apesar de haver poucas evidências concretas do uso de simuladores de bases celulares contra manifestantes nos EUA, também achamos que as etapas necessárias para se proteger são simples o suficiente para que essa seja uma medida de proteção razoável para a maioria das pessoas e não altere realmente a forma como você usará seu dispositivo:
O que fazer
- Dependendo da versão do sistema operacional que estiver executando, do fabricante do telefone e da operadora, talvez seja possível desativar o 2G, exigir conexões celulares criptografadas ou ambos. Abra Configurações > Rede e Internet > SIMs > [nome da sua operadora], localize a opção "Permitir 2G" e desative-a para desativar totalmente o 2G.
- Você também pode ver uma opção na página SIMs para "Exigir criptografia". Se você vir essa opção, ative-a para evitar que o telefone use uma "cifra nula" ao se conectar a uma torre de celular. Como a maioria das empresas de telefonia celular dos EUA não tem mais redes 2G, você pode esperar pouca interrupção na conectividade...
Nível 3: Crédito Extra
Nem todo mundo tem as mesmas necessidades, e algumas alterações no Android são mais fáceis do que outras. Aqui estão mais algumas coisas que você pode considerar alterar, dependendo de suas necessidades:
Desativar a Capacidade de se Conectar a Redes WEP
O WEP é um protocolo de rede Wi-Fi mais antigo com grandes problemas de segurança. Ele é antigo o suficiente para que a maioria das pessoas não precise se preocupar com redes que o utilizam, mas isso ainda acontece. Esse recurso foi adicionado no Android 15 e não está disponível em dispositivos mais antigos.
Para garantir que você não possa se conectar a uma dessas redes, abra Configurações > Rede e Internet > Internet, role para baixo até Preferências de rede e desative a opção "Permitir redes WEP".
Obscurecer as Notificações da Tela de Bloqueio
Por padrão, as notificações que você recebe ficam visíveis na tela de bloqueio, o que significa que, se você deixar o telefone fora, alguém poderá ver as mensagens que você receber e os aplicativos que estiver usando sem precisar desbloquear o dispositivo.
Se quiser desativar essas visualizações, abra Configurações > Notificações > Notificações na tela de bloqueio e, em seguida, desative a opção "Notificações sensíveis". O que é e não é sensível é definido pelo aplicativo que está enviando a notificação, e cada aplicativo trata isso de forma diferente, portanto, isso pode nem sempre funcionar como deseja. Se você estiver muito preocupado com o fato de uma notificação revelar informações, talvez seja necessário considerar a possibilidade de desativar as notificações totalmente desse aplicativo.
Instalar uma Distribuição Personalizada
Os serviços do Google estão intimamente integrados ao Android. Embora as etapas acima possam atenuar alguns dos problemas mais invasivos de privacidade com o Google, não é possível remover completamente essa ameaça sem usar um sistema operacional totalmente diferente. No entanto, isso é possível. Existem várias "ROMs personalizadas" que podem aumentar a sua privacidade ao usar um dispositivo Android instalando versões personalizadas do sistema operacional no seu telefone. Isso mudará fundamentalmente a maneira como o telefone funciona e pode fazer com que alguns aplicativos de que você precisa não funcionem.
As ROMs personalizadas também apresentam novos riscos, pois essas distribuições não são examinadas da mesma forma e com a mesma quantidade de recursos que o Google coloca no Android. Por esse motivo, só recomendamos o uso de ROMs personalizadas se você tiver um conhecimento profundo dessas possíveis ameaças.
Uma ROM personalizada pode aumentar a privacidade e a segurança do seu dispositivo Android, estender as atualizações de segurança caso o Google ou o fabricante do dispositivo tenha parado de emiti-las e adicionar novos recursos especiais. Se forem projetadas para serem privadas por padrão, elas também exigirão menos ajustes nas configurações para garantir que você as use da forma mais privada possível. ROMs personalizadas populares que se concentram em segurança e privacidade incluem:
A EFF não pode dá garantias sobre nenhuma ROM personalizada. Reserve um tempo para pesquisar recomendações e notícias para revelar quaisquer problemas evidentes que eles tenham ou que os pesquisadores de segurança possam encontrar no futuro. Por sua natureza, o uso de uma ROM personalizada pode comprometer muitos dos recursos de segurança integrados do Android. Não use uma ROM personalizada a menos que confie nela.

