How to: Encrypt Your Windows, Mac, or Linux Computer
Last Reviewed: February 06, 2025
Encrypting your computer's storage drive is a simple, but powerful tool to secure your data. When enabled, "full-disk" encryption (also known as device encryption ) encrypts everything on your computer so it cannot be viewed without first entering a password when you log in.

Just to instructions for:
What Full-Disk Encryption Does
Full-disk encryption can protect your computer (or smartphone) from people who have physical access to the device. This is useful if you want to protect your data from roommates, coworkers or employers, school officials, family members, partners, police officers, or other law enforcement officials. It also protects the data on your devices if they are stolen or lost, like if you accidentally leave your laptop on a bus or at a coffee shop.
With full-disk encryption, your entire storage drive is encrypted when you turn off your computer. When you turn it on and then log in with your password, the device decrypts all the data on the drive. Both Microsoft and Apple provide free, built-in methods for enabling full-disk encryption (both use the XTS-AES data encryption algorithm) on their operating systems without the need to download third-party software. Both of these solutions are closed-source and proprietary, but if you're using Windows or macOS, you already trust Microsoft and Apple to some extent. Most Linux distributions (distros) use Linux Unified Key Setup (LUKS).
When you enable full-disk encryption, you will have the option to create a "recovery key " that will get you into your computer if you forget your password. A recovery key is just a very long string of numbers which you can then write out on a piece of paper, print, or copy and paste to a document. We'll go over the pros and cons of both options below.
Apple's macOS always gives you an option to store your recovery key locally, so it's less concerning than Microsoft, which sometimes requires you to store your recovery key online using a Microsoft account, or sometimes doesn't offer device encryption at all. In this case, you can also consider third-party encryption software, like VeraCrypt, though it can be trickier to use than Microsoft and Apple's options. If you prefer that route, Freedom of the Press Foundation's Veracrypt tutorial guides you through the process.
Once encryption is enabled, you will need to log into your computer's user account every time you turn your computer on or wake it from sleep. This protects your data at rest, and full-disk encryption also helps protect against someone taking your storage drive out and putting it into a different computer to attempt to see what's on it.
Should You Store Your Recovery Key Locally or Online?
The main downside with device encryption is that if you lose access to the recovery key or password, your data is likely gone forever. This is why both Microsoft and Apple offer multiple ways to unlock your storage drive.
When you set up disk encryption, you're given two options: (1) local storage of the key, or (2) storing it online in your Apple or Microsoft account, which allows you to unlock the disk with the same credentials you use to log in on Microsoft or Apple. With this second option, if you lose your password or the recovery key, Microsoft or Apple can help you restore access. This convenience is a compromise though, as it means Microsoft or Apple would have the password needed to decrypt the data and log into your computer. They could hand that information over to law enforcement if required to do so, but it still protects your computer from other concerns, like theft or other attempts to access it from non-law enforcement entities.
The first option requires you to save the recovery key yourself, either by printing it out on a piece of paper or storing a digital copy. This means Microsoft or Apple do not have access to the recovery key. The trade-off is if you lose the key, there is no recovery option, and there's no way to request help or a password reset. While that sounds more secure than storing the recovery key in your Apple or Microsoft account, keep in mind that anyone who finds this key can unlock your computer, so it's important to store it somewhere safe:
- If you print it out with a recovery key, consider storing it in a fireproof safe or with a trusted friend or family member at a different location than your own home.
- If you keep a digital copy, don't store it on your computer or on whatever cloud storage service you use. Instead, consider storing the key in a password manager that uses a different username and password than your computer does.
If you decide to save the recovery key yourself, you'll get a string of letters and numbers. It's important you save that key, because Microsoft or Apple cannot help you recover it, and without it you will not be able to access your storage drive—losing your files forever—if you forget your login password.
How to Encrypt Your Windows Computer
 Windows has two different names for full-disk encryption that may be available on your computer, depending on your computer type and version of the operating system : device encryption and BitLocker. Device encryption is available on all modern versions of Windows, but only if your hardware supports it by containing a Trusted Platform Module (TPM), and the manufacturer enables a few security methods. BitLocker only requires a TPM, but is only available on Windows 10 (and 11) Pro, Education, and Enterprise.
There's a chance if you have Windows 10 (or 11) Home, and have hardware that doesn't support device encryption, you will not see an option to encrypt the drive. In this case, we recommend following Freedom of the Press Foundation's Veracrypt tutorial guide.
Figuring out which method you have available can be tricky. Some Windows laptops have device encryption enabled by default. To check:
Windows 10
- Open Settings > Update & Security. Find and click on “Device encryption” on the left sidebar of the settings panel. If device encryption isn’t an option on this screen, you can also try searching for “device encryption” in the search bar.
- If device encryption is turned off, turn it on. You may need to sign in with a Microsoft account to complete the process. If you do not want your recovery key stored in your Microsoft account, but it's requiring you to do so to move on, you may need to consider third-party tools.
If device encryption isn’t an option, look for BitLocker, which is included in Windows 10 (and 11) Pro, Education, and Enterprise. On Windows 10, BitLocker's toggle is in a different place than device encryption:
- In the search box in the taskbar, type “Manage BitLocker” and then select it from the result.
- Click Turn on BitLocker and follow the instructions. You will need to create a password, and then you'll be given an option for saving your recovery key to your Microsoft account, as a file, or as a printout.
Windows 11
On Windows 11, both BitLocker and device encryption will show up in the same place:
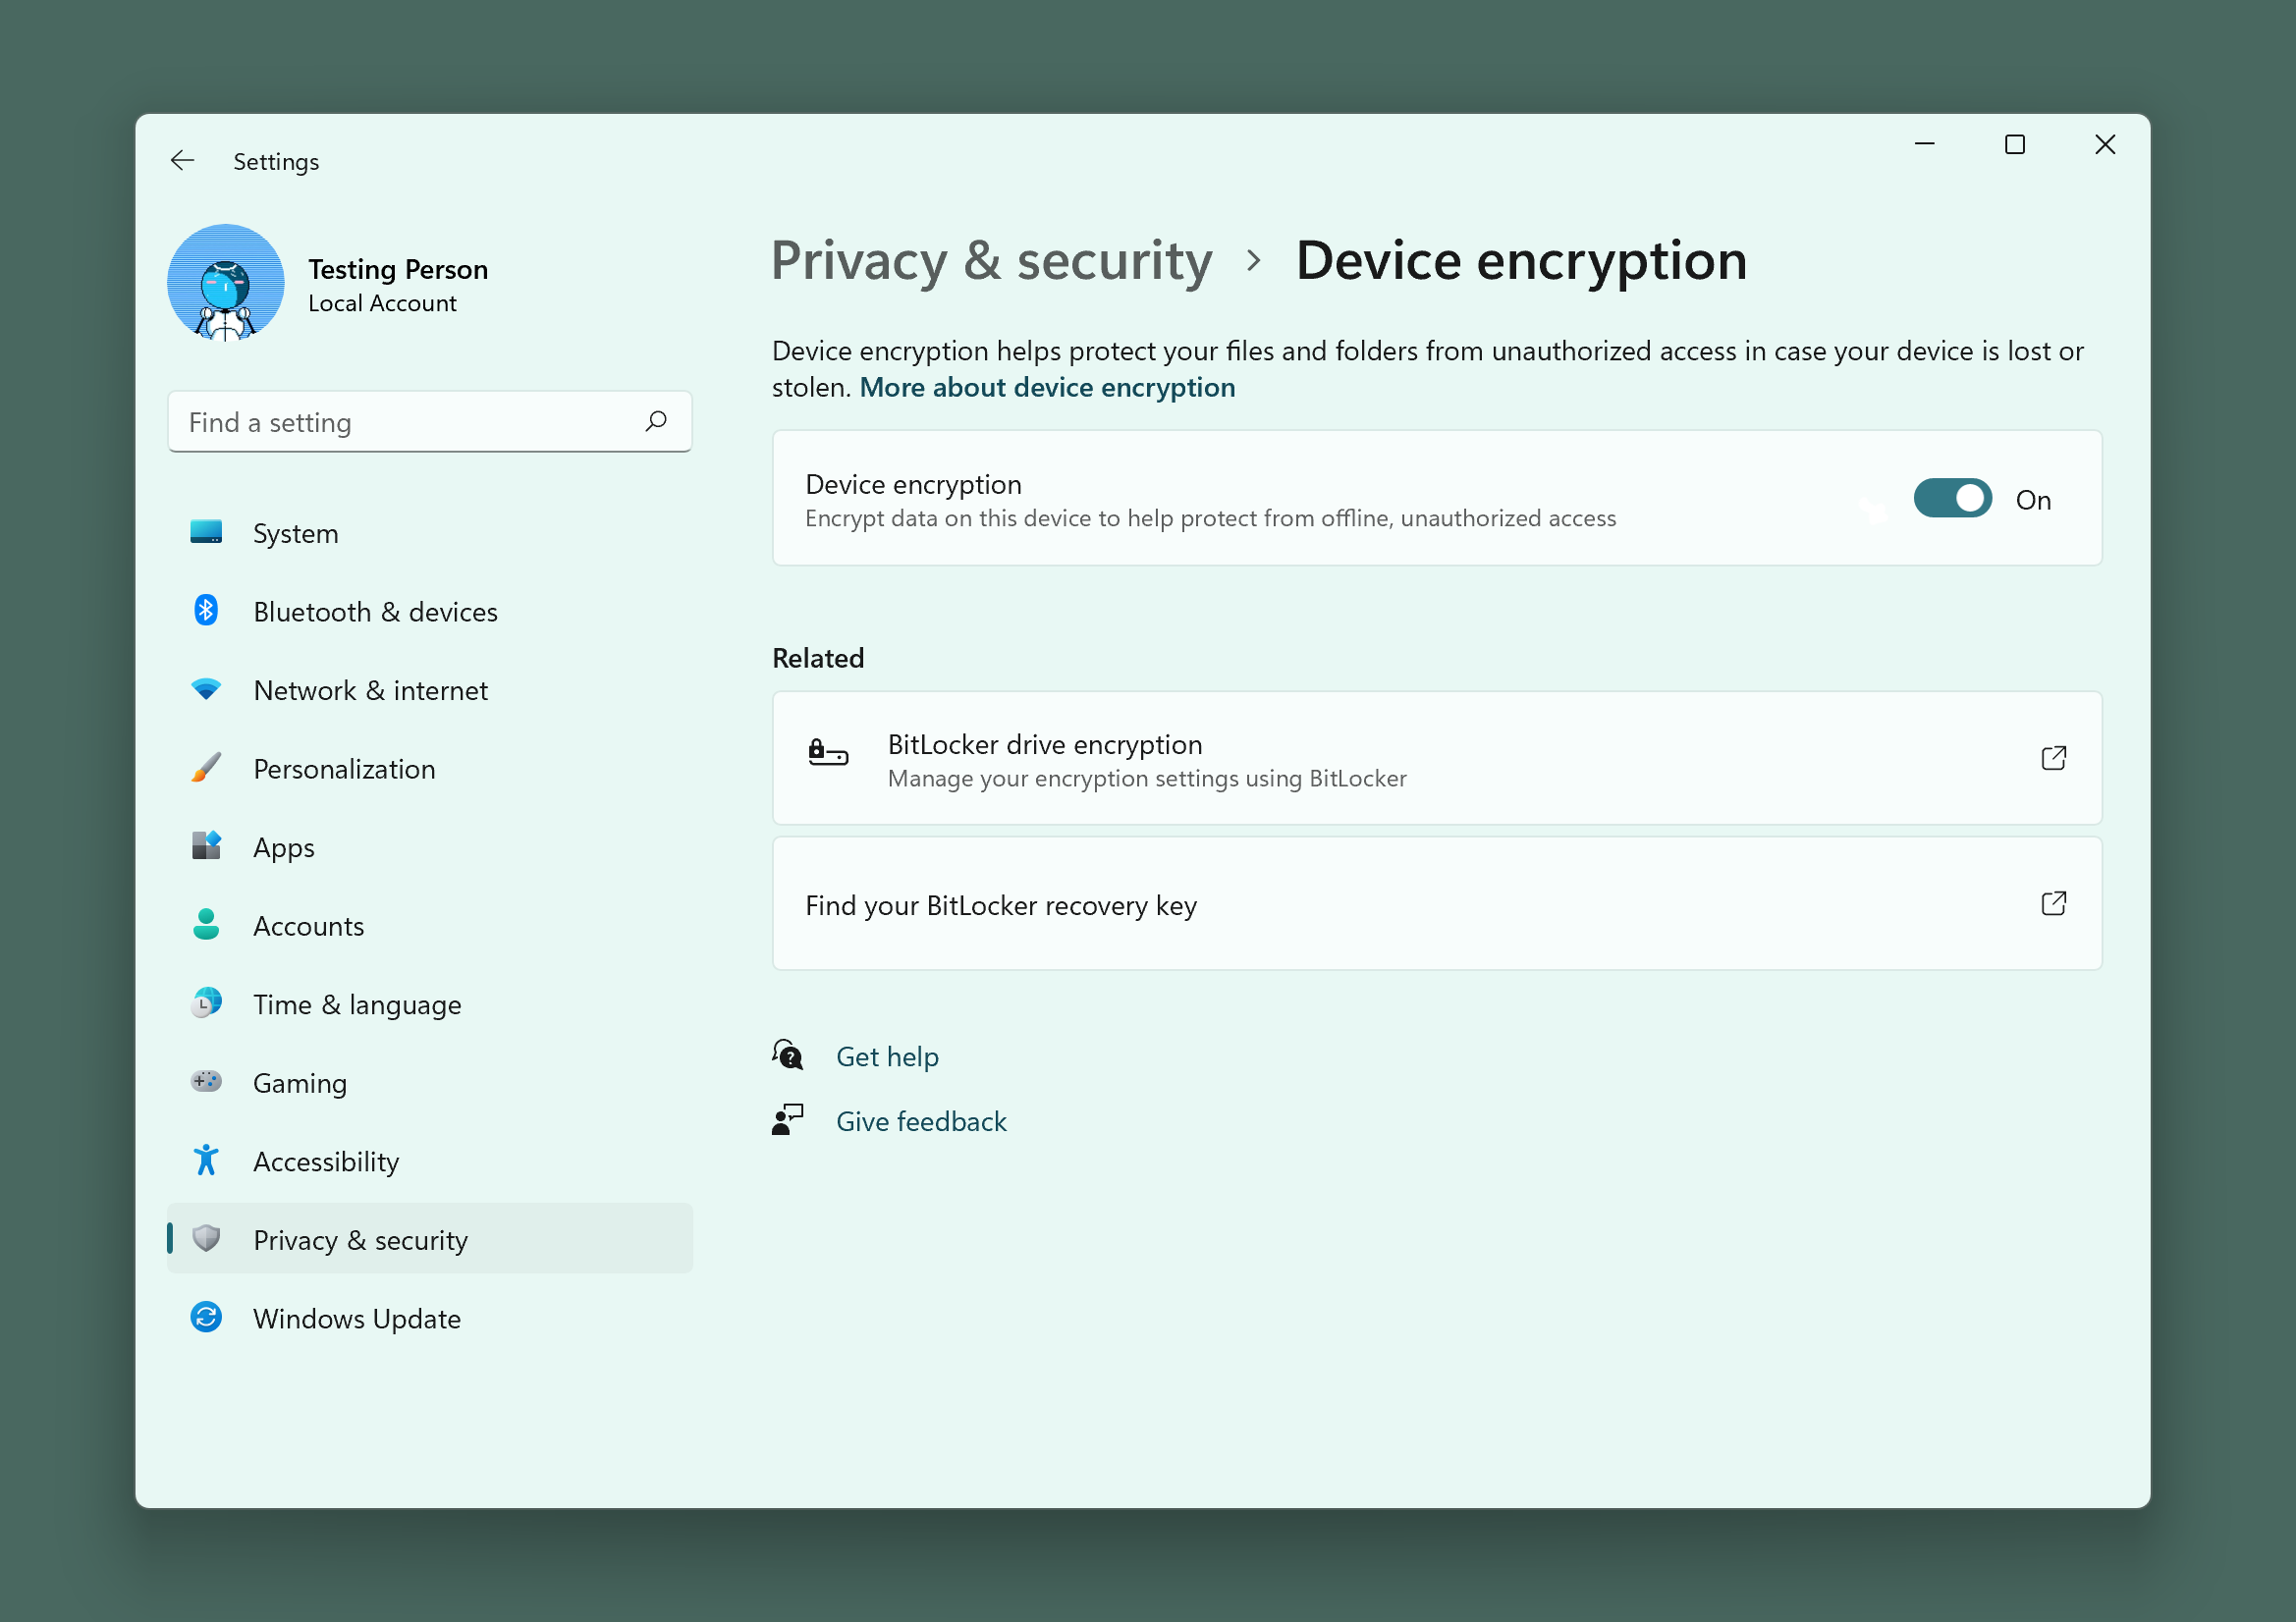
- Open Settings > Privacy & security > Device encryption.
- If device encryption is turned off, turn it on. BitLocker may be an option here, in which case you can enable it here. With device encryption, you may need to sign in with a Microsoft account to complete the process. With BitLocker, you first create a password, and then are given an option for saving your recovery key to your Microsoft account, as a file, or as a printout.
Microsoft sometimes moves its settings pages around in updates. If you’re having trouble finding device encryption with the above directions, Microsoft’s Windows support articles may provide more information. If that doesn't help, try searching online for your computer's manufacturer and "device encryption" to see if they offer special instructions.
How to Encrypt Your Mac Computer
As long as you are running macOS 10.7 or newer, encryption is a simple process done through free built-in software called FileVault.
If you have a Mac made in the past couple of years, FileVault may be enabled by default. But if you have an older computer, or if you opted out of the feature when you set up your Mac initially, you should check to confirm that it’s turned on. On macOS Ventura or newer:
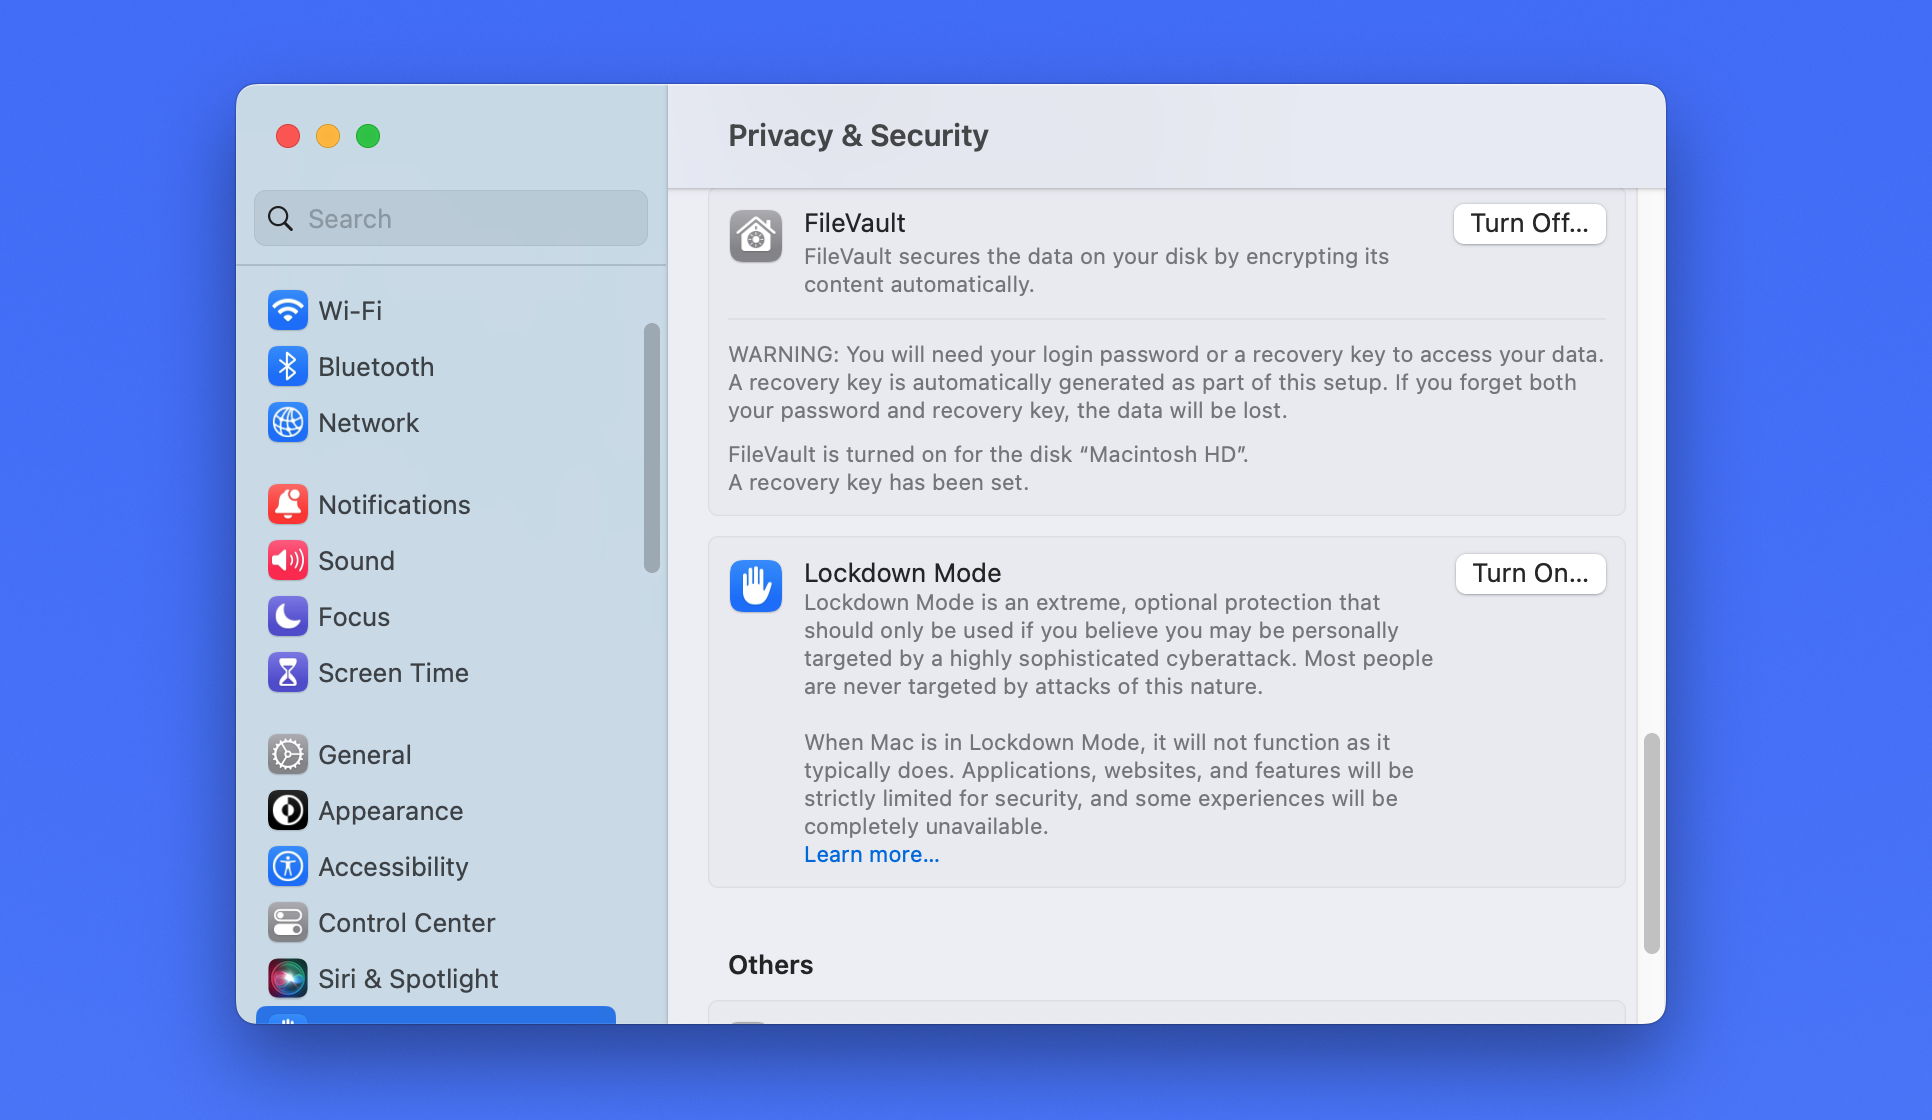
- Open System Settings, click Privacy & Security, and scroll down to the "FileVault" section.
- Click Turn On and follow the on-screen instructions.
Apple gives you the option to store your recovery key in your Apple account or locally. If you choose to store your key locally, save the key somewhere safe, as you will not be able access your data if you forget your login password and lose the key. If you have an older operating system, refer to Apple's documentation for specific directions.
How to Encrypt Your Linux Computer
Most Linux distributions offer a way to enable full-disk encryption when you first set up your computer, often using the Linux Unified Key Setup (LUKS). Unlike Windows and macOS, full disk encryption on most Linux distros can only be enabled during the installation of the operating system. This means if you did not turn it on when you set up your computer the first time, you'll likely need to wipe the contents of your storage drive before reinstalling Linux and encrypting the drive in the process (be sure to make a backup of your important files before starting this process!). This is the case with most popular versions of Linux, including Ubuntu, Arch Linux, and Fedora.
Since there are so many different Linux distros, we can't cover directions for all of them here. But let's run through the process in Ubuntu to give you an idea of how this works.
- Download the newest version of Ubuntu and set up an installation drive.
- When you get to the installation welcome screen, click "Install Ubuntu," then select your preferred keyboard layout and update preferences.
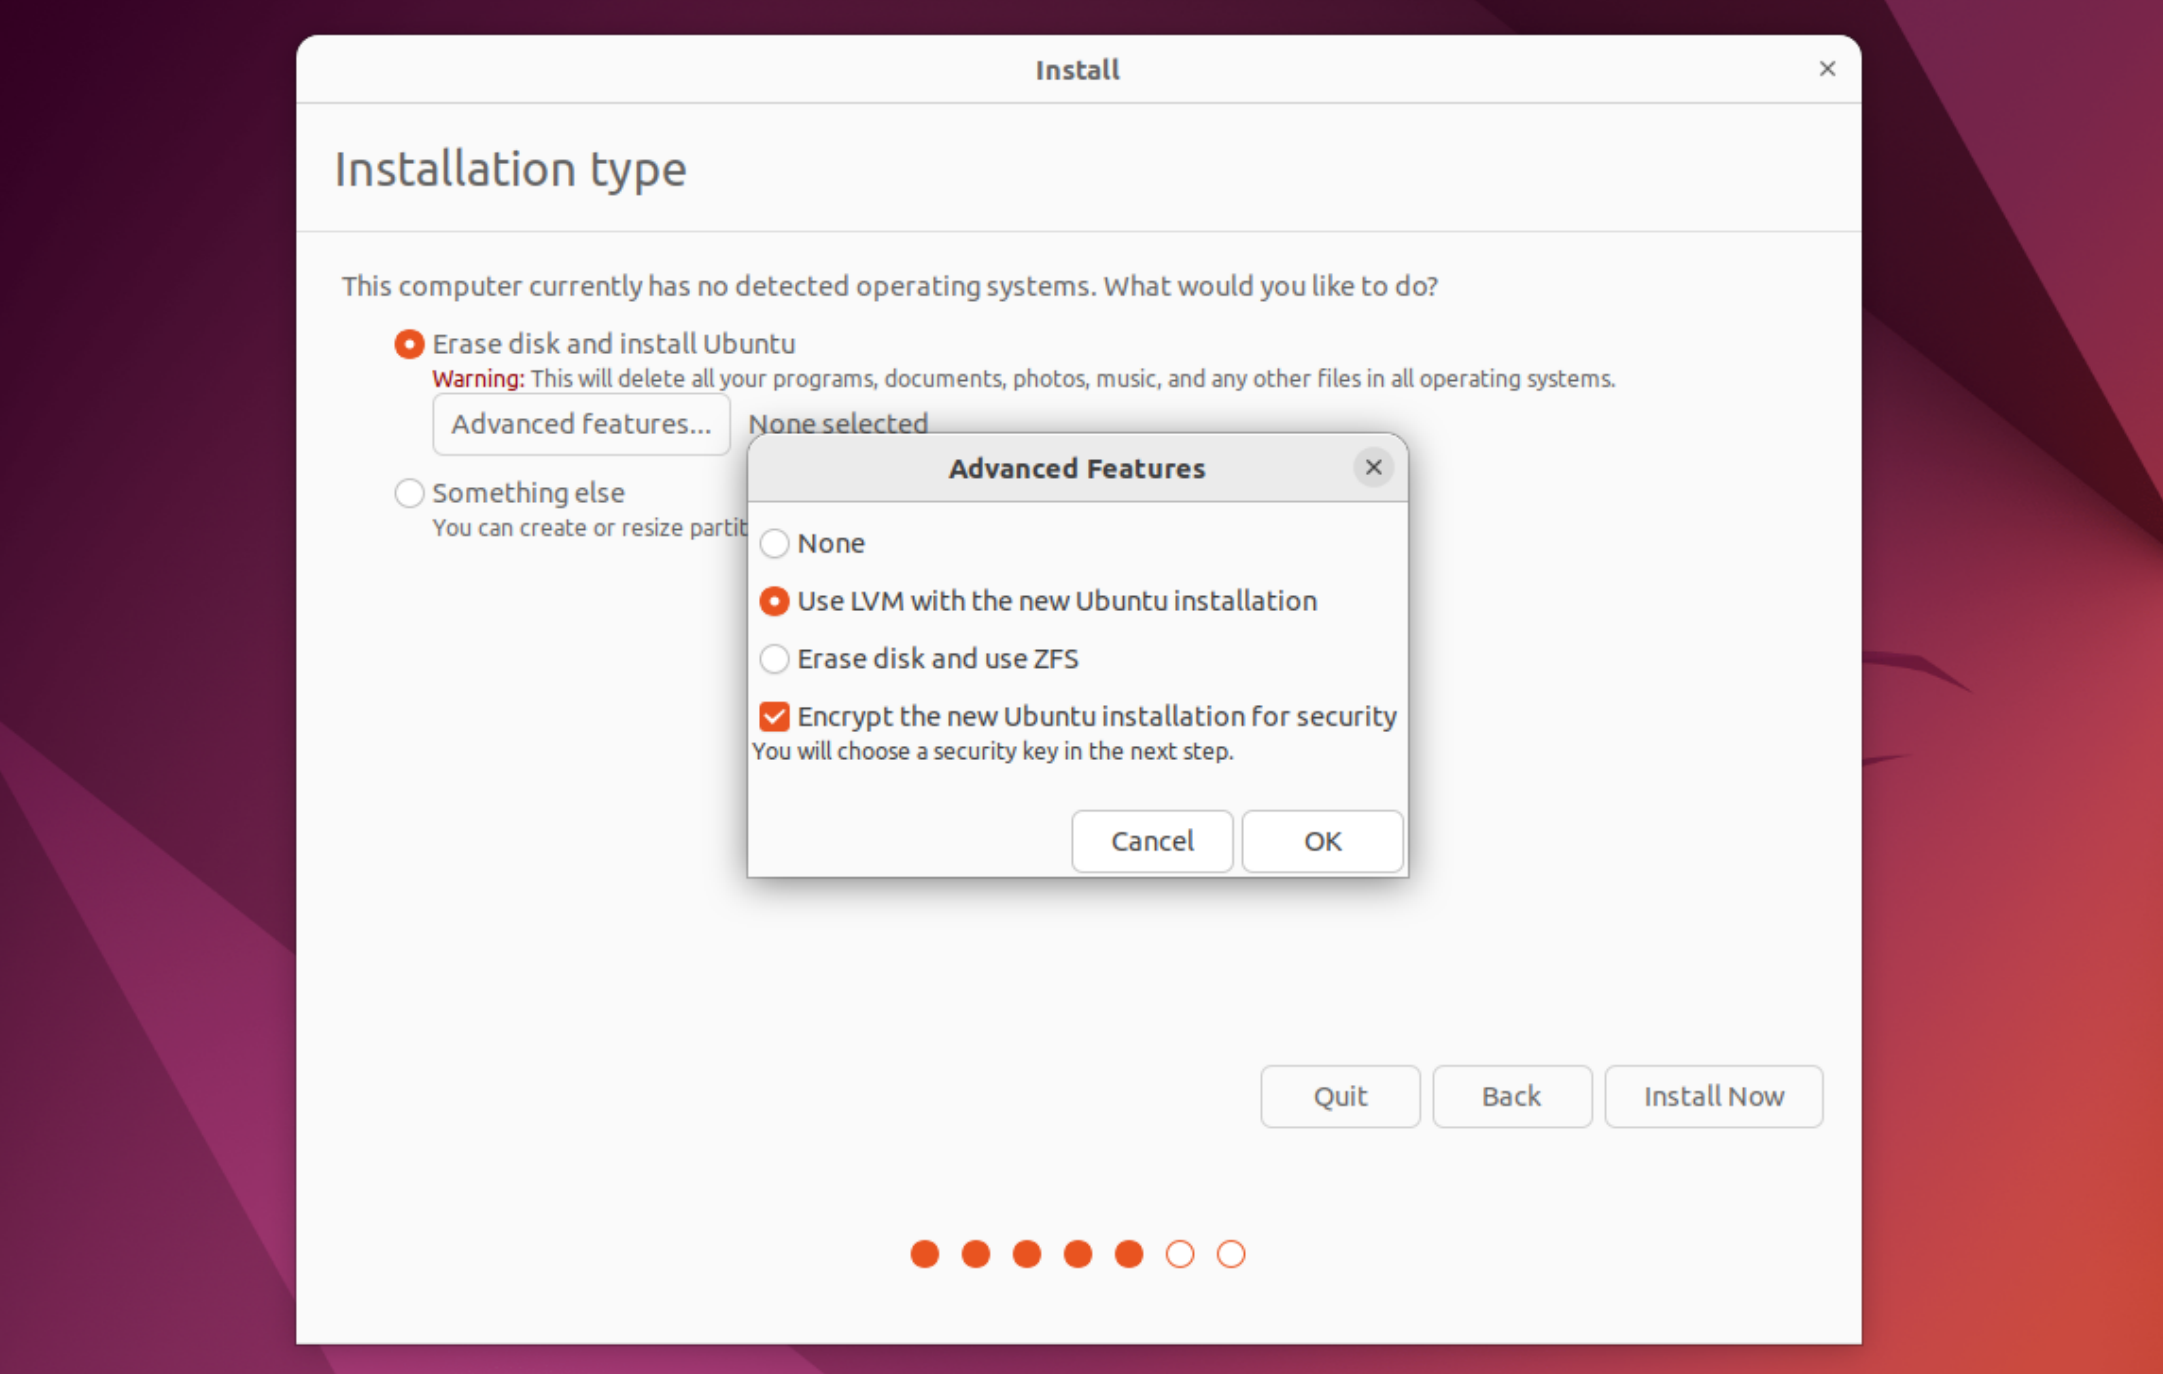
- When you get to the "Installation type" screen, click "Advanced Features."
- Select "Use LVM with the new Ubuntu installation," and check the box for "Encrypt the new Ubuntu installation for security."
- Click "OK," then "Install Now."
- In the "Choose your security key" box, type the password you'd like to use to encrypt the drive (be sure to use a strong password!), then enter it again in the "Confirm the security key" box.
- You can optionally check the box for a "recovery key." Like with Mac and Windows, this allows you to restore access to your system if you forget the password. You can write down this key or store it in a password manager . You can also optionally create a "recovery.key" file that's available once you complete the installation. You can then store this file somewhere secure.
- Click "Install Now" and follow the directions to complete the installation process.
Once Ubuntu is installed, you'll need to enter your encryption password every time you boot your computer. Note that this is different from your login password, which you'll need to enter any time the computer wakes from sleep.